


The Country Charm Crochet Headband is a quick and easy project with a pretty textured stitch and a simple twist at the front. It comes in three sizes: toddler, child and adult, so you can make one for just about everyone.
This is also a great stash project because you only need a small amount of worsted weight yarn. I used Lion Brand Wool Ease Roving Origins for my sample, but there are plenty of other yarns that will work beautifully too.
And if you’ve made my Country Charm Pumpkin or Acorn patterns, you’ll recognize the textured stitch right away. I love when patterns can work together like that!
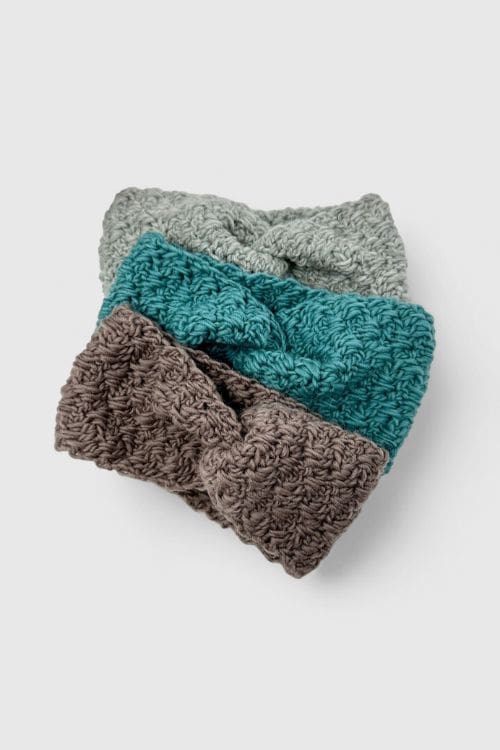
Country Charm Crochet Headband at a Glance
- Finish: The ends are folded and sewn together to create the twist
- Skill level: Easy
- Sizes: Toddler, child and adult
- Yarn: Worsted weight
- Hook: 6.5 mm
- Construction: Worked flat in rows as a rectangle
- Special stitches: Long double crochet and cluster
- Fit: Designed with a little negative ease so it fits snugly
- Customization: Add or remove rows to adjust the length
What Makes This Crochet Headband Different?
The Country Charm Headband looks a little more complicated than it actually is.
The body is worked flat in complete rows using basic crochet stitches, with a long double crochet and cluster stitch added to create the textured pattern. Once the rectangle is finished, the ends are folded and interlocked before being sewn together to create the twist at the front.
So there’s no complicated shaping to worry about.
It’s also one of those crochet projects that’s easy to adjust as you go. If you’re making it for yourself, you can simply wrap the headband around your head as you crochet and remove or add rows until it feels snug.
Country Charm Headband Size Chart
| Size | Head Circumference | Headband Height | Approx. Yarn |
|---|---|---|---|
| Toddler, 1–3 years | 18–19″ | 4″ | 35 g |
| Child, 3–10 years | 19–20″ | 5″ | 45 g |
| Adult | 21–22″ | 6″ | 60 g |
The finished headband should fit slightly smaller than the actual head circumference. This negative ease is what helps the headband stretch comfortably around the head without sliding off.
If you’re between sizes, I would generally go with the smaller size since the headband will stretch.
Yarn for Your Crochet Headband
For my sample, I used Lion Brand Wool Ease Roving Origins, a medium 4 worsted weight yarn made from 100% traceable wool. I really like the texture it gives this stitch, and it has a nice natural warmth that makes it perfect for an ear warmer.
One skein contains 299 yards (273 m), so you’ll have more than enough for one headband.
That said, you definitely don’t have to use the same yarn I did.
A soft acrylic or wool blend can be a better choice for toddler and child sizes, especially if the headband will be worn directly against the forehead and ears. Some 100% wool can feel a little scratchy on sensitive skin, and wool also needs a bit more care when washing.

Some good alternatives include:
- Bernat Super Value: An affordable acrylic option that’s easy to care for.
- Red Heart Super Saver: Durable, widely available and comes in a huge range of colours.
- Caron One Pound: A good choice if you plan to make several headbands.
- Lily Sugar ’n Cream: Cotton gives a firmer fabric and excellent stitch definition, although the finished headband will have less stretch than wool or acrylic.
For a headband, I’d stick with a yarn that feels comfortable against your skin and has enough stretch for a snug fit.
Step-by-Step Crochet Headband VIDEO Tutorial
Prefer to watch and crochet along? 🎥 Here’s the full video tutorial for the Country Charm Headband. If you like to follow step-by-step written instructions, keep scrolling – I’ve included those below too!
How to Get the Perfect Fit
This is probably my favourite thing about this headband pattern. You can adjust the fit while you’re making it.
If you’re making it for yourself, wrap the headband around your head once it gets close to the finished length. Bring the ends together and check that it feels snug but comfortable.
If it feels too loose, take out a row or two.
If it feels too tight, add a row.
Remember that the yarn will have some stretch, so you want the finished band to be snug rather than sitting loosely around your head.
For a custom width, you can also adjust your starting chain, but you’ll need to keep the stitch count compatible with the cluster pattern.

Making the Twist
The twist looks fancy, but this part is actually quite simple.
Once your rectangle is finished:
- Fold the short ends toward the middle.
- Fold the short ends in half and insert them into each other.
- Make sure the ends are lined up evenly.
- Sew through all four layers.
- Flip the headband right side out.
And that’s it! You’ve got the little twisted front that gives the Country Charm Headband its finished look.
If this part sounds confusing when you read it, definitely check out the video tutorial. Seeing the folds makes it much easier to understand.
Scroll down for the free written crochet pattern.


Purchase Ad Free Pattern – Instant Download!
Purchase the ad-free PDF for a smooth, distraction-free crocheting experience anytime, anywhere.
Already a subscriber? Check your latest email for your special discount code. Not subscribed yet? Sign up here to get yours!
Thanks so much for supporting my blog!
Country Charm Crochet Headband Instructions
Skill Level
Easy
Abbreviations
- ch – chain
- hdc – half double crochet
- dc – double crochet
- ldc – long double crochet
- sc – single crochet
- sk – skip
- sp – space
- st – stitch
- sts – stitches
- sl st – slip stitch
Gauge
10 stitches × 9 rows = 4″ × 4″ in special stitch pattern using 6.5 mm hook.
Finished Measurements & Yarn Requiremets
Size: 1 – 3 Years
Height: 4”
Length: 17” x 18”
Fits Head Circumference: 18” – 19”
Yarn Requirements: 35 grams
Size: 3 – 10 Years
Height: 5”
Length: 18” – 19”
Fits Head Circumference: 19” – 20”
Yarn Requirements: 45 grams
Size: Adult
Height: 6”
Length: 20” – 21”
Fits Head Circumference: 21” – 22”
Yarn Requirements: 60 grams
Materials Needed
- 6.50 mm crochet hook
- Lion Brand Wool Ease Roving Origins – 5oz / 140g = 299yds / 273m
- 35, 45 and 60 grams
- Tapestry Needle
- Stitch Marker
- Scissors

Special Stitches:
Long Double Crochet (ldc): Work a double crochet around and in front of the previous row, inserting the hook into the stitch one row below.
When working ldc be sure to bring the height of the stitch up to match the height of the dc previously made in the space between the clusters.
Cluster: In the spaces between groups of 3dc, work (dc, ldc in middle st of cluster below, dc) into each space.


Notes
- If making for yourself you can get a perfect fit by simply wrapping the headband around your head till the edges of the headband meet and it feels snug around your head.
- You want the band snug so that it will fit after any stretching. If the band is too big – take out one row at a time till you are happy with the length and fit.
- The best thing about this crochet headband pattern is that you are working the length of the headband as you go – it couldn’t be easier to customize the size by crocheting less or more rows for smaller or larger heads.
- This headband will be crocheted flat as a rectangle then it will be seamed at the front to make the beautiful twist.
- Turning chain does not count as stitch.

1 – 3 Years
Ch 11
Row 1: Sc in 2nd ch from the hook and each ch across (10). Ch 1, turn.
Row 2: 3 dc in 1st sc, sk next 2 sc *3dc in next sc, sk next 2 sc* repeat from * to * to last 3 sc. Hdc in last st. Ch 1, turn. (10)
Note for row 3: Long double crochet stitches being worked under spaces for row 3 are worked into the sc of row 1.
Row 3: Working in space before 1st cluster, (dc, ldc in 1st sc below space, dc). *Sk next cluster, in space before next cluster (dc, ldc in 1st sc below space, dc).* Repeat from *to* to last 3 sts. Skip next 2 sts, hdc in last st. Ch 1, turn. (10)
Row 4: Working in space before 1st cluster, (dc, ldc in middle st of cluster below, dc). *Sk next cluster, in space before next cluster (dc, ldc in 2nd st of cluster below, dc).* Repeat from *to* to last 3 sts. Skip next 2 sts, hdc in last st. Ch 1, turn. (10)
Repeat row 4 until piece measures 17 to 18 inches.
Note for finishing row: You will no longer be working into the spaces. Work directly into stitches as instructed below.
Finishing Row: Dc in middle st of cluster below, sk next st, sc in next 2 sts. *dc in middle st of cluster below, sk next, sc in next 2 sts.* Repeat from *to* to last 3 sts. Skip next st, sc in the last 2 sts.
Fasten off leaving tail long enough to sew ends together.
To finish the headband refer to the “Making the Twist Instructions for All Sizes”.

3 – 10 Years
Chain 14
Row 1: Sc in 2nd ch from the hook and each ch across (13). Ch 1, turn.
Row 2: 3 dc in 1st sc, sk next 2 sc *3dc in next sc, sk next 2 sc* repeat from * to * to last 3 sc. Hdc in last st. Ch 1, turn. (13)
Note for row 3: Long double crochet stitches being worked under spaces for row 3 are worked into the sc of row 1.
Row 3: Working in space before 1st cluster, (dc, ldc in 1st sc below space, dc). *Sk next cluster, in space before next cluster (dc, ldc in 1st sc below space, dc).* Repeat from *to* to last 3 sts. Skip next 2 sts, hdc in last st. Ch 1, turn. (13)
Row 4: Working in space before 1st cluster, (dc, ldc in middle st of cluster below, dc). *Sk next cluster, in space before next cluster (dc, ldc in 2nd st of cluster below, dc).* Repeat from *to* to last 3 sts. Skip next 2 sts, hdc in last st. Ch 1, turn. (13)
Repeat row 4 until piece measures 18 to 19 inches.
Note for finishing row: You will no longer be working into the spaces. Work directly into stitches as instructed below.
Finishing Row: Dc in middle st of cluster below, sk next st, sc in next 2 sts. *dc in middle st of cluster below, sk next, sc in next 2 sts.* Repeat from *to* to last 3 sts. Skip next st, sc in the last 2 sts.
Fasten off leaving tail long enough to sew ends together.
To finish the headband refer to the “Making the Twist Instructions for All Sizes”.
Adult
Chain 16
Row 1: Sc in 2nd ch from the hook and each ch across (15). Ch 1, turn.
Row 2: 3 dc in 1st sc, sk next 2 sc *3dc in next sc, sk next 2 sc* repeat from * to * to last 3 sc. Hdc in last st. Ch 1, turn. (15)
Note for row 3: Long double crochet stitches being worked under spaces for row 3 are worked into the sc of row 1.
Row 3: Working in space before 1st cluster, (dc, ldc in 1st sc below space, dc). *Sk next cluster, in space before next cluster (dc, ldc in 1st sc below space, dc).* Repeat from *to* to last 3 sts. Skip next 2 sts, hdc in last st. Ch 1, turn. (15)
Row 4: Working in space before 1st cluster, (dc, ldc in middle st of cluster below, dc). *Sk next cluster, in space before next cluster (dc, ldc in 2nd st of cluster below, dc).* Repeat from *to* to last 3 sts. Skip next 2 sts, hdc in last st. Ch 1, turn. (15)
Repeat row 4 until piece measures 20 to 21 inches.
Note for finishing row: You will no longer be working into the spaces. Work directly into stitches as instructed below.
Finishing Row: Dc in middle st of cluster below, sk next st, sc in next 2 sts. *dc in middle st of cluster below, sk next, sc in next 2 sts.* Repeat from *to* to last 3 sts. Skip next st, sc in the last 2 sts.
Fasten off leaving tail long enough to sew ends together.
To finish the headband refer to the “Making the Twist Instructions for All Sizes”.
Making the Twist Instruction for All Sizes
Follow instructions below or click here to be taken to this part in the video.
- Fold short ends of headband together so they meet in the middle.
- Fold short ends in half then insert into each other.
- Make sure all ends are even and sew through all four layers.
- Flip headband right side out.


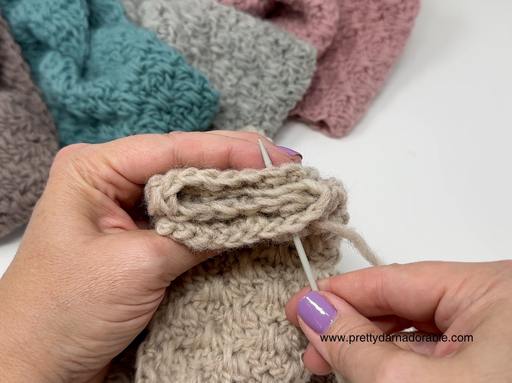

👉 Watch the full step-by-step tutorial here on YouTube
Frequently Asked Questions
Measure around the head where the headband will sit, then compare that measurement to the size chart.
Because this headband needs to stretch, you don’t want to make it the exact same circumference as the head. A little negative ease helps it stay comfortably in place.
Yes! That’s one of the easiest things about this pattern.
The length is worked as you go, so you can simply add or remove rows to make the headband larger or smaller.
You can also adjust the starting chain if you want to change the height of the band. Just be sure to maintain the stitch multiple needed for the textured pattern.
It should feel snug without being uncomfortable.
If it feels slightly tight when you first try it on, that’s usually better than having it too loose. The yarn will relax and stretch a little with wear.
When making the long double crochet, pull the loop up so it reaches the same height as the surrounding double crochet stitches before completing the stitch.
This little step makes a big difference in keeping the texture nice and even.
If you use 100% wool, check the yarn label first. For my sample yarn, gentle washing and air drying are the safest choices.
Avoid wringing or twisting the headband, and lay it flat to dry so it keeps its shape.
Yes, you can sell finished items made from this pattern in small quantities. Please credit Pretty Darn Adorable as the pattern designer, and please don’t copy, sell or redistribute the written pattern itself.
Love Headbands? Try these crochet patterns next!
Where to Get the Printable PDF
Want the ad-free, printable free pattern to keep? Grab it in my Etsy shop.
It’s available for personal use only, and I may earn a small commission if you purchase through affiliate links.
Don’t Miss Out!
✨ Visit my VIP Library for more free crochet patterns, tags, printables & planners
📌 Follow along on Pinterest for more crochet ideas
🎥 Watch more tutorials and walkthroughs on YouTube