


I’m always checking Facebook Marketplace for good deals on yarn because you know who doesn’t love a great deal! This crochet basket pattern was born because in a huge bag was 4-5 skeins of jumbo yarn which was beautiful!
So now I had the yarn I just needed to decide on what it should look like. The Montero line has become such a favourite among you guys, that I thought a basket/bag would be a great addition.
I also decided to use a larger 15 mm crochet hook than the yarn called for. I wanted those beautiful textured stitches to really open up and stand out, and I absolutely love how bold they turned out.
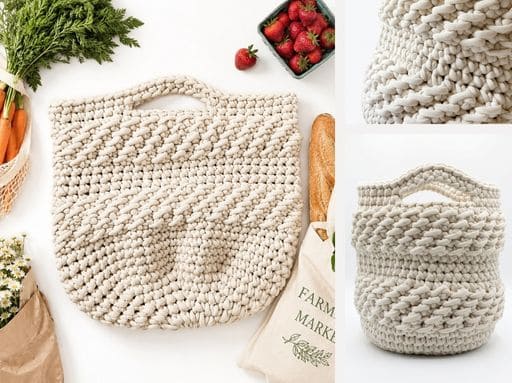
The finished basket is nice and big too, making it perfect for storing larger items around the house like throw blankets, pillows, toys, or even your growing yarn stash. But while I was carrying around the house for photos I also realized it would be a great bag! A heavy bag but a super sturdy bag.
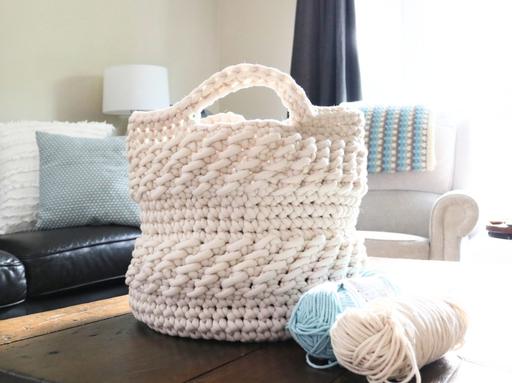
I couldn’t believe how quickly this project came together. Even while I was designing the pattern and making changes as I went, I had a finished basket in about three or four hours.
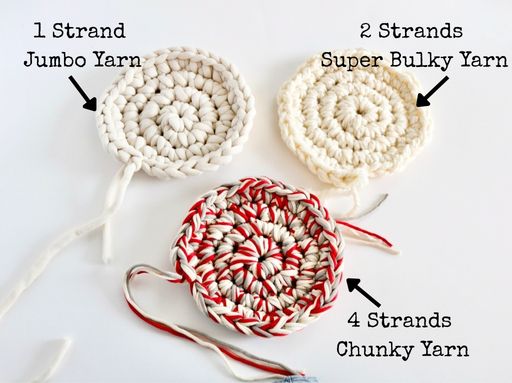
If you can’t find a jumbo yarn you love, you can easily substitute four strands of Bernat Maker Home Dec yarn held together to get a very similar chunky, rustic look. Or two strands of super bulky yarn. I have included all the information for those subs, and I’ll share a sample below so you can see how it compares.
Don’t Let the Texture Fool You
At first glance, this crochet basket looks like it would be a complicated project, but I promise it is much easier than it looks. If you’re comfortable with basic crochet stitches and you’re confident counting your stitches, you’ll have no trouble making this one.
The entire basket uses only three stitches:
- Single Crochet
- Half Double Crochet
- Slip Stitch
That’s it!
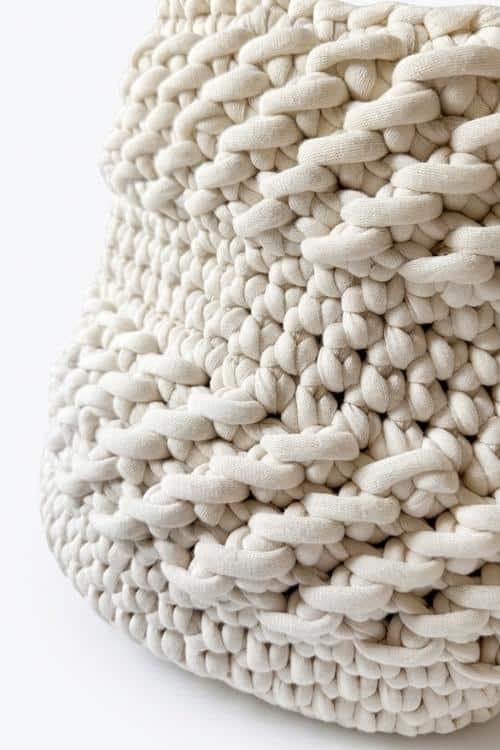
The beautiful woven texture is created simply by changing where those stitches are used throughout the basket. It’s always amazing to me how much texture you can create with just a few basic stitches.
The one thing you’ll want to pay attention to is whether the pattern tells you to work continuous rounds or join and turn. Some sections are worked continuously, while others are joined and turned before continuing. That little change is what creates the signature Montero texture.
If you accidentally join when you should be working continuously, or work continuously when the pattern tells you to turn, the texture won’t line up properly.
Once you get into the rhythm, though, it becomes a really relaxing project.
Made in Three Simple Steps
The basket is made in three simple sections, and before you know it, it will be DONE!
Step 1 – Crochet the Base
The basket begins with a flat circular base worked entirely in continuous rounds of single crochet. This gives the basket a nice sturdy foundation and also makes it easy to customize the size.
Want a bigger basket? Simply continue adding increase rounds.
Prefer a smaller basket? Stop increasing sooner.
It’s an easy way to create a basket size that works perfectly for your space without changing the overall design.
Step 2 – Build the Sides
Once the base is finished, you’ll begin working the sides. This is where the alternating stitch pattern creates that beautiful woven texture that makes the Montero design so unique.
The combination of, half double crochet, and slip stitches creates a thick, textured fabric that gives the basket a gorgeous handmade look.
I always love when a design turns out even better than the picture I had in my head.

Step 3 – Create the Handles
The final section finishes off the basket and creates the built-in handles.
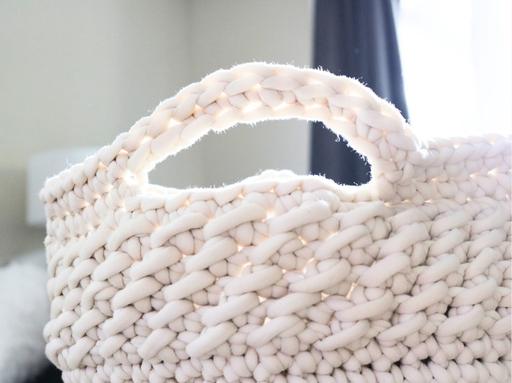
I love this method because there is nothing extra to attach afterward. The handles are worked right into the basket, which keeps the finished crochet basket with handles looking clean and sturdy.
Choosing The Right Yarn
The jumbo yarn I used for my sample has unfortunately been discontinued, but don’t worry this design is very forgiving!
If you can’t find a jumbo yarn you love, you can easily experiment with other options. Holding multiple strands of yarn together is also a great way to use up some of that yarn stash that we all seem to have growing in our craft rooms.
For my sample, I used a very thick jumbo yarn and a 15 mm crochet hook to really open up the texture and make those stitches stand out.
If you decide to substitute yarn, just keep in mind that changing the yarn weight and hook size may change the finished size of your basket.
Below are some yarn substitution swatches below so you can compare different combinations and see how they affect the finished basket.
Some combinations I’d love to try are:
- Cream and oatmeal
- Mustard and charcoal
- Sage and ivory
- Dusty pink and cream
- Denim and natural
Purchase Ad Free Pattern – Instant Download!
Purchase the ad-free PDF for a smooth, distraction-free crocheting experience anytime, anywhere.
Already a subscriber? Check your latest email for your special discount code. Not subscribed yet? Sign up here to get yours!
Thanks so much for supporting my blog!
Free Montero Basket Crochet Pattern
Ready to make your own?
The full written pattern is below.
Skill Level
Easy
Abbreviations
- ch – chain
- hdc – half double crochet
- sc – single crochet
- sk – skip
- st – stitch
- sts – stitches
- sl st – slip stitch
- rnd – round
- rnds – rounds
- rpt – repeat
Gauge
Not required for this design
Finished Measurements
Laying flat 18” tall x 18” wide
In use approximately 13” tall x 13” across
Materials Needed
Bernat Maker Big Jumbo (#7) Yarn
1000 g (35.2 oz) / 280 m (308 yd) required.
or Substitute Bernat Fab. Hobbii has a great one Bungee Mini
2 strands of Super Bulky (#6) yarn held together:
Total required: 560 m (616 yd)
Each strand requires: 280 m (308 yd)
Each strand weight: 500 g (17.6 oz)
Total weight: approximately 1000 g (35.2 oz)
4 strands of Chunky (#5) yarn held together:
Total required: 1120 m (1232 yd)
Each strand requires: 280 m (308 yd)
Each strand weight: 250 g (8.8 oz)
Total weight: approximately 1000 g (35.2 oz)
Notes
- The base of the basket will be worked in continuous rounds without joining. Use a marker in first stitch of each round to indicate the beginning of each round for easier counting.
- The increase rounds in this pattern will determine the width of your crochet basket, so feel free to adjust them based on the size of the pot you’re using.
- If you need a larger basket, simply continue working increase rounds, following the same pattern.
- For a smaller basket, reduce the number of increase rounds or omit some of the increases as necessary. This flexibility allows you to customize the size of the basket to fit your specific needs, so adjust the number of increases until you achieve your desired width.
- Be sure when changing the size of the basket that you always add an extra stitch so that the final stitch count is an odd number (51, 53, 55 etc.)
Instructions
Using 15 mm hook
Basket is crocheted starting at the bottom working up.
Chain 2
Rounds 1 thru 10 are the base of the basket and are worked continuously without joining or turning.
Rnd 1: Work 8 sc in 2nd st from hook. (8)
Rnd 2: 2 Sc in each st around. (16)
Rnd 3: 1 sc in first st *2 sc in next st, 1 sc in next st* rpt from * to * until end of round. End round with 2 sc in last st. (24)
Rnd 4: 1 sc in first 2 sts *2 sc in next st, 1 sc in next 2 sts* rpt from * to * until end of round. End round with 2 sc in last st. (32)
Rnd 5: 1 sc in first 3 sts *2 sc in next st, 1 sc in next 3 sts* rpt from * to * until end of round. End round with 2 sc in last st. (40)
Rnd 6: 1 sc in first 4 sts *2 sc in next st, 1 sc in next 4 sts* rpt from * to * until end of round. End round with 2 sc in last st. (48)
Rnd 7: 1 sc in first 5 sts *2 sc in next st, 1 sc in next 5 sts* rpt from * to * until end of round. End round with 1 sc in last st. (55)
Rnds 8 – 12: Sc each sc around. (55)
Starting the Sides – Texture Starts Here
Join with sl st, ch 1 turn. The ‘wrong’ side of the basket will now be facing you.
Rounds 13 thru 17 below are worked in continuous rounds ‘wrong’ side facing.
Rnd 13: 1 hdc in 1st sc, sl st in next *1 hdc in next sc, sl st in next* rpt from * to * to end of rnd. End with hdc in last sc. (55)
Rnd 14: Slst in 1st hdc, hdc in next sl st. *Slst in next hdc, hdc in next sl st.* Repeat from * to * until end of rnd. End with sl st in last hdc. (55)
Rnd 15: 1 hdc in 1st sc, sl st in next *1 hdc in next sc, sl st in next* rpt from * to * to end of rnd. End with hdc in last sc (55)
Rnd 16: Slst in 1st hdc, hdc in next sl st. *Slst in next hdc, hdc in next sl st.* Repeat from * to * until end of rnd. End with sl st in last hdc. (55)
Rnd 17: 1 hdc in 1st sc, sl st in next *1 hdc in next sc, sl st in next* rpt from * to * to end of rnd. End with hdc in last sc (55)
Join with sl st, ch 1 turn. The ‘right’ side of the basket will now be facing you.
Rounds 18 – 21 are worked in continuous rounds ‘right’ or the outside of the basket side facing out.
Rnds 18 – 21: Sc in 1st and each st around. (55)
Join with sl st, ch 1 turn. The ‘wrong’ side of the basket will now be facing you.
Rounds 22 thru 26 are worked in continuous rounds ‘wrong’ side facing.
Rnd 22: 1 hdc in 1st sc, sl st in next *1 hdc in next sc, sl st in next* rpt from * to * to end of rnd. End with hdc in last sc. (55)
Rnd 23: Slst in 1st hdc, hdc in next sl st. *Slst in next hdc, hdc in next sl st.* Repeat from * to * until end of rnd. End with sl st in last hdc. (55)
Rnd 24: 1 hdc in 1st sc, sl st in next *1 hdc in next sc, sl st in next* rpt from * to * to end of rnd. End with hdc in last sc (55)
Rnd 25: Slst in 1st hdc, hdc in next sl st. *Slst in next hdc, hdc in next sl st.* Repeat from * to * until end of rnd. End with sl st in last hdc. (55)
Rnd 26: 1 hdc in 1st sc, sl st in next *1 hdc in next sc, sl st in next* rpt from * to * to end of rnd. End with hdc in last sc (55)
Join with sl st, ch 1 turn. The ‘right’ outside side of the basket will now be facing you.
Rnd 27: Sc in 1st and each st around. (55) join with sl st, ch 1, turn.
HANDLES:
Rnd 28, will create the handle openings.
Rnd 28: Sc in 1st 9 sts, ch 10, sk next 10 sts, sc next 19 sts, ch 10, sk next 10 sts, sc in next 9 sts. (37 sc + 20 ch)
Rnd 29: Sc in each st around, working into each chain across both handle openings. (55)
Customize Your Crochet Basket
One of my favourite things about this crochet home decor project is how easy it is to make it your own.
Whether you keep it simple and neutral or add a fun seasonal touch, this basket can easily be customized to match your home and your style.
Add a Fabric Lining
If you’ve ever lined one of my crochet hats, you’ll already know how to line this basket. It’s the exact same process!

Adding a fabric lining gives the basket a more finished look and also helps keep smaller items from slipping through the stitches.
And here is my biggest money-saving tip…
Don’t buy new fabric!
Fabric has become so expensive here in Ontario. Instead, look around your house first. A sheet, pillowcase, or cotton tablecloth that never got used as often as you had hoped can make the perfect basket liner.
I’ve started looking at old sheets and pillowcases in a whole new way. If the fabric is clean and matches my decor, it’s fair game!
Change It for Every Season
A simple fabric liner can completely change the look of your basket.
Try:
- Christmas plaid
- Spring florals
- Neutral linen
- Farmhouse stripes
- Baby prints
- Halloween fabric
- Fall buffalo check
It’s almost like having several baskets in one!
What Can You Store in a Crochet Storage Basket?
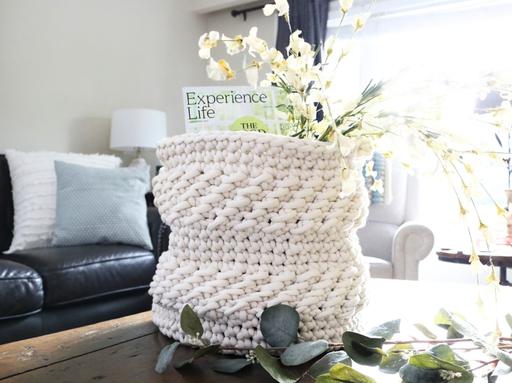
I originally planned to use mine for wrapping paper bows, ribbon, and gift bags. That lasted about five minutes.
Before I knew it, I was swooshing all the odds and ends that had collected on my coffee table for a quick clean up before I could dust. So the question is… am I organized enough to use this for just one thing? … Probably NOT!
But if you are more organized than me here are some ideas! This crochet organizer basket is perfect for:
- Yarn
- Baby essentials
- Toys
- Bathroom towels and face cloths
- Kitchen towels
- Dog toys
- Plant covers
- Remote controls
- Entryway storage
- Bedroom organization
A Beautiful Handmade Gift Basket
If you’re anything like me, you’re always looking for a handmade gift idea that doesn’t take weeks to finish.
That’s another reason I love this basket, it works up so quickly that it’s the perfect last-minute gift.
Fill it with almost anything to create a thoughtful handmade present.
Baby Shower Gift
- Bibs
- Baby blanket
- Washcloths
- Books
- Teethers
Housewarming Gift
- Tea towels
- Dishcloths
- Wooden spoon
- Recipe cards
- Kitchen gadgets
Spa Basket
- Candles
- Bath products
- Lotion
- Face cloths
- Soap
Crochet Lover Gift
- Yarn
- Crochet hooks
- Stitch markers
- Small scissors
- Printed patterns
Frequently Asked Questions
Is this a good crochet basket pattern for beginners?
Yes! If you’re comfortable making single crochet, half double crochet, and slip stitches, this is a wonderful beginner-friendly basket project.
The texture may look complicated at first, but it’s really created by combining simple stitches and changing how they are worked throughout the basket.
Can I make the basket larger?
Absolutely!
Simply continue the increase rounds until your base reaches the diameter you’d like before beginning the sides.
Keep in mind that changing the size will also change the amount of yarn you’ll need and the final look of your basket.
Can I make the basket smaller?
Yes!
Stop increasing sooner to create a smaller base and a smaller finished basket.
This is one of my favourite things about this design because you can easily customize it to fit your space.
Can I use a different yarn?
Definitely.
Although I designed this as a jumbo yarn crochet pattern, you can also hold multiple strands of lighter-weight yarn together to achieve a similar thickness and texture.
Just remember that changing your yarn weight and hook size may change the finished size of your basket.
I always recommend making a small swatch if you’re unsure how your yarn choice will work.
Why are some rounds worked continuously while others are joined?
This is what creates the signature Montero texture.
The changes between continuous rounds and joined rounds are intentional and help the textured sections line up properly throughout the basket.
Following the pattern instructions carefully will keep that beautiful woven look consistent.
Can I sell baskets made from this pattern?
Absolutely!
You’re welcome to sell finished baskets made from this free crochet basket pattern.
I simply ask that you don’t copy, share, or redistribute the written pattern itself.
I had so much fun designing this basket, and I honestly can’t wait to see the colours and yarn combinations you choose.
One of my favourite parts of sharing crochet patterns is seeing how each person puts their own little spin on them. A different yarn colour, a fun fabric liner, or a completely different use for the basket can make it feel brand new.
If you make one, be sure to tag me on social media. I would absolutely love to see your finished basket and all the creative ways you use it!
Happy crocheting!
Hugs,
Cyp
I am definitely going to start this project. It will be handy for so many things that need extra space. Thank u so much. Im sharing it with my crochet buddy
I’m so glad you like it! Yes I am using mine a lot never realized how handy the handles are!!!