


Free crochet mitten ornament pattern… the kind that instantly brings back those early-winter memories the moment you see it. There’s just something about tiny mittens that feels like the start of the season.
When my boys were little, they’d come in from the cold with wet mittens, pink cheeks, and frozen hands… and as tired as I was, I always loved those moments. Mini mittens have that same quiet holiday feeling simple, handmade, and full of heart.
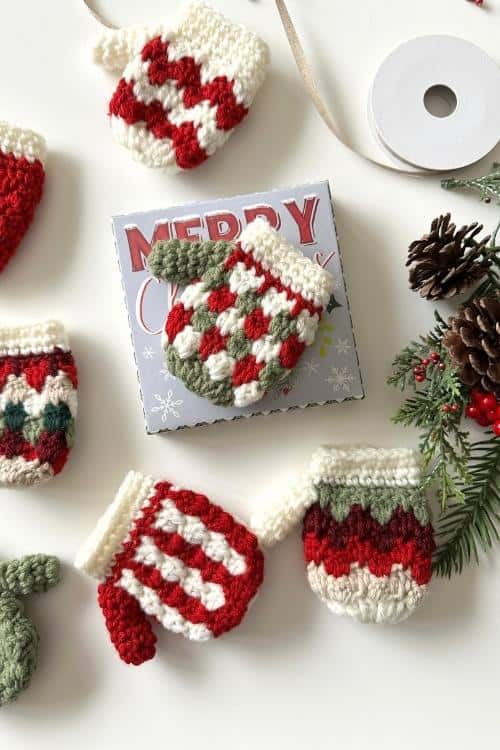
That’s exactly what inspired this Mini Country Charm Mitten. It’s small, quick to make, and full of those little details that make your tree feel personal, not store-bought.
Each mitten works up in just a few rounds and looks cute no matter what colours you choose. Make one or make a whole basket of them they add instant cuteness anywhere you put them.
Easy Country Charm Crochet Mini Hat Ornament Pattern
Mini Country Charm Free Crochet Stocking Ornament Pattern
Why You’ll Love This Pattern
- Beginner-friendly and quick to make
- A great way to use up worsted weight yarn scraps
- Customizable with endless colours
- Perfect for gifting and decorating
- Works beautifully with farmhouse, modern, or traditional holiday décor
- Ideal for craft fairs or last-minute “I forgot someone” gifts

Purchase Ad Free Pattern – Instant Download!
Purchase the ad-free PDF for a smooth, distraction-free crocheting experience anytime, anywhere.
Already a subscriber? Check your latest email for your special discount code. Not subscribed yet? Sign up here to get yours!
Thanks so much for supporting my blog!
Free Crochet Mitten Ornament Pattern
Skill Level
Easy
Abbreviations (US Terms)
- ch – chain
- dc – double crochet
- ldc – long double crochet (see special stitches)
- rpt – repeat
- sc – single crochet
- sk – skip
- sp – space
- st – stitch
- sts – stitches
- sl st – slip stitch
- yo – yarn over
Gauge
No swatching required for this project.
Measurement
Laying flat: 2 ½” wide x 3 ½” long
Materials Needed
- 25 grams Worsted weight yarn – for Solid Colour Mitten
Lion Brand Pound of Love shown in photos. Colours used: Olive, Winter Green, Cherry, Sugar Cookie, Antique White, and Claret. - For multi colour mitten divide 25 By the number of colours used.
- 4.50 mm crochet hook
- Yarn needle
- Scissors
Please note that the actual amount of yarn needed may change depending on the yarn chosen always purchase a little more than you think you may need.
Notes
- This mini mitten ornament is worked from the bottom up.
- The mitten is worked in joined rounds, and you’ll turn at the end of each round.
- Change colours on the final slip stitch of the round unless otherwise noted.
- See photos below for complete colour instructions.
- Stitch counts are included at the end of each round in ( ).
- Written in US crochet terms.
- Turning chain does not count as a stitch.
- This crochet Mini Mitten Ornament can have many different looks just by adjusting colour changes.
Using Colours in Your Christmas Mini Mitten Ornament
Follow the crochet Mini Mitten Ornament round instructions as written, and simply switch yarns according to the colour guide below.
Each round is worked completely in a single colour. At the end of the listed rounds, change colours as instructed.
How to Make Colour Changes
- Work the round as written in the current colour.
- When you get to the very last slip stitch (sl st) of the round, stop before completing it.
- Drop the old colour and place the new colour on your hook.
- Pull the new colour through to finish the slip stitch – this completes the join for that round.
- Chain 1 and turn (as pattern instructs), now working the next round in the new colour.
- No need to weave in. Simply tie a knot and tuck them to the inside of the Mini Ornament.
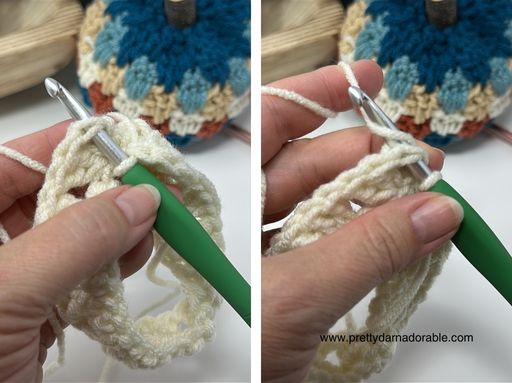
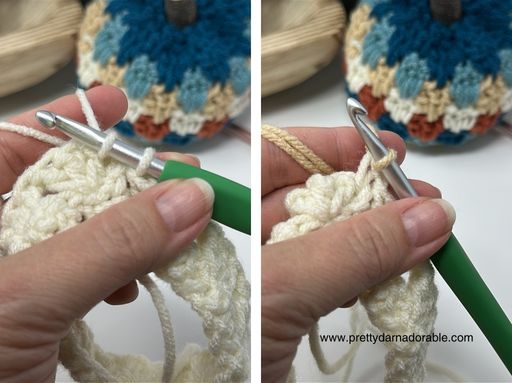
Note: Make sure all yarn tails from your colour changes are pulled to the same side of the Mini Ornament. Round 1 is the outside of the mitten, so pull all tails to the inside. If you forget, no worries – just use your crochet hook to grab them through and pull them to the inside later.
Special Stitches
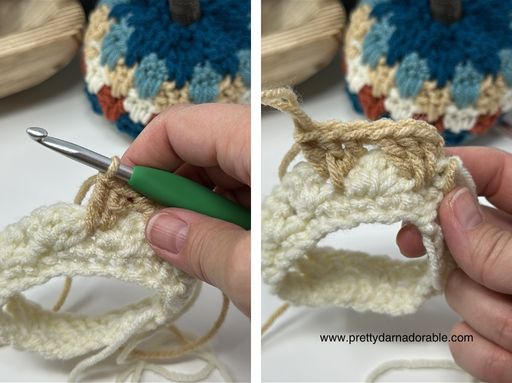
Long Double Crochet (ldc): Work double crochet around and in front of the previous Rnd and into the stitch indicated one Rnd below.
Cluster: In the space between groups of 3 dc, work (dc, ldc in middle st of cluster below, dc). When working ldc be sure to bring the height of the stitch up to match the height of the dc previously made in the space between the clusters.
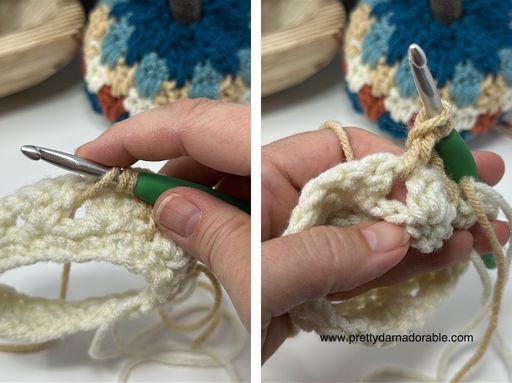
Striping Instructions


Mitten Instructions
The mitten is worked from the bottom up.
Ch 2
Rnd 1: Work 6 sc into 2nd ch from hook. (6)
Rnd 2: 3 dc in 1st and each st around. Join with sl st, ch 1, turn. (18 sts)

Rnd 3: 3 dc in 1st dc, sk next 2 sts, *3 dc in next st, sk next 2 sts* repeat * to * around. Skip last 2 sts. Join with sl st, ch 1, turn. (18 sts)
Rnd 4: In space before 1st cluster: (dc, ldc in dc below, dc). *Sk next cluster, in space before next cluster (dc, ldc in dc below, dc).* Repeat from * to * around, end just before last cluster. Skip the last cluster. Join with sl st, ch 1, turn. (18 sts)

Rnds 5 – 9: Working in space before 1st cluster, (dc, ldc in middle st of cluster below, dc). *Sk next cluster, in space before next cluster (dc, ldc in middle st of cluster below, dc).* Repeat from * to *around, end just before last cluster. Skip the last cluster. Join with sl st, ch 1, turn. (18 sts)
Rnd 10: Ldc in middle st of cluster below, sc in next 2 sts. *Ldc in middle st of cluster below, sc in next 2 sts.* Repeat from *to* to end of round. (18 sts). Join with sl st.
Cuff
Change to contrast colour here
You’ll now work continuously without turning. Use a stitch marker to keep track of rounds.
Rnds 11 – 13: Sc in 1st and each st around. (18) Fasten off and weave in ends.
Thumb
The thumb will be worked in continuous rounds through round 4.
Then you will work a half row which will allow for nicer positioning of the thumb on the mitt.
This half round will allow the thumb piece to sit at an angle instead of straight out if we had not made it.
Ch 2
Rnd 1: Work 7 sc in 2nd ch from hook. (7)
Rnds 2-4: Sc in 1st st and each st around (7)
Join to next stitch with slip stitch and chain 1, sc in same stitch. Work sc in next 3 stitches. Fasten off leaving a long tail and sew thumb to mitt.
Use photo below as guide for thumb placement and sew thumb to mitt with needle and yarn.


Add a little loop of twine, yarn, or ribbon to the top corner so it’s ready to hang.
Add optional embellishment ideas: Attach small pom poms, buttons, or bells for extra charm.
If giving as a gift tag or ornament: You can slip in a small candy cane or tag for decoration.

Ways to Use Mini Crochet Mittens
These tiny mittens are cute on their own, but here are lots of fun and practical ideas to make the most of them this season:
Holiday Decorating
- Hang individually on the tree
- Make a full mitten garland
- Add to wreaths
- Tie onto stockings
- Hang from cabinet knobs or a mantel garland
Gifting
- Use as a gift topper
- Add a handwritten name tag
- Slip in a candy cane or small chocolate
- Attach to wine bottles for holiday gifting
- Use in Advent calendars or countdown bags
Craft Fair Ideas
- Sell as singles or in sets of two or three
- Package in clear bags with twine
- Offer colour-coordinated bundles
- Keep a basket of them at your checkout table
Keepsake Ideas
- Add initials or a tiny year tag
- Make one each year for your kids or grandkids
- Use as memory ornaments for milestone holidays

Around the Home
- Add to tiered trays
- Fill a bowl with mini mittens and ornaments
- Tie onto napkins for Christmas dinner
- Hang on a peg rail or mini tree
Make It Your Own
- Try solids, stripes, or colour blocking
- Go neutral for farmhouse décor
- Add bells, buttons, ribbons, or faux-fur trim
- Personalize the cuff with initials
- Mix bright and traditional colours
Every mitten turns out with its own personality that’s part of the fun.
FAQ – Mini Crochet Mitten Ornament Pattern
How long does it take to crochet a mini mitten ornament?
Usually 20–30 minutes. They’re fast, easy, and great for batching.
Is this pattern beginner-friendly?
Yes. The stitches repeat in a simple rhythm and are great for newer crocheters.
What yarn works best?
Any worsted weight yarn. Acrylic, cotton, and blends all work well.
Can I sell finished items made from this pattern?
Yes! Makers are always welcome to sell finished pieces. Crediting Pretty Darn Adorable is appreciated.
Do I have to weave in all the colour-change tails?
No, the pattern uses a quick-change technique where all tails are pulled inside and tucked. No tedious weaving.
How can I customize the look?
Use different colour combos, add stripes, attach bells or buttons, or embroider initials on the cuff.

If you make a Mini Country Charm Mitten, I would love to see it.
Tag me on Instagram so I don’t miss your creation.
Hugs,
Cyprianne 💕