


This free crochet aviator hat pattern was long overdue for an update. It has been around for a while but still a favourite and when someone shared a photo of the Cumberland Earflap hat in a beautiful variegated yarn – I knew the time was now.
If you found this page through an older version of the pattern, I’ve moved everything here and updated it with clearer instructions, better sizing, and individual yarn requirements for each size.
Over time, I kept revisiting this design, making versions with different trims, buttons, and yarns. But I am pretty sure this is my favourite to date.
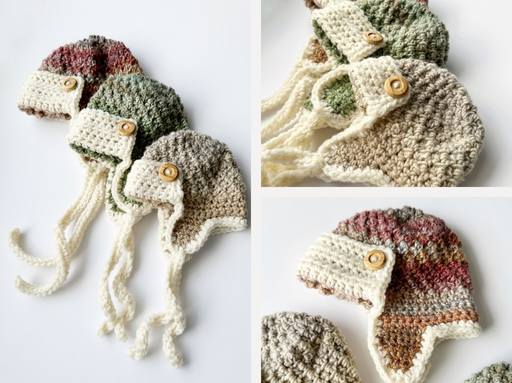
This updated free crochet aviator hat pattern is now laid out to be much easier to follow and includes every size from newborn to adult, with individual yarn requirements for each size. For this version, I used a worsted weight wool-blend yarn and a 6.5 mm crochet hook, which keeps the hat warm without making it stiff or bulky.
This design works beautifully as a crochet earflap hat, trapper hat, or pilot-style winter hat, depending on how you style it. It’s practical, cozy, and actually gets worn which is always my goal when designing hats.

Fun Facts:
This hat:
- Fully covers the ears without awkward gaps
- Has a front flap that adds warmth and personality
- Isn’t bulky or heavy on the head
- Works for babies, kids, teens, and adults
- Looks great in solid colours, heathers, or self-striping yarns
The construction is simple, the fit is reliable, and the finished hat looks more polished than you’d expect from such straightforward stitches.

Crochet Aviator Hat Construction Overview
This crochet aviator hat is worked from the crown down in the round, making it easy to adjust for size and fit. Once the main body of the hat is complete, the earflaps and front flap are added with simple rows, no complicated shaping or math required.

If you’re comfortable with single crochet and triple crochet, you’ll be right at home with this pattern. Everything is written step by step, and the layout is designed to keep things clear and readable especially if you’re newer to crochet.
Purchase Ad Free Pattern – Instant Download!
Purchase the ad-free PDF for a smooth, distraction-free crocheting experience anytime, anywhere.
Already a subscriber? Check your latest email for your special discount code. Not subscribed yet? Sign up here to get yours!
Thanks so much for supporting my blog!
Free Crochet Cumberland Aviator Hat
Skill Level
Easy
Abbreviations
ch – chain
dc – double crochet
hdc – half double crochet
sc – single crochet
sc2tog – single crochet two together
sk – skip
st – stitch
sts – stitches
sl st – slip stitch
tc – triple crochet
rpt – repeat
Gauge
9 sc x 10 rows = 4 inches (10 cm)
Because the texture of this hat can only be worked in rounds the gauge will be based on a swatch of rows made in single crochet.
A gauge swatch is vital for a well-fitting crochet hat. It determines stitch tension and measures the number of stitches and rows. Comparing it to the pattern’s gauge ensures the final hat fits as desired. Adjust hook or tension if needed for a perfectly fitting hat.
Materials Needed & Measurements
- 6.5 mm hook
- Tapestry Needle
- Stitch Markers
- 2 Buttons ¾” (Optional)
- Patons Inspired for Front Brim and Trim
- Main Part of Hat – Bulky Yarn (5) Caron Macchiato Cakes – see sizing chart for amounts.
See below for broken down amount for each size.
Please note that the actual amount of yarn needed may change depending on the yarn chosen always purchase a little more than you think you may need.
0 to 3 months:
Width: 14″
Height: 5.5″
Main Yarn: 35g, 68m, 1.23 oz, 74 yds
Trim Yarn: 16.5g, 22m, 0.58 oz, 24 yds
Solid Color Total: 51.5g, 90m, 1.81 oz, 98 yds
3 to 6 months:
Width: 15.5″
Height: 6″
Main Yarn: 45g, 87m, 1.59 oz, 95 yds
Trim Yarn: 19.8g, 27m, 0.70 oz, 30 yds
Solid Color Total: 64.8g, 114m, 2.29 oz, 125 yds
6 to 12 months:
Width: 17″
Height: 6.5″
Main Yarn: 50g, 97m, 1.76 oz, 106 yds
Trim Yarn: 24.2g, 33m, 0.85 oz, 36 yds
Solid Color Total: 74.2g, 130m, 2.61 oz, 142 yds
12 months to 3 years:
Width: 18.5″
Height: 7″
Main Yarn: 55g, 106m, 1.94 oz, 116 yds
Trim Yarn: 22g, 30m, 0.78 oz, 33 yds
Solid Color Total: 77g, 136m, 2.72 oz, 149 yds
3 to 10 years:
Width: 20″
Height: 7.5″
Main Yarn: 65g, 127m, 2.29 oz, 139 yds
Trim Yarn: 38.5g, 53m, 1.36 oz, 58 yds
Solid Color Total: 103.5g, 180m, 3.65 oz, 197 yds
Adult:
Width: 21.5″
Height: 8″
Main Yarn: 80g, 156m, 2.82 oz, 171 yds
Trim Yarn: 56.1g, 76m, 1.98 oz, 83 yds
Solid Color Total: 136.1g, 232m, 4.80 oz, 254 yds
Care Instructions
To wash your hat, just use a little cool water (around 30°C) and do it by hand. Don’t use any bleach, and definitely stay away from the iron. When you’re done, just squeeze the water out gently don’t wring it and lay it flat to dry so it doesn’t lose its shape. No need for dry cleaning, either.
Notes
- Crown: The top portion of the hat, worked in the round.
- Earflaps: The sections on each side of the hat that extend downward to cover the ears.
- Nape flap: The fixed section at the back of the hat that extends downward to cover the neck.
- Front brim: The section at the front of the hat that extends slightly over the forehead for added coverage.
- To maintain proper fit and proportion, some sizes use different stitches for the starting round of the crown and for the earflap ties. Always follow the stitch instructions for your selected size.
- This hat uses a specific stitch sequence to create the textured look. Place stitches exactly as written and do not alter the pattern sequence.
- The crown is worked in continuous rounds. When instructed, the pattern switches to rows to form the nape flap, earflaps, and front brim. Turn your work at the end of each row.
- Pay attention to instructions that specify working with the right side facing, especially when joining yarn for earflaps and the front brim.
- Stitch counts are provided to help ensure proper fit. Checking your count regularly will help keep the hat aligned.
- In larger sizes, the crown begins with double crochet rather than half double crochet to add height. This is intentional.
- 6–12 month size introduces the texture one round earlier to adjust the shape. Follow as written.
- The brim is joined on alternating sides for each size to ensure the final single crochet edging is always on the outside of the hat. This ensures a clean finish for every size.
- Tie Stitch Note: Smaller sizes use single crochet for earflap ties for a more delicate finish. Larger sizes use half double crochet for added strength and proportion.

0 – 3 Months
Hat is worked in rounds until noted otherwise. Use a stitch marker at the beginning of each round for easier counting.
Crown
Using 6.5 mm hook ch 2
Rnd 1: Work 9 hdc in 2nd ch from hook. (9)
Rnd 2: (tc, sc) in 1st st and each st around (18)
Rnd 3: (tc, sc) in 1st st and each st around (36)
Rnds 4-10: (tc, sc) in 1st tc *sk next st (tc, sc) in next tc* rpt from *to* to end of rnd (36)
At end of round 10 skip last stitch, sl st in next, ch 2 (this will be the 1st st of 1st row below)
The remainder of the hat is worked in rows.
Nape Flap
Rows 1-3: Sc in 1st and next 23 sts (24)
Ch 1, turn at the end of each row.
Earflap
Row 1: Sc in 1st and next 4 sts, ch 1 turn (5)
Rows 2-3: Sc in 1st st and each st across, ch 1 turn (5)
Row 4: Sc2tog, sc next st, sc2tog (3)
Row 5: Sc in 1st st and each st across (3)
Fasten off and weave in ends.
With the right side facing, join yarn with a sl st in the first stitch on the opposite side of the nape flap.
Ch 1 and repeat Rows 1–5 above for the second earflap. Fasten off and weave in ends.
Front Brim
Row 1: With the right side facing, join contrast colour yarn with a sl st beside the earflap.
Ch 2, hdc in each stitch across to other earflap. Ch 2 turn (12)
Rows 2-3: Hdc in 1st st and each st across. Ch 2 turn (12)
Work hdc in each stitch around the entire hat.
At each corner and along the bottom of the earflaps, work 3 hdc in the same stitch to keep the edges smooth.
This includes the points where the earflaps, nape flap, and front brim meet the main hat.
Fasten off and weave in ends.
Earflap Ties
Join yarn with a sl st to the centre stitch of the earflap.
Ch 21 to form the first tie.
Working back along the chain, sc in the 2nd ch from the hook and in each ch across.
Sl st into the next hdc on the earflap to secure. (20)
Repeat for the second tie on the opposite earflap.
3 to 6 Months
Hat is worked in rounds until noted otherwise. Use a stitch marker at the beginning of each round for easier counting.
Crown
Using 6.5 mm hook ch 2
Rnd 1: Work 10 hdc in 2nd ch from hook. (10)
Rnd 2: (tc, sc) in 1st st and each st around (20)
Rnd 3: (tc, sc) in 1st st and each st around (40)
Rnds 4-12: (tc, sc) in 1st tc *sk next st (tc, sc) in next tc* rpt from *to* to end of rnd (40)
At end of round 12 skip last stitch, sl st in next ch 2 (this will be the 1st st of 1st row below)
The remainder of the hat is worked in rows.
Nape Flap
Rows 1-4: Sc in 1st and next 25 sts (26) ch 1 turn
Earflap
Row 1: Sc in 1st and next 5 sts, ch 1 turn (6)
Rows 2-3: Sc in 1st st and each st across, ch 1 turn (6)
Row 4: Sc2tog, sc next 2 sts, sc2tog (4)
Row 5: Sc in 1st and each st across (4)
Fasten off and weave in ends.
Working at opposite side of the extended back, (with right side facing) join yarn in 1st stitch with slip stitch, ch 1 and repeat rows 1-5, fasten off and weave in ends.
Front Brim
Row 1: With the wrong side facing, join contrast colour yarn with a sl st beside the earflap.
Ch 2, hdc in each stitch across to other earflap. Ch 2 turn (14)
Rows 2-4: Hdc in 1st st and each st across, ch 2 turn (14)
Work hdc in each stitch around the entire hat.
At each corner and along the bottom of the earflaps, work 3 hdc in the same stitch to keep the edges smooth.
This includes the points where the earflaps, nape flap, and front brim meet the main hat.
Fasten off and weave in ends.
Earflap Ties
Join yarn with a sl st to the centre stitch of the earflap.
Ch 23 to form the first tie.
Working back along the chain, sc in the 2nd ch from the hook and in each ch across.
Sl st into the next hdc on the earflap to secure. (22)
Repeat for the second tie on the opposite earflap.

6 to 12 Months
Hat is worked in rounds until noted otherwise. Use a stitch marker at the beginning of each round for easier counting.
Crown
Using 6.5 mm hook ch 2
Rnd 1: Work 11 hdc in 2nd ch from hook (11)
Rnd 2: (tc, sc) in 1st and each st around (22)
Rnd 3: (tc, sc) in 1st tc *sk next st (tc, sc) in next tc* rpt from *to* to end of rnd (22)
Rnd 4: (tc, sc) in 1st st and each st around (44)
Rnds 5-13: (tc, sc) in 1st tc *sk next st (tc, sc) in next tc* rpt from *to* to end of rnd (44)
At end of round 13 skip last stitch, sl st in next, ch 2 (this will be the 1st st of 1st row below)
The remainder of the hat is worked in rows.
Nape Flap
Rows 1-5: Sc in 1st and next 29 sts (30) ch 1 turn
Earflap
Row 1: Sc in 1st and next 6 sts, ch 1 turn (7)
Rows 2-3: Sc in 1st st and each st across, ch 1 turn (7)
Row 4: Sc2tog, sc next 3 sts, sc2tog (5)
Row 5: Sc2tog, sc next st, sc2tog (3)
Row 6: Sc in 1st and each st across (3)
Fasten off and weave in ends.
Working at opposite side of the extended back, (with right side facing) join yarn in 1st stitch with slip stitch, ch 1 and repeat rows 1-6, fasten off and weave in ends.
Front Brim
Row 1: With the right side facing, join contrast colour yarn with a sl st beside the earflap.
Ch 2, hdc in each stitch across to other earflap. Ch 2 turn (14)
Rows 2-5: Hdc in 1st st and each st across, ch 2 turn (14)
Work hdc in each stitch around the entire hat.
At each corner and along the bottom of the earflaps, work 3 hdc in the same stitch to keep the edges smooth.
This includes the points where the earflaps, nape flap, and front brim meet the main hat.
Fasten off and weave in ends.
Earflap Ties
Join yarn with a sl st to the centre stitch of the earflap.
Ch 27 to form the first tie.
Working back along the chain, sc in the 2nd ch from the hook and in each ch across.
Sl st into the next hdc on the earflap to secure. (26)
Repeat for the second tie on the opposite earflap.
1 to 3 Years
Hat is worked in rounds until noted otherwise. Use a stitch marker at the beginning of each round for easier counting.
Crown
Using 6.5 mm hook ch 2
Rnd 1: Work 12 hdc in 2nd ch from hook (12)
Rnd 2: (tc, sc) in 1st and each st around (24)
Rnd 3: (tc, sc) in 1st tc *sk next st (tc, sc) in next tc* rpt from *to* end of rnd (24)
Rnd 4: (tc, sc) in 1st and each st around (48)
Rnds 5-13: (tc, sc) in 1st tc *sk next st (tc, sc) in next tc* rpt from *to* end of rnd (48)
At end of round 13 skip last stitch, sl st in next, ch 2 (this will be the 1st st of 1st row below)
The remainder of the hat is worked in rows.
Nape Flap
Rows 1-6: Sc in 1st and next 31 sts (32) ch 1 turn
Earflap
Row 1: Sc in 1st and next 7 sts, ch 1 turn (8)
Rows 2-4: Sc in 1st st and each st across, ch 1 turn (8)
Row 5: Sc2tog, sc next 4 sts, sc2tog (6)
Row 6: Sc2tog, sc next 2 sts, sc2tog (4)
Row 7: Sc in 1st and each st across (4)
Fasten off and weave in ends.
Working at opposite side of the extended back, (with right side facing) join yarn in 1st stitch with slip stitch, ch 1 and repeat rows 1-7, fasten off and weave in ends.
Front Brim
Row 1: With the wrong side facing, join contrast colour yarn with a sl st beside the earflap.
Ch 2, hdc in each stitch across to other earflap. Ch 2 turn (16)
Rows 2-6: Hdc in 1st st and each st across, ch 2 turn (16)
Work hdc in each stitch around the entire hat.
At each corner and along the bottom of the earflaps, work 3 hdc in the same stitch to keep the edges smooth.
This includes the points where the earflaps, nape flap, and front brim meet the main hat.
Fasten off and weave in ends.
Earflap Ties
Join yarn with a sl st to the centre stitch of the earflap.
Ch 29 to form the first tie.
Working back along the chain, hdc in the 2nd ch from the hook and in each ch across.
Sl st into the next hdc on the earflap to secure. (28)
Repeat for the second tie on the opposite earflap
3 to 10 Years
Hat is worked in rounds until noted otherwise. Use a stitch marker at the beginning of each round for easier counting.
Crown
Using 6.5 mm hook ch 2
Rnd 1: Work 13 dc in 2nd ch from hook (13)
Rnd 2: (tc, sc) in 1st and each st around (26)
Rnd 3: (tc, sc) in 1st tc *sk next st (tc, sc) in next tc* rpt from *to* end of rnd, (26)
Rnd 4: (tc, sc) in 1st and each st around (52)
Rnds 5-14: (tc, sc) in 1st tc *sk next st, (tc, sc) in next tc* rpt from *to* end of rnd (52)
At end of round 14 skip last stitch, sl st in next, ch 2 (this will be the 1st st of 1st row below)
The remainder of the hat is worked in rows.
Nape Flap
Rows 1-7: Sc in 1st and next 33 sts (34) ch 1 turn
Earflap
Row 1: Sc in 1st and next 8 sts, ch 1 turn (9)
Rows 2-4: Sc in 1st st and each st across, ch 1 turn (9)
Row 5: Sc2tog, sc next 5 sts, sc2tog (7)
Row 6: Sc2tog, sc next 3 sts, sc2tog (5)
Row 7: Sc in 1st, sc2tog, sc in last 2 sts (4)
Row 8: Sc in 1st st and each st across (4)
Fasten off and weave in ends.
Working at opposite side of the extended back, (with right side facing join) yarn in 1st stitch with slip stitch, ch 1 and repeat rows 1-8, fasten off and weave in ends.
Front Brim
Row 1: With the right side facing, join contrast colour yarn with a sl st beside the earflap.
Ch 2, hdc in each stitch across to other earflap. Ch 2 turn (18)
Rows 2-7: Hdc in 1st st and each st across, ch 2 turn (18)
Don’t ch 2 or turn after last row continue below.
Work hdc in each stitch around the entire hat.
At each corner and along the bottom of the earflaps, work 3 hdc in the same stitch to keep the edges smooth.
This includes the points where the earflaps, nape flap, and front brim meet the main hat.
Fasten off and weave in ends.
Earflap Ties
Join yarn with a sl st to the centre stitch of the earflap.
Ch 31 to form the first tie.
Working back along the chain, hdc in the 2nd ch from the hook and in each ch across.
Sl st into the next hdc on the earflap to secure. (30)
Repeat for the second tie on the opposite earflap
Adult
Hat is worked in rounds until noted otherwise. Use a stitch marker at the beginning of each round for easier counting.
Crown
Using 6.5 mm hook Ch 2
Rnd 1: Work 14 dc in 2nd ch from hook (14)
Rnd 2: (tc, sc) in 1st st and each st around (28)
Rnd 3: (tc, sc) in 1st tc *sk next st, (tc, sc) in next tc* rpt from *to* end of rnd (28)
Rnd 4: (tc, sc) in 1st and each st around (56)
Rnds 5-16: (tc, sc) in 1st tc *sk next st, (tc, sc) in next tc* rpt from *to* end of rnd (56)
At end of round 16 skip last stitch, sl st in next, ch 2 (this will be the 1st st of 1st row below)
The remainder of the hat is worked in rows.
Nape Flap
Rows 1-7: Sc in 1st and next 33 sts (34) ch 1 turn
Earflap
Row 1: Sc in 1st and next 9 sts, ch 1 turn (10)
Rows 2-4: Sc in 1st st and each st across, ch 1 turn (10)
Row 5: Sc2tog, sc next 6 sts, sc2tog (8)
Row 6: Sc2tog, sc next 4 sts, sc2tog (6)
Row 7: Sc2tog, sc next 2 sts, sc2tog (4)
Rows 8 & 9: Sc in 1st st and each st across (4)
Fasten off and weave in ends.
Working at opposite side of the extended back, (with right side facing) join yarn in 1st stitch with slip stitch, ch 1 and repeat rows 1-9, fasten off and weave in ends.
Front Brim
Row 1: With the wrong side facing, join contrast colour yarn with a sl st beside the earflap.
Ch 2, hdc in each stitch across to other earflap. Ch 2 turn (22)
Rows 2-8: Hdc in 1st st and each st across, ch 2 turn (22)
Work hdc in each stitch around the entire hat.
At each corner and along the bottom of the earflaps, work 3 hdc in the same stitch to keep the edges smooth.
This includes the points where the earflaps, nape flap, and front brim meet the main hat.
Fasten off and weave in ends.
Earflap Ties
Join yarn with a sl st to the centre stitch of the earflap.
Ch 31 to form the first tie.
Working back along the chain, hdc in the 2nd ch from the hook and in each ch across.
Sl st into the next hdc on the earflap to secure. (30)
Repeat for the second tie on the opposite earflap.
Fun Ways to Customize This Crochet Aviator Hat
One of the best things about this crochet aviator hat pattern is how easy it is to make it your own.
Here are a few fun ways to customize it:
- Change the yarn: Try self-striping yarn for automatic colour changes or a heathered wool for a classic look.
- Add buttons or toggles: Decorative buttons on the front flap instantly change the vibe.
- Faux fur trim: Add faux fur yarn just to the front flap for extra warmth and texture.
- Skip the front flap: Turn it into a cleaner crochet earflap hat with a more minimal look.
- Play with edging: Finish with reverse single crochet or a contrasting colour for extra detail.
Fun Ways to Gift This Aviator Hat
This free crochet aviator hat pattern makes an excellent handmade gift because it’s both useful and special.
Some easy gifting ideas:
- New baby gift: Pair a newborn size with a handwritten care tag.
- Sibling sets: Make matching hats in different sizes for brothers and sisters.
- Winter birthday gift: A practical handmade gift that doesn’t feel last-minute.
- Holiday gifting: Great for stocking stuffers or teacher gifts when made in child or adult sizes.
Because this hat works up quickly and doesn’t require a lot of yarn, it’s also perfect for last-minute gifting.
FAQs About the Free Crochet Aviator Hat Pattern
Is this crochet aviator hat pattern beginner-friendly?
Yes. If you can chain, single crochet, triple crochet, and count stitches, you can make this hat.
What yarn works best for this aviator hat?
Worsted weight wool or wool-blend yarn works best. Acrylic blends also work if you prefer something machine washable.
Can I make this hat without the front flap?
Yes. You can skip the front flap to make a simpler crochet earflap hat.
How long does it take to crochet this hat?
Baby and toddler sizes can usually be finished in an evening. Larger sizes are still very weekend-friendly.
Does this pattern include adult sizes?
Yes. The pattern includes sizes from newborn through adult XL.
Can I sell hats made from this pattern?
Yes. You’re welcome to sell finished hats made from this pattern. A credit or tag is always appreciated but not required.