


There is no debating that when winter comes, those tiny (and not-so-tiny) ears need to be covered! Living at the end of a street where the winter winds circulate just that much stronger, I’ve come to know firsthand that brain freeze from cold gusts is definitely a thing! That’s why I’m so excited to finally share this free crochet earflap hat pattern that’s been much requested after my YouTube video, How to Line a Hat with Earflaps. Honestly, I don’t know why it’s taken me so long, but here we are—better late than never!

This crochet earflap hat is made with super warm chunky yarn, ensuring extra coziness for even the chilliest days. The entire hat is worked in continuous rounds, starting from the top of the hat and working your way down—no joining or turning, which makes it a fantastic beginner-friendly project.
This pattern has something for everyone, with sizes ranging from 0-3 months to adult sizes. It’s wonderfully customizable—use soft yarn in your favorite colors, add playful stripes, or top it off with a fun pom pom to make it uniquely yours. For an extra special touch, pair it with a matching cowl, cozy, or boot cuffs to create thoughtful, handmade gifts.

Before you get started, gather the following materials: a yarn needle and stitch marker to keep your rounds tidy, a 6.0 mm hook and 6.5 mm hook for achieving the perfect gauge, and chunky #5 yarn—I used Patons Inspired for this pattern. For an extra finishing touch, you can optionally add a faux fur pom pom or use strands of yarn to create your own.
Scroll down for free crochet earflap hat pattern
Construction of This Hat
- The hat is designed to be worked seamlessly in continuous rounds, which keeps the texture smooth and eliminates any awkward joining lines.
- The top of the hat can be worked using a magic circle (or magic ring) to create a neat, seamless start.
- Use a stitch marker to mark the first stitch of each round. This will make it easier to track your progress.
Earflaps and Ties
Each earflap is worked directly onto the hat, with simple rows of single crochet. You’ll finish them off with braided ties made from strands of yarn! Check out the earflap instructions in the pattern for detailed steps.
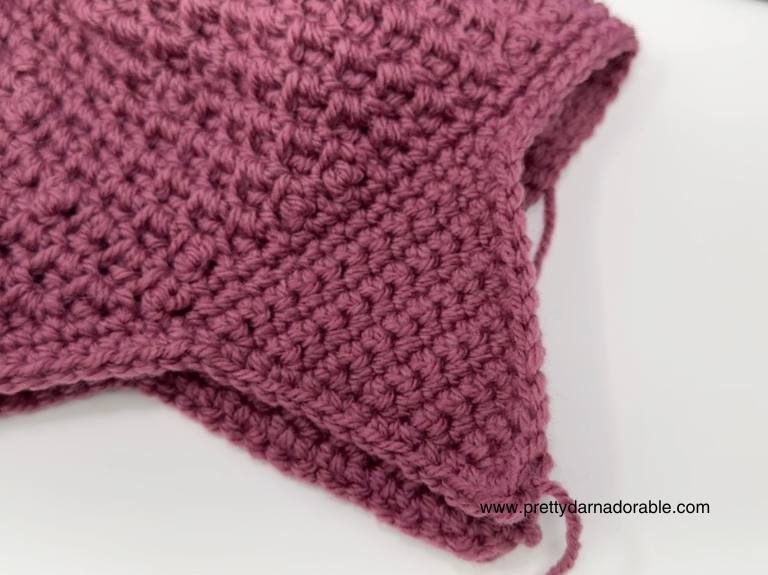
Customization Options
Want to make this project your own? Here are some ideas:
- Stripes: Create a DIY striped crocheted earflap hat by alternating colors in continuous rounds. The seamless design makes color changes super easy! The Cumberland Slouch was made using stripes!
- Add a lining: For extra warmth, use fleece to line the inside of the hat—this is especially helpful for windier days. Watch this video to learn how!
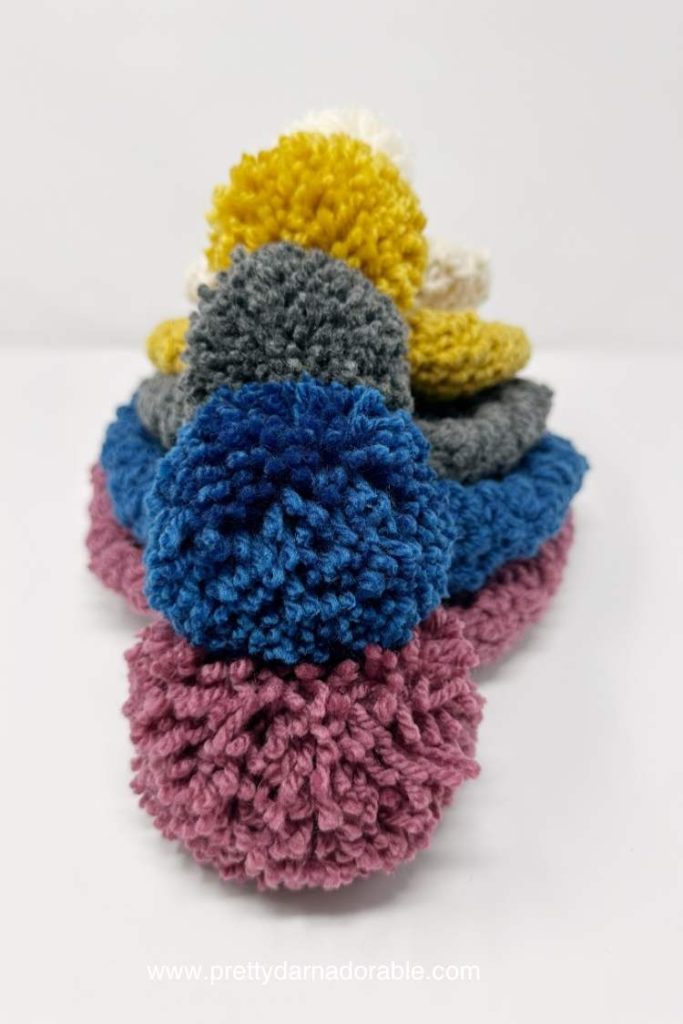
- Pom Pom Perfection: Use a faux fur pom pom or make your own with chunky or medium-weight yarn to give your hat that cozy, winter-perfect look.
Notes
- This pattern is that it also comes with a video tutorial. This means that you can follow along step-by-step and have all your questions answered in real-time. Whether you’re struggling to understand a particular stitch or just want to see how it should look, the video tutorial is a fantastic resource to have. You can pause, rewind, and re-watch as many times as you need to make sure you’re doing everything correctly.
- The Cumberland crochet earflap hat pattern is designed to have a shorter length, in so that the earflaps start at the top of the ear. If the base of the hat is too long it they may fall in the middle of the ear.
- Hat is worked into continuous rounds without joining or turning.
Purchase Ad Free Pattern – Instant Download!
Purchase the ad-free PDF for a smooth, distraction-free crocheting experience anytime, anywhere.
Already a subscriber? Check your latest email for your special discount code. Not subscribed yet? Sign up here to get yours!
Thanks so much for supporting my blog!
Did you make any of these?
I would love to see what you have made be sure to mention @prettydarnadorable or tag me using #prettydarnadorable on Instagram so I can see your creations!

Cumberland Ski Hat – free crochet earflap hat pattern
Skill Level
Beginner
Abbreviations
- ch – chain
- dc – double crochet
- hdc – half double crochet
- sc – single crochet
- sk – skip
- st – stitch
- sts – stitches
- sl st – slip stitch
- tc – triple crochet
- rpt – repeat
Gauge
Using 6.5 mm crochet hook and #5 Chunky Yarn
4” x 4” = Approximately 11 sc x 8 rows
A gauge swatch is vital for a well-fitting crochet hat. It determines stitch tension and measures the number of stitches and rows. Comparing it to the pattern’s gauge ensures the final hat fits as desired. Adjust hook or tension if needed for a perfectly fitting hat.
Because the texture of this hat can only be worked in rounds the gauge will be based on a swatch of rows made in single crochet.
Finished Measurements & Yarn Requirements
Finished Measurements & Yarn Requirements
0 to 3 months
Width: 13.5”
Height: 4.5”
Yarn: 63 gm / 101 m / 2.23 oz / 111 yd
3 to 6 months
Width: 15.0”
Height: 5.0”
Yarn: 78 gm / 125 m / 2.75 oz / 137 yd
6 to 12 months
Width: 16.5”
Height: 5.5”
Yarn: 85 gm / 136 m / 3.0 oz / 149 yd
1 to 3 years
Width: 18.0”
Height: 6.0”
Yarn: 93 gm / 149 m / 3.29 oz / 163 yd
3 to 10 years
Width: 21.0”
Height: 6.5”
Yarn: 138 gm / 221 m / 4.87 oz / 241 yd
Adult
Width: 22.5”
Height: 7.0”
Yarn: 164 gm / 262 m / 5.78 oz / 287 yd
Please note that the actual amount of yarn needed may change depending on the yarn chosen always purchase a little more than you think you may need..
Additional Materials Needed
Yarn used in pattern (see sizing chart above for exact amount required):
Yarn Gauge: Gauge must be matched for the correct fit of this hat, matching the recommended yarn gauge can assist in successful substitution and result in a more accurate finished product.
- 6.00 mm crochet hook
- 6.50 mm crochet hook
- Chunky Yarn (#5 Yarn shown in photo Patons Inspired) See table above for complete quantities.
- Tapestry Needle
- Stitch Markers
- Scissors
- Measuring Tape
Please note that the actual amount of yarn needed may change depending on the yarn chosen always purchase a little more than you think you may need.
Video Tutorial
How To Line A Hat With Earflaps
Pompoms
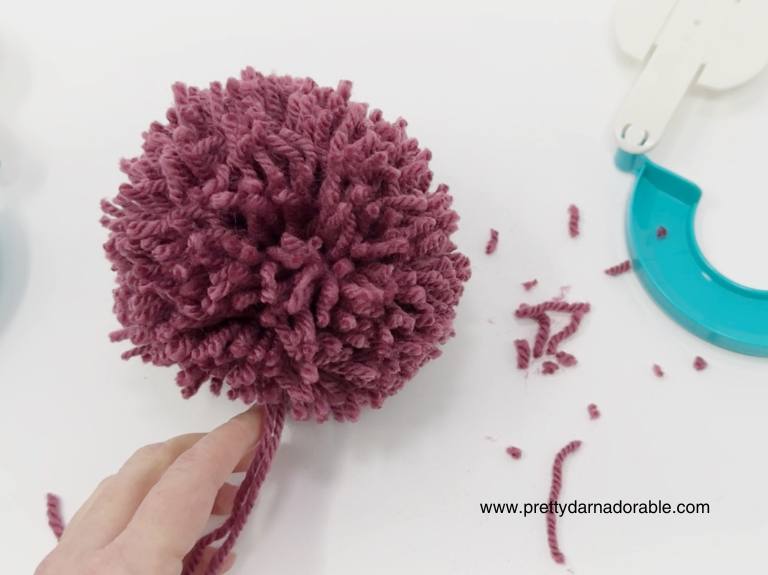
I used the Clover Pom Pom Maker
You can also use a 6” X 6” piece of cardboard (this doesn’t have to be exact).
- Wind yarn around cardboard approx. 200 times.
- Carefully slide off of cardboard and tie yarn around middle as tight as possible, leaving ends long for attaching to ties.
- Cut all loops
- Fluff and trim pom pom to size and shape desired.
Braided Ties
Cut 18 pieces yarn 30 inches or longer
- Working in the 3 sc stitches at bottom of earflap, hold three strands of yarn and fold in half. Hold hat with right side facing you.
- Using hook draw the folded ends through the stitch from wrong to right side. Pull the loose ends through the folded section and draw the knot up firmly.
- Repeat for next two stitches.
- Braid to last 3 inches. Using a piece of string, about 12 inches long, tie and knot leaving one long end to wrap around braid.
- Wrap yarn around braid several times.
- Use tapestry needle to weave end through.
Repeat for other earflap.
0 – 3 Months
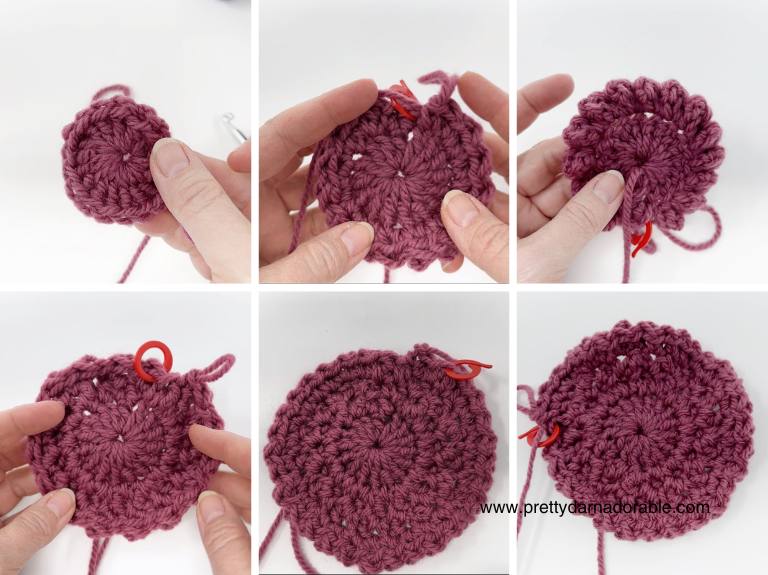
Entire hat will be worked in continuous rounds do not join. After the increase rounds you will find the top of the hat may be rippled this will straighten out as additional rounds are added.
Use stitch markers at the beginning of each round for easier counting.
Using 6.5 mm hook ch 2
Rnd 1: Work 9 hdc in 2nd ch from hook. (9)
Rnd 2: (tc, sc) in 1st st and each st around (18)
Rnd 3: (tc, sc) in 1st tc *sk next st (tc, sc) in next tc* rpt from *to* to end of rnd (18)
Rnd 4: (tc, sc) in 1st st and each st around (36)
Rnds 5-9: (tc, sc) in 1st tc *sk next st (tc, sc) in next tc* rpt from *to* to end of rnd (36)
Change to 6.00 mm hook
Rnd 10: Sc in 1st st and each st around.
Do not fasten off, continue with earflaps below.
Earflaps – Will be worked in rows
Row 1: Sl st in the next st, ch 1, sc in the same space (counts as 1st sc), sc in the next 7 sts, ch 1, turn (8 sts).
Rows 2–8: Skip the 1st sc at the start of each row, sc across, ch 1, turn. Continue until 1 st remains. Fasten off and weave in ends.
Placement: With the right side of the hat facing you, count 9 sts to the left of the first earflap. Attach yarn with a sl st and repeat Rows 1–8 above to create the second earflap.
Finish by working sc around entire hat including earflaps. Be sure to work 2 sc in each corner where the earflap attaches to the hat. Fasten off and weave in all ends.
3 – 6 Months
Entire hat will be worked in continuous rounds do not join. After the increase rounds you will find the top of the hat may be rippled this will straighten out as additional rounds are added.
Use stitch markers at the beginning of each round for easier counting.
Using 6.5 mm crochet hook ch 2
Rnd 1: Work 10 hdc in 2nd ch from hook. (10)
Rnd 2: (tc, sc) in 1st st and each st around (20)
Rnds 3: (tc, sc) in 1st tc *sk next st (tc, sc) in next tc* rpt from *to* to end of rnd (20)
Rnd 4: (tc, sc) in 1st st and each st around (40)
Rnds 5-10: (tc, sc) in 1st tc *sk next st (tc, sc) in next tc* rpt from *to* to end of rnd (40)
Change to 6.00 mm crochet hook
Rnd 11: Sc in 1st st and each st around. Do not fasten off, continue with earflaps below.
Earflaps – Will be worked in rows
Row 1: Sl st in the next st, ch 1, sc in the same space (counts as 1st sc), sc in the next 7 sts, ch 1, turn (8 sts).
Rows 2–8: Skip the 1st sc at the start of each row, sc across, ch 1, turn. Continue until 1 st remains. Fasten off and weave in ends.
Placement: With the right side of the hat facing you, count 12 sts to the left of the first earflap. Attach yarn with a sl st and repeat Rows 1–8 above to create the second earflap.
Finish by working sc around entire hat including earflaps. Be sure to work 2 sc in each corner where the earflap attaches to the hat. Fasten off and weave in all ends.
6 – 12 Months
Entire hat will be worked in continuous rounds do not join. After the increase rounds you will find the top of the hat may be rippled this will straighten out as additional rounds are added.
Use stitch markers at the beginning of each round for easier counting.
Using 6.5 mm crochet hook ch 2
Rnd 1: Work 11 hdc in 2nd ch from hook (11)
Rnd 2: (tc, sc) in 1st and each st around (22)
Rnd 3: (tc, sc) in 1st tc *sk next st (tc, sc) in next tc* rpt from *to* to end of rnd (22)
Rnd 4: (tc, sc) in 1st st and each st around (44)
Rnds 5-11: (tc, sc) in 1st tc *sk next st (tc, sc) in next tc* rpt from *to* to end of rnd (44)
Change to 6.00 mm crochet hook
Rnd 12: Sc in 1st st and each st around. Do not fasten off, continue with earflaps below.
Earflaps – Will be worked in rows
Row 1: Sl st in the next st, ch 1, sc in the same space (counts as 1st sc), sc in the next 7 sts, ch 1, turn (8 sts).
Rows 2–8: Skip the 1st sc at the start of each row, sc across, ch 1, turn. Continue until 1 st remains. Fasten off and weave in ends.
Placement: With the right side of the hat facing you, count 14 sts to the left of the first earflap. Attach yarn with a sl st and repeat Rows 1–8 above to create the second earflap.
Finish by working sc around entire hat including earflaps. Be sure to work 2 sc in each corner where the earflap attaches to the hat. Fasten off and weave in all ends.
1 – 3 Years
Entire hat will be worked in continuous rounds do not join. After the increase rounds you will find the top of the hat may be rippled this will straighten out as additional rounds are added.
Use stitch markers at the beginning of each round for easier counting.
Using 6.5 mm crochet hook ch 2
Rnd 1: Work 12 dc in 2nd ch from hook (12)
Rnd 2: (tc, sc) in 1st and each st around (24)
Rnd 3: (tc, sc) in 1st tc *sk next st (tc, sc) in next tc* rpt from *to* end of rnd (24)
Rnd 4: (tc, sc) in 1st and each st around (48)
Rnds 5-12: (tc, sc) in 1st tc *sk next st (tc, sc) in next tc* rpt from *to* end of rnd (48)
Change to 6.00 mm crochet hook
Rnd 13: Sc in 1st st and each st around. Do not fasten off, continue with earflaps below.
Earflaps – Will be worked in rows
Row 1: Sl st in the next st, ch 1, sc in the same space (counts as 1st sc), sc in the next 9 sts, ch 1, turn (10 sts).
Rows 2–10: Skip the 1st sc at the start of each row, sc across, ch 1, turn. Continue until 1 st remains. Fasten off and weave in ends.
Placement: With the right side of the hat facing you, count 16 sts to the left of the first earflap. Attach yarn with a sl st and repeat Rows 1–10 above to create the second earflap.
Finish by working sc around entire hat including earflaps. Be sure to work 2 sc in each corner where the earflap attaches to the hat. Fasten off and weave in all ends.
3 -10 Years
Entire hat will be worked in continuous rounds do not join. After the increase rounds you will find the top of the hat may be rippled this will straighten out as additional rounds are added.
Use stitch markers at the beginning of each round for easier counting.
Using 6.5 mm crochet hook Ch 2
Rnd 1: Work 14 dc in 2nd st from hook (14)
Rnd 2: (tc, sc) in 1st and each st around (28)
Rnd 3: (tc, sc), in 1st tc *sk next st, (tc, sc) in next tc* rpt from *to* end of rnd (28)
Rnd 4: (tc, sc) in 1st st and each st around (56)
Hat may look rippled at this point – don’t worry it will take a normal shape as you continue adding rounds.
Rnds 5-13: (tc, sc) in 1st tc *sk next st, (tc, sc) in next tc* rpt from *to* end of rnd (56) Do not fasten off, continue with earflaps below.
Change to 6.00 mm crochet hook
Rnd 14: Sc in 1st st and each st around.
Earflaps – Will be worked in rows
Row 1: Sl st in the next st, ch 1, sc in the same space (counts as 1st sc), sc in the next 13 sts, ch 1, turn (14 sts).
Rows 2–14: Skip the 1st sc at the start of each row, sc across, ch 1, turn. Continue until 1 st remains. Fasten off and weave in ends.
Placement: With the right side of the hat facing you, count 18 sts to the left of the first earflap. Attach yarn with a sl st and repeat Rows 1–14 above to create the second earflap.
Finish by working sc around entire hat including earflaps. Be sure to work 2 sc in each corner where the earflap attaches to the hat. Fasten off and weave in all ends.
Adult
Entire hat will be worked in continuous rounds do not join. After the increase rounds you will find the top of the hat may be rippled this will straighten out as additional rounds are added.
Use stitch markers at the beginning of each round for easier counting.
Using 6.5 mm crochet hook Ch 2
Rnd 1: Work 15 dc in 2nd st from hook (15)
Rnd 2: (tc, sc) in 1st and each st around (30)
Rnd 3: (tc, sc) in 1st tc, *sk next st, (tc, sc) in next tc* rpt from *to* end of rnd (30)
Rnd 4: (tc, sc) in 1st st and each st around (60)
Hat may look rippled at this point – don’t worry it will take a normal shape as you continue adding rounds.
Rnds 5-14: (tc, sc) in 1st tc *sk next st, (tc, sc) in next tc* rpt from *to* end of rnd (60)
Change to 6.00 mm crochet hook
Rnd 15: Sc in 1st st and each st around. Do not fasten off, continue with earflaps below.
Earflaps – Will be worked in rows
Row 1: Sl st in the next st, ch 1, sc in the same space (counts as 1st sc), sc in the next 13 sts, ch 1, turn (14 sts).
Rows 2–14: Skip the 1st sc at the start of each row, sc across, ch 1, turn. Continue until 1 st remains. Fasten off and weave in ends.
Placement: With the right side of the hat facing you, count 20 sts to the left of the first earflap. Attach yarn with a sl st and repeat Rows 1–14 above to create the second earflap.
Finish by working sc around entire hat including earflaps. Be sure to work 2 sc in each corner where the earflap attaches to the hat. Fasten off and weave in all ends.
This beautiful hat is not only a winter staple but also a fun and rewarding new project to add to your list. Whether you’re crocheting for yourself, your family, or for special events, this pattern is sure to become a favorite. Don’t forget to share your finished piece with me—I love seeing how you make it your own!
This hat is so cute. Where is the pattern?