


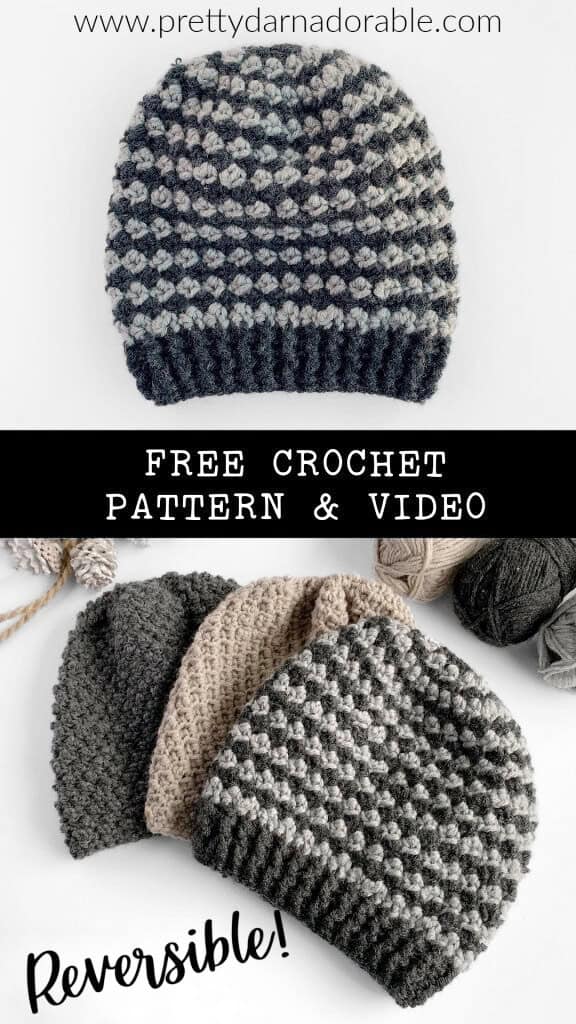
The Cumberland Free Crochet Slouch Hat Pattern is like a blank canvas, just waiting for you to unleash your creativity with wild colours and fun textures. Whether you’re into stripes, bobbles, or classic looks, you can whip up a one-of-a-kind hat that’ll have everyone saying “Where’d you get that?
This free crochet hat pattern is easy to make and has a relaxed, slouchy. This top-down crochet hat is perfect for beginners and experienced crocheters alike! Designed with a classic shape and simple stitches, it’s an ideal project to add to your collection.
For this girls and guys crochet free hat pattern, you’ll need worsted weight yarn for a soft yet structured result. Grab a 5.5 mm crochet hook (or the hook size required to match gauge) to get started. This pattern is designed to be flexible with multiple sizes included, from baby to adult, so you can easily create the right fit for anyone. Each size comes with specific stitch counts and instructions to make following the pattern as smooth as possible.

And the best part? You’ll stay warm and toasty thanks to the soft, snuggly worsted weight yarn. Perfect for those chilly days when you need a little extra something to keep your noggin warm.
This pattern is a cinch, even for newbie crocheters. And if you need a hand, I’ve got a video tutorial for the adult size that makes it a breeze. So what are you waiting for? Let’s get started and make a cozy and stylish slouch hat that’ll have everyone talking!
Watch Video Tutorial Here
Tips for beginner crocheters! Watch the video all the way through a few times so that you know what to expect.
How to print this pattern
If you’re looking for a crochet pattern that you can take with you anywhere, and that is easy to read and follow, then look no further!
I’ve created an INEXPENSIVE ad-free version of my popular crochet pattern that you can easily download from Etsy. This way, you can mark up the pattern as needed without any distractions, and enjoy crocheting it wherever you go.
Thanks so much for supporting my blog!
- Add Pattern to your Ravelry Library
- Download on Etsy
- Pin Now Make Later
How to personalize
The Cumberland is perfect for personalizing with stripes. You can add a pop of personality to this hat by experimenting with different colours and patterns. Whether you’re inspired by the changing seasons, your favourite sports team, or just want to show off your holiday spirit, adding stripes to your hats is a fun and easy way to do so.
Pastel colours for spring, red and green for Christmas, blue and yellow for your favourite sports team – the possibilities are endless! And if you’re feeling a little uninspired, have no fear! Websites like Adobe Colour and Canva Color Palette Generator are here to help. Just enter a colour or image that you love, and voila! You’ll have a whole host of gorgeous colour combinations to choose from for your stripey hat.
Be sure to play around and see what you like best. The beauty of crochet is that you can always take it out and start again if you don’t like the way it’s turning out. So don’t be afraid to mix and match colours, try different stripe patterns, and have some fun with it! With a little creativity, you can create a one-of-a-kind accessory that will make everyone who sees it say, “Wow, that hat is so cool! Who made it?” And you can proudly reply, “I did!”
Designers Notes
💕 Skill Level is Beginner
💕 Skills Needed double crochet, single crochet, triple crochet
💕 Adult Size
💕 Made with worsted weight yarn
💕 Unisex crochet hat pattern
💕 Written in Standard American terms
Construction of this hat
The top-down spiral! This technique is a total breeze for beginners, especially because you won’t have to worry about those pesky seams up the back of your hat. Yup, you heard that right, no more joining or turning for you!
Working in a spiral shape makes it super easy to keep track of your stitches. And let’s be real, who wants to lose count and end up with a hat that looks more like a wobbly bowl? Not us! With the top-down spiral method, you’ll be able to focus on perfecting your crochet skills and creating a hat that’ll make you the envy of all your friends.
The top-down spiral method is a total win-win – you’ll have a blast making it and look amazing wearing it!

Free Crochet Pattern – Cumberland Slouch Hat
Skill Level
Beginner
Abbreviations
- ch – chain
bpdc – back post double crochet
dc – double crochet - fpdc – front post double crochet
- rnd – round
sc – single crochet - sk – skip
sp – space
st – stitch
sts – stitches
slst – slip stitch
tc – triple crochet - rpt – repeat
Size
Adult 10.5″ x 21″
Pattern Gauge
Must be met to ensure proper sizing
A gauge swatch is vital for a well-fitting crochet hat. It determines stitch tension and measures the number of stitches and rows. Comparing it to the pattern’s gauge ensures the final hat fits as desired. Adjust hook or tension if needed for a perfectly fitting hat.
Because the texture of this hat can only be worked in rounds the gauge will be based on a swatch of rows made in single crochet.
The number or rows is not needed for this swatch as you will be working the number or rounds based on a measurement and not a round count. But it is recommended to do at least 6 rows for your gauge swatch.
16 sts = 4 inch across (10 cm) in Single Crochet
Materials Needed
- 100 grams worsted weight yarn
- Yarns used and tested for this pattern
- Vannas Choice
- Lion’s Brand Wool Ease
- Tapestry Needle
- Stitch Markers
- Scissors
- Bernat Premium
- Measuring Tape
- 6.00 mm crochet hook
- Pom poms (optional)
Yarn Gauge
Gauge must be matched for the correct fit of this hat, matching the recommended yarn gauge can assist in successful substitution and result in a more accurate finished product.
Crochet YARN Gauge (4in x 4in)
16 sts / 10 cm (4″)
Please note that the actual amount of yarn needed may change depending on the yarn chosen always purchase a little more than you think you may need.
Finished Measurements & Yarn Requirements
0 to 3 months:
- Width: 14”
- Height: 8.5”
- Yarn: 50g, 78m, 1.76 oz, 85 yds
3 to 6 months:
- Width: 16”
- Height: 8.5”
- Yarn: 55g, 86m, 1.94 oz, 94 yds
6 to 12 months:
- Width: 17”
- Height: 9”
- Yarn: 60g, 94m, 2.12 oz, 102 yds
12 months to 3 yrs:
- Width: 18”
- Height: 9.5”
- Yarn: 80g, 125m, 2.82 oz, 137 yds
3 to 10 yrs:
- Width: 19”
- Height: 10”
- Yarn: 90g, 140m, 3.17 oz, 154 yds
Adult:
- Yarn: 100g, 156m, 3.53 oz, 171 yds
- Width: 21”
- Height: 10.5”
Please note that the actual amount of yarn needed may change depending on the yarn chosen always purchase a little more than you think you may need..

0 – 3 Months
Entire hat will be worked in continuous rounds. After the increase rounds you will find the top of the hat may be rippled; this will straighten out as additional rounds are added.
Use stitch markers at the beginning of each round for easier counting. Do not join and do not turn.
For striped version make colour changes every round.
If you are making the bobble version the texture of the hat will be on the inside.
Using 6.0 mm hook ch 2
Rnd 1: Work 10 hdc in 2nd ch from hook. (10)
Rnd 2: (tc, sc) in 1st st and each st around (20)
Rnd 3: (tc, sc) in 1st tc *sk next st (tc, sc) in next tc* rpt from *to* to end of rnd (20)
Rnd 4: (tc, sc) in 1st st and each st around (40) Hat will look rippled at this point – don’t worry, it will take a normal shape as you continue adding rounds.
Rnd 5: (tc, sc) in 1st tc *sk next st (tc, sc) in next tc* rpt from *to* to end of rnd (40)
Repeat round 5 until hat measures 8.5 inches from crown to bottom of hat.
Ribbed Band (optional)
Rnd 1: Dc in 1st and each st around. Join with slst to 1st dc. Ch 2 Do not turn. (40)
Rnd 2: Fpdc in 1st st, bpdc in next. *fpdc in next st, bpdc in next* rpt from *to* until end of rnd. Join with slst to 1st fpdc, fasten off and weave in ends. (40)
Finishing round (optional): If you are making the bobble version the texture of the hat will be on the inside. You will want to join with a slst and turn your work before working your last round so that the final round of single crochet is on the right/outside of the hat.
3 – 6 Months
Entire hat will be worked in continuous rounds. After the increase rounds you will find the top of the hat may be rippled; this will straighten out as additional rounds are added.
Use stitch markers at the beginning of each round for easier counting. Do not join and do not turn.
For striped version make colour changes every round. Be sure to pull yarn to the opposite side you will have facing out so that colour changes will not show.
If you are making the bobble version the texture of the hat will be on the inside.
Using 6.0 mm hook ch 2
Rnd 1: Work 11 hdc in 2nd ch from hook (11)
Rnd 2: (tc, sc) in 1st and each st around (22)
Rnd 3: (tc, sc) in 1st tc *sk next st (tc, sc) in next tc* rpt from *to* to end of rnd (22)
Rnd 4: (tc, sc) in 1st st and each st around (44) Hat will look rippled at this point – don’t worry, it will take a normal shape as you continue adding rounds.
Rnd 5: (tc, sc) in 1st tc *sk next st (tc, sc) in next tc* rpt from *to* to end of rnd (44)
Repeat round 5 until hat measures 8.5 inches from crown to bottom of hat.
Ribbed Band (optional)
Rnd 1: Dc in 1st and each st around. Join with slst to 1st dc. Ch 2, turn. (44)
Rnd 2: Fpdc in 1st st, bpdc in next. *fpdc in next st, bpdc in next* rpt from *to* until end of rnd. Join with slst to 1st fpdc, fasten off and weave in ends. (44)
Finishing round (optional): If you are making the bobble version the texture of the hat will be on the inside. You will want to join with a slst and turn your work before working your last round so that the final round of single crochet is on the right/outside of the hat.
6 – 12 Months
Entire hat will be worked in continuous rounds. After the increase rounds you will find the top of the hat may be rippled; this will straighten out as additional rounds are added.
Use stitch markers at the beginning of each round for easier counting. Do not join and do not turn.
For striped version make colour changes every round. Be sure to pull yarn to the opposite side you will have facing out so that colour changes will not show.
If you are making the bobble version the texture of the hat will be on the inside.
Using 6.0 mm hook ch 2
Rnd 1: Work 12 dc in 2nd ch from hook (12)
Rnd 2: (tc, sc) in 1st and each st around (24)
Rnd 3: (tc, sc) in 1st tc *sk next st (tc, sc) in next tc* rpt from *to* until end of rnd (24)
Rnd 4: (tc, sc) in 1st and each st around (48) Hat will look rippled at this point – don’t worry, it will take a normal shape as you continue adding rounds.
Rnd 5: (tc, sc) in 1st tc *sk next st (tc, sc) in next tc* rpt from *to* until end of rnd (48)
Repeat round 5 until hat measures 9 inches from crown to bottom of hat.
Ribbed Band (optional)
Rnd 1: Dc in 1st and each st around. Join with slst to 1st dc. Ch 2 Do not turn. (48)
Rnd 2: Fpdc in 1st st, bpdc in next. *fpdc in next st, bpdc in next* rpt from *to* until end of rnd. Join with slst to 1st fpdc, fasten off and weave in ends. (48)
Finishing round (optional): If you are making the bobble version the texture of the hat will be on the inside. You will want to join with a slst and turn your work before working your last round so that the final round of single crochet is on the right/outside of the hat.
12 Months – 3 Years
Entire hat will be worked in continuous rounds. After the increase rounds you will find the top of the hat may be rippled; this will straighten out as additional rounds are added.
Use stitch markers at the beginning of each round for easier counting. Do not join and do not turn.
For striped version make colour changes every round. Be sure to pull yarn to the opposite side you will have facing out so that colour changes will not show.
If you are making the bobble version the texture of the hat will be on the inside.
Using 6.0 mm hook ch 2
Rnd 1: Work 7 sc in 2nd st from hook (7)
Rnd 2: 1 hdc in 1st st, (tc, sc) in each st around (13)
Rnd 3: (tc, sc) in 1st and each st around (26)
Rnd 4: (tc, sc) in 1st tc *sk next st (tc, sc) in next tc* rpt from *to* until end of rnd (26)
Rnd 5: (tc, sc) in 1st and each st around (52). Hat will look rippled at this point – don’t worry, it will take a normal shape as you continue adding rounds.
Rnd 6: (tc, sc) in 1st tc *sk next st (tc, sc) in next tc* rpt from *to* until end of rnd (52)
Repeat round 6 until hat measures 9.5 inches from crown to bottom of hat.
Ribbed Band (optional)
Rnd 1: Dc in 1st and each st around. Join with slst to 1st dc. Ch 2 Do not turn. (52)
Rnds 2-3: Fpdc in 1st st, bpdc in next. *fpdc in next st, bpdc in next* rpt from *to* until end of rnd. Join with slst to 1st fpdc. Ch 2 Do not turn. (52)
After round 3 of band fasten off and weave in ends.
Finishing round (optional): If you are making the bobble version the texture of the hat will be on the inside. You will want to join with a slst and turn your work before working your last round so that the final round of single crochet is on the right/outside of the hat.
3 – 10 Years
Entire hat will be worked in continuous rounds. After the increase rounds you will find the top of the hat may be rippled; this will straighten out as additional rounds are added.
Use stitch markers at the beginning of each round for easier counting. Do not join and do not turn.
For striped version make colour changes every round. Be sure to pull yarn to the opposite side you will have facing out so that colour changes will not show.
If you are making the bobble version the texture of the hat will be on the inside.
Using 6.0 mm hook Ch 2
Rnd 1: Work 14 dc in 2nd st from hook (14)
Rnd 2: (tc, sc) in 1st and each st around (28)
Rnd 3: (tc, sc), in 1st tc *sk next st, (tc, sc) in next tc* rpt from *to* until end of rnd (28)
Rnd 4: (tc, sc) in 1st st and each st around (56) Hat will look rippled at this point – don’t worry, it will take a normal shape as you continue adding rounds.
Rnd 5: (tc, sc) in 1st tc *sk next st, (tc, sc) in next tc* rpt from *to* until end of rnd (56)
Repeat round 5 until hat measures 10 inches from crown to bottom of hat.
Ribbed Band (optional)
Rnd 1: Dc in 1st and each st around. Join with slst to 1st dc. Ch 2 Do not turn. (56)
Rnds 2-4: Fpdc in 1st st, bpdc in next. *fpdc in next st, bpdc in next* rpt from *to* until end of rnd. Join with slst to 1st fpdc. Ch 2 Do not turn. (56)
After round 4 of band fasten off and weave in ends.
Finishing round (optional): If you are making the bobble version the texture of the hat will be on the inside. You will want to join with a slst and turn your work before working your last round so that the final round of single crochet is on the right/outside of the hat.
Adult
Entire hat will be worked in continuous rounds. After the increase rounds you will find the top of the hat may be rippled; this will straighten out as additional rounds are added.
Use stitch markers at the beginning of each round for easier counting. Do not join and do not turn.
For striped version make colour changes every round. Be sure to pull yarn to the opposite side you will have facing out so that colour changes will not show.
If you are making the bobble version the texture of the hat will be on the inside.
Using 6.0 mm hook Ch 2
Rnd 1: Work 15 dc in 2nd st from hook (15)
Rnd 2: (tc, sc) in 1st and each st around (30)
Rnd 3: (tc, sc) in 1st tc, *sk next st, (tc, sc) in next tc* rpt from *to* until end of rnd (30)
Rnd 4: (tc, sc) in 1st st and each st around (60) Hat will look very rippled at this point – don’t worry, it will take a normal shape as you continue adding rounds.
Rnd 5: (tc, sc) in 1st tc *sk next st, (tc, sc) in next tc* rpt from *to* until end of rnd (60)
Repeat round 5 until hat measures 10.5 inches from crown to bottom of hat.
Ribbed Band (optional)
Rnd 1: Dc in 1st and each st around. Join with slst to 1st dc. Ch 2 Do not turn. (60)
Rnd 2-5: Fpdc in 1st st, bpdc in next. *fpdc in next st, bpdc in next* rpt from *to* until end of rnd. Join with slst to 1st fpdc. Ch 2 Do not turn. (60)
After round 5 of band fasten off and weave in ends.
Finishing round (optional)
If you are making the bobble version the texture of the hat will be on the inside. You will want to join with a slst and turn your work before working your last round so that the final round of single crochet is on the right/outside of the hat.
A couple of abbreviations are missing from the list:
fpdc – front post double crochet
bpdc – back post double crochet
Absolutely! Thank you so much for catching that!
I really appreciate you taking the time to point it out.
I’ve added the missing abbreviations to the list:
fpdc – front post double crochet
bpdc – back post double crochet
Thanks so much again!