


I am excited to be adding my crochet elephant hat pattern to the blog for you! This is one of my original designs that was super popular along with the Buddy Bear Hat and Chunky Bunny Hat. If you are looking for a matching diaper cover I have you covered. HAHA see what I did there? Not only is this hat super cute and unique, but it is also warm and cozy, perfect for those chilly days.
This elephant hat and diaper cover set makes for a great shower gift for new moms, a unique photo prop for babies’ first photos, or even a special keepsake for the baby to treasure for years to come. And, it’s a great way to add a little bit of personality to your baby’s everyday wear.
So, grab your crochet hooks and yarn, and let’s get started on creating something special for the little one in your life. As always, happy crocheting!
- Add Pattern to your Ravelry Library
- Download on Etsy
- Pin Now Make Later

It seems that lately, herds of cute little elephants have been stomp-stomp-stomping their way into baby items and nursery décor.
Why not carry this theme over to baby/toddler accessories as well? These big, floppy ears are sure to draw a stampede of smiles. And the pretty, textured stitch sets this hat apart from the other basic, crocheted baby hats.
Crochet this adorable elephant hat as a baby gift that’s guaranteed to draw an “Awww!” or two. Also makes a charming and unique photo prop!
This crochet elephant hat pattern is truly so easy to make. Using a simple combination of single and double crochet you will get this adorable texture. Why not add a little extra snazz to your hats with this unique texture.
I have included multiple sizes from preemie to toddler making it a great hat for siblings too!
DESIGNERS NOTES
💕 Skill Level is Beginner
💕 Skills Needed single crochet, half double crochet, reverse single crochet (optional) double crohet
💕 Sizes Preemie to 3 Years
💕 Made with bulky weight yarn
💕 All sizes written individually
💕 Unisex crochet hat pattern
💕 Written in Standard American terms
💕 Easily sub worsted weight yarn
Skill Level
Easy
Abbreviations
- ch – chain
- dec – decrease
- dc – double crochet
- hdc – half double crochet
- sc – single crochet
- sk – skip
- st – stitch
- sts – stitches
- sl st – slip stitch
- rsc – reverse single crochet
- rpt – repeat
- sc2tog – single crochet 2 together
Gauge
4” x 4” = 10 sts x 11 rows
Materials Needed
- 6.5 mm hook
- Tapestry Needle
- Stitch Markers
- 100 g – main colour 5 Bulky yarn
- 10 g – contrast colour 5 bulky yarn
Finished Measurements
- Preemie 14” x 4 1/2”
- Newborn to 6 Months 16” x 5 1/2”
- 6 to 12 Months 17” x 6 1/2”
- 1 to 3 Years 18” x 7 1/2”
Little Extras
SPECIAL STITCH
Sk st, (sc, dc) in next, sk nest st, (sc, dc) in next
rsc – reverse single crochet
With right side facing, work left to right. Insert hook in next stitch to the right, yarn over, draw yarn through stitch, yarn over and draw through two loops on hook. 1 rsc made.
EAR ASSEMBLY
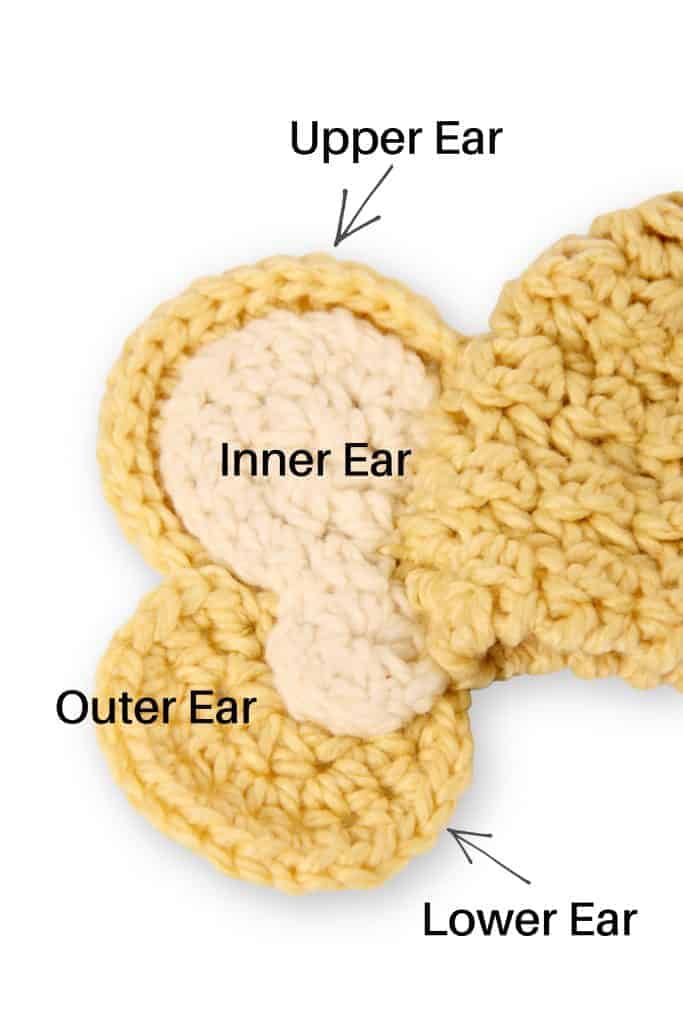
Preemie Crochet Elephant Hat Pattern
Ch 2
Rnd 1: Work 8 hdc in 2nd st from hook (8)
Rnd 2: 2 sc in 1st and each st around, join with sl st, ch 1 turn (16)
Rnd 3: Sk 1st st, (sc, dc) in next st *sk next st *(sc, dc) in next st* rpt from *to* end of rnd, join with sl st, ch 1 turn (16)
Rnd 4: 2 sc in 1st st and each st around (32), join with sl st, ch 1 turn
Rnd 5: Sk 1st st, (sc, dc) in next st *sk next st *(sc, dc) in next st* rpt from *to* end of rnd, join with sl st, ch 1 turn (32)
From this point forward be sure to work (sc,dc) in dc st
Rnd 6: Sk 1st st, (sc, dc) in next dc *sk next st *(sc, dc) in next dc* rpt from *to* end of rnd, join with sl st, ch 1 turn (32)
Rnd 7: Sk 1st st, (sc, dc) in next dc *sk next st *(sc, dc) in next dc* rpt from *to* end of rnd, join with sl st, ch 1 turn (32)
Rnd 8: Sk 1st st, (sc, dc) in next dc *sk next st *(sc, dc) in next dc* rpt from *to* end of rnd, join with sl st, ch 1 turn (32)
Rnd 9: Sk 1st st, (sc, dc) in next dc *sk next st *(sc, dc) in next dc* rpt from *to* end of rnd, join with sl st, ch 1 turn (32)
Rpt rounds 8 and 9 once.
Join yarn at fasten off point at back of hat. Working left to right rsc in each st around.
PREEMIE ELEPHANT EARS
Work in rounds and join final rounds with slip stitch and fasten off.
OUTER EAR
Upper Ear
Ch 2
Rnd 1: 8 hdc in 2nd ch from hook (8)
Rnd 2: 2 hdc in 1st st and each st around (16)
Rnd 3: 1 hdc in 1st st, *2 hdc in next, 1 hdc next st* rpt from * to * to end (24)
Lower Ear
Ch 2
Rnd 1: 8 hdc in 2nd ch from hook (8)
Rnd 2: 2 hdc in 1st st, and each st around (16)
INNER EAR
Upper Ear
Ch 2
Rnd 1: 8 hdc in 2nd ch from hook (8)
Rnd 2: 2 hdc in 1st st and each st around (16)
Lower Ear
Ch 2
Rnd 1: 8 hdc in 2nd ch from hook (8)
Ear Assembly: Use photos on page 5 of pattern for guide.
Step 1: Attach upper and lower lobe together for both inner and outer ear.
Step 2: Stitch inner ear to outer ear.
Step 3: Stitch ear to hat, fasten off and weave in all ends.
- Add Pattern to your Ravelry Library
- Download on Etsy
- Pin Now Make Later

Newborn to 6 Months Crochet Elephant Hat Pattern
Ch 2 Rnd 1: Work 8 hdc in 2nd st from hook (8)
Rnd 2: 2 sc in 1st and each st around, join with sl st, ch 1 turn (16)
Rnd 3: Sk 1st st, (sc, dc) in next st *sk next st *(sc, dc) in next st* rpt from *to* end of rnd, join with sl st, ch 1 turn (16)
Rnd 4: 2 sc in 1st st and each st around (32), join with sl st, ch 1 turn
Rnd 5: Sk 1st st, (sc, dc) in next st *sk next st *(sc, dc) in next st* rpt from *to* end of rnd, join with sl st, ch 1 turn (32)
Rnd 6: Sc in first 3 sts *2 sc in next st, sc in next 3 sts* rpt from *to* till end of rnd, join with sl st, ch 1 turn (40)
From this point forward be sure to work (sc,dc) in dc st
Rnd 7: Sk 1st st, (sc, dc) in next dc *sk next st *(sc, dc) in next dc* rpt from *to* end of rnd, join with sl st, ch 1 turn (40)
Rnd 8: Sk 1st st, (sc, dc) in next dc *sk next st *(sc, dc) in next dc* rpt from *to* end of rnd, join with sl st, ch 1 turn (40)
Rnd 9: Sk 1st st, (sc, dc) in next dc *sk next st *(sc, dc) in next dc* rpt from *to* end of rnd, join with sl st, ch 1 turn (40)
Rnd 10: Sk 1st st, (sc, dc) in next dc *sk next st *(sc, dc) in next dc* rpt from *to* end of rnd, join with sl st, ch 1 turn (40)
Rnd 11: Sk 1st st, (sc, dc) in next dc *sk next st *(sc, dc) in next dc* rpt from *to* end of rnd, join with sl st, ch 1 turn (40)
Rnd 12: Sk 1st st, (sc, dc) in next dc *sk next st *(sc, dc) in next dc* rpt from *to* end of rnd, join with sl st, ch 1 turn (40)
Rnd 13: Sk 1st st, (sc, dc) in next dc *sk next st *(sc, dc) in next dc* rpt from *to* end of rnd, join with sl st, ch 1 turn (40)
Rnd 14: Sk 1st st, (sc, dc) in next dc *sk next st *(sc, dc) in next dc* rpt from *to* end of rnd, join with sl st, ch 1 turn (40)
Rnd 15: Hdc in 1st st and each st around (40)
Rnd 16: Rsc in 1st and each st around, join with slst and fasten off.
ELEPHANT EARS
Work in rounds and join final round with slip stitch and fasten off.
OUTER EAR
Upper Ear
Ch 2
Rnd 1: 8 hdc in 2nd ch from hook (8)
Rnd 2: 2 hdc in 1st st and each st around (16)
Rnd 3: 2 hdc in 1st st and each st around (32)
Lower Ear
Ch 2
Rnd 1: 8 hdc in 2nd ch from hook (8)
Rnd 2: 2 hdc in 1st st and each st around (16)
Rnd 3: 1 sc in 1st st, *2 sc in next, 1 sc next st* rpt from * to * to end (24)
INNER EAR
Upper Ear
Ch 2
Rnd 1: 8 hdc in 2nd ch from hook (8)
Rnd 2: 2 sc in 1st st and each st around (16)
Rnd 3: sc in 1st st and each st around (16)
Lower Ear
Ch 2
Rnd 1: 8 hdc in 2nd ch from hook (8)
Rnd 2: 2 sc in 1st st and each st around (16)
Ear Assembly: Use photos on page 5 of pattern for guide.
Step 1: Attach upper and lower lobe together for both inner and outer ear.
Step 2: Stitch inner ear to outer ear.
Step 3: Stitch ear to hat, fasten off and weave in all ends.

Most Helpful
Crochet Resources
6 to 12 Months Crochet Elephant Hat Pattern
Ch 2
Rnd 1: Work 8 hdc in 2nd st from hook (8)
Rnd 2: 2 sc in 1st and each st around, join with sl st, ch 1 turn (16)
Rnd 3: Sk 1st st, (sc, dc) in next st *sk next st *(sc, dc) in next st* rpt from *to* end of rnd, join with sl st, ch 1 turn (16)
Rnd 4: 2 sc in 1st st and each st around (32), join with sl st, ch 1 turn
Rnd 5: Sk 1st st, (sc, dc) in next st *sk next st *(sc, dc) in next st* rpt from *to* end of rnd, join with sl st, ch 1 turn (32)
Rnd 6: Sc in first 3 sts *2 sc in next st, sc in next 3 sts* rpt from *to* till end of rnd (40) join with slt st, ch 1 turn
Rnd 7: Sk 1st st, (sc, dc) in next st *sk next st *(sc, dc) in next st* rpt from *to* end of rnd, join with sl st, ch 1 turn (40)
Rnd 8: Sc in first 7 sts *2 sc in next st, sc in next 7 sts* rpt from *to* till end of rnd (44) join with sl st, ch 1 turn
From this point forward be sure to work (sc,dc) in dc st
Rnd 9: Sk 1st st, (sc, dc) in next dc *sk next st *(sc, dc) in next dc* rpt from *to* end of rnd, join with sl st, ch 1 turn (44)
Rnd 10: Sk 1st st, (sc, dc) in next dc *sk next st *(sc, dc) in next dc* rpt from *to* end of rnd, join with sl st, ch 1 turn (44)
Rnd 11: Sk 1st st, (sc, dc) in next dc *sk next st *(sc, dc) in next dc* rpt from *to* end of rnd, join with sl st, ch 1 turn (44)
Rnd 12: Sk 1st st, (sc, dc) in next dc *sk next st *(sc, dc) in next dc* rpt from *to* end of rnd, join with sl st, ch 1 turn (44)
Rnd 13: Sk 1st st, (sc, dc) in next dc *sk next st *(sc, dc) in next dc* rpt from *to* end of rnd, join with sl st, ch 1 turn (44)
Rnd 14: Sk 1st st, (sc, dc) in next dc *sk next st *(sc, dc) in next dc* rpt from *to* end of rnd, join with sl st, ch 1 turn (44)
Rnd 15: Sk 1st st, (sc, dc) in next dc *sk next st *(sc, dc) in next dc* rpt from *to* end of rnd, join with sl st, ch 1 turn (44)
Rnd 16: Sk 1st st, (sc, dc) in next dc *sk next st *(sc, dc) in next dc* rpt from *to* end of rnd, join with sl st, ch 1 turn (44)
ELEPHANT EARS
Work in rounds and join final rounds with slip stitch and fasten off.
OUTER EAR
Upper Ear
Ch 2
Rnd 1: 8 hdc in 2nd ch from hook (8)
Rnd 2: 2 hdc in 1st st and each st around (16)
Rnd 3: 2 hdc in 1st st and each st around (32)
Lower Ear
Ch 2
Rnd 1: 8 hdc in 2nd ch from hook (8)
Rnd 2: 2 hdc in 1st st and each st around (16)
Rnd 3: 1 sc in 1st st, *2 sc in next, 1 sc next st* rpt from * to * to end (24)
INNER EAR
Upper Ear
Ch 2
Rnd 1: 8 hdc in 2nd ch from hook (8)
Rnd 2: 2 sc in 1st st and each st around (16)
Rnd 3: sc in 1st st and each st around (16)
Lower Ear
Ch 2
Rnd 1: 8 hdc in 2nd ch from hook (8)
Rnd 2: 2 sc in 1st st and each st around (16)
Ear Assembly: Use photos on page 5 of pattern for guide.
Step 1: Attach upper and lower lobe together for both inner and outer ear.
Step 2: Stitch inner ear to outer ear.
Step 3: Stitch ear to hat, fasten off and weave in all ends.
1 to 3 Years Crochet Elephant Hat Pattern
Ch 2
Rnd 1: Work 8 hdc in 2nd st from hook (8)
Rnd 2: 2 sc in 1st and each st around, join with sl st, ch 1 turn (16)
Rnd 3: Sk 1st st, (sc, dc) in next st *sk next st *(sc, dc) in next st* rpt from *to* end of rnd, join with sl st, ch 1 turn (16)
Rnd 4: 2 sc in 1st st and each st around (32), join with sl st , ch 1 turn
Rnd 5: Sk 1st st, (sc, dc) in next st *sk next st *(sc, dc) in next st* rpt from *to* end of rnd, join with sl st, ch 1 turn (32)
Rnd 6: Sc in 1st st *2 sc in next st, sc in next st* (48) join with slt st, ch 1 turn
Rnd 7: Sk 1st st, (sc, dc) in next st *sk next st *(sc, dc) in next st* rpt from *to* end of rnd, join with sl st, ch 1 turn (48)
From this point forward be sure to work (sc,dc) in dc st
Rnd 8: Sk 1st st, (sc, dc) in next dc *sk next st *(sc, dc) in next dc* rpt from *to* end of rnd, join with sl st, ch 1 turn (48)
Rnd 9: Sk 1st st, (sc, dc) in next dc *sk next st *(sc, dc) in next dc* rpt from *to* end of rnd, join with sl st, ch 1 turn (48)
Rnd 10: Sk 1st st, (sc, dc) in next dc *sk next st *(sc, dc) in next dc* rpt from *to* end of rnd, join with sl st, ch 1 turn (48)
Rnd 11: Sk 1st st, (sc, dc) in next dc *sk next st *(sc, dc) in next dc* rpt from *to* end of rnd, join with sl st, ch 1 turn (48)
Rnd 12: Sk 1st st, (sc, dc) in next dc *sk next st *(sc, dc) in next dc* rpt from *to* end of rnd, join with sl st, ch 1 turn (48)
Rnd 13: Sk 1st st, (sc, dc) in next dc *sk next st *(sc, dc) in next dc* rpt from *to* end of rnd, join with sl st, ch 1 turn (48)
Rnd 14: Sk 1st st, (sc, dc) in next dc *sk next st *(sc, dc) in next dc* rpt from *to* end of rnd, join with sl st, ch 1 turn (48)
Rnd 15: Sk 1st st, (sc, dc) in next dc *sk next st *(sc, dc) in next dc* rpt from *to* end of rnd, join with sl st, ch 1 turn (48)
Rnd 16: Sk 1st st, (sc, dc) in next dc *sk next st *(sc, dc) in next dc* rpt from *to* end of rnd, join with sl st, ch 1 turn (48)
Rnd 17: Sk 1st st, (sc, dc) in next dc *sk next st *(sc, dc) in next dc* rpt from *to* end of rnd, join with sl st, ch 1 turn (48)
ELEPHANT EARS
Work in rounds and join final rounds with slip stitch and fasten off.
OUTER EAR
Upper Ear
Ch 2
Rnd 1: 8 hdc in 2nd ch from hook (8)
Rnd 2: 2 hdc in 1st st and each st around (16)
Rnd 3: 1 hdc in 1st st, *2 hdc in next, 1 hdc next st* rpt from * to * to end (24)
Rnd 4: 2 sc in 1st st and each st around (48)
Lower Ear
Ch 2
Rnd 1: 8 hdc in 2nd ch from hook (8)
Rnd 2: 2 hdc in 1ST st, 2 hdc in next st and each st around (16)
Rnd 3: 2 hdc in 1ST st, 2 hdc in next st and each st around (32)
INNER EAR
Upper Ear
Ch 2
Rnd 1: 8 hdc in 2nd ch from hook (8)
Rnd 2: 2 hdc in 1st st and each st around (16)
Rnd 3: *1 hdc in 1st st, 2 hdc in next* rpt to end of rnd (24)
Lower Ear
Ch 2
Rnd 1: 8 hdc in 2nd ch from hook (8)
Rnd 2: 2 hdc in 1st st and each st around (16)
Ear Assembly: Use photos on page 5 of pattern for guide.
Step 1: Attach upper and lower lobe together for both inner and outer ear.
Step 2: Stitch inner ear to outer ear.
Step 3: Stitch ear to hat, fasten off and weave in all ends.

I also love to see what you make so please also be sure to tag me on social media @prettydarnadorable xo