


There’s something about a slouchy crochet hat that makes it so easy to wear. Not too fitted, not too floppy, just that little bit of extra room at the back that gives it a relaxed, comfortable look.
That’s exactly what I wanted with the Brookside Slouchy Hat!
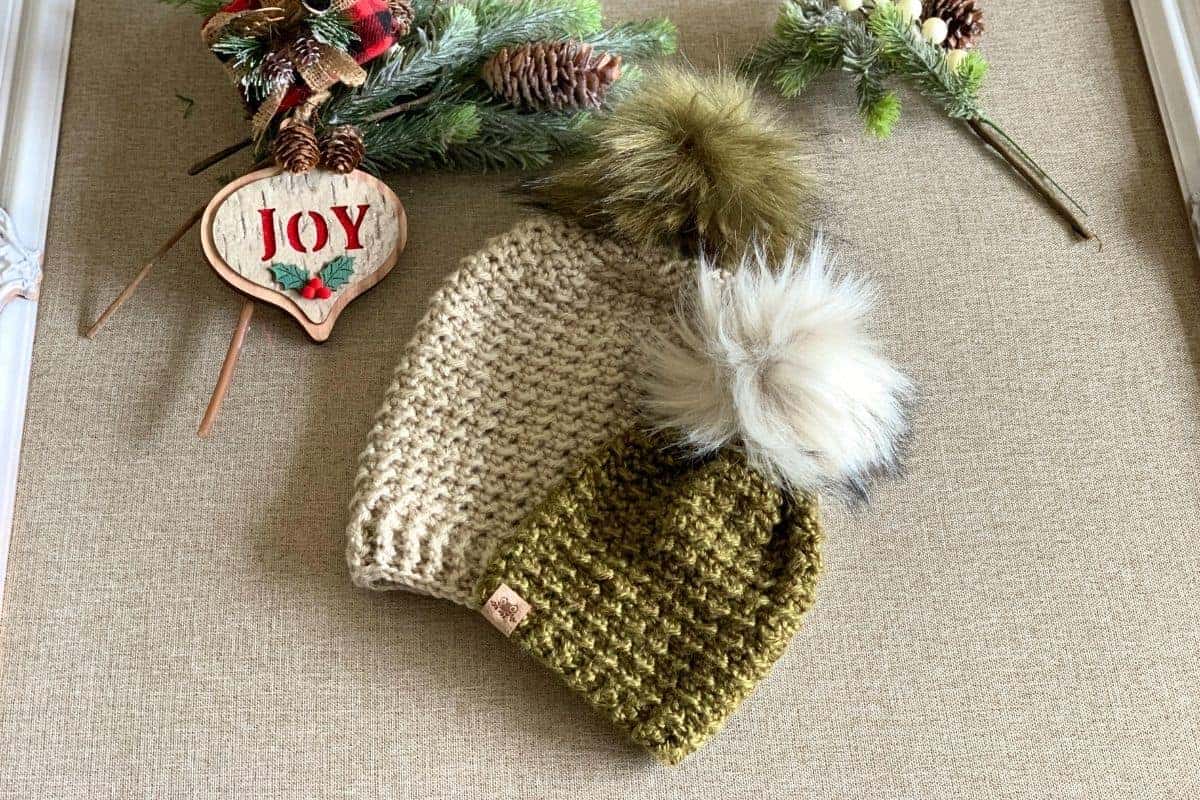
This free crochet slouch hat pattern uses a beautiful textured stitch made from two basic stitches, the slip stitch and half double crochet. It looks much more complicated than it actually is, which is always one of my favourite things about a crochet pattern!
I’ve included seven different sizes, from tiny babies right through to Adult XL. Whether you’re making a little baby beanie hat or a slouchy crochet hat for yourself, there’s a size for just about everyone.
Brookside Crochet Slouch Hat Pattern At a Glance
- Skill Level: Easy
- Yarn & Hook: Worsted weight yarn and 6.50 mm crochet hook
- Sizes: Seven sizes, from 0–3 months to Adult XL
- Stitches Used: Chain, single crochet, slip stitch, half double crochet, double crochet, front post and back post double crochet
- Construction: Worked from the top down in joined, turned rounds, with a gathered crown and ribbed band
- Perfect For: Everyday winter hats, handmade gifts, matching family hats and craft fairs
- Why You’ll Love It: A simple textured stitch pattern, easy construction and a relaxed slouchy fit
An Easy Crochet Slouch Hat With Beautiful Texture
One of the things I love most about this slouchy beanie pattern is the texture.
At first glance, the stitches look almost woven together, giving the hat a rich, slightly raised appearance. But instead of using complicated special stitches or clusters, you’re working with just two simple crochet stitches.
The stitch pattern is created by alternating a slip stitch (sl st) and a half double crochet (hdc).
On the following round, you’ll work a slip stitch into the previous half double crochet and a half double crochet into the previous slip stitch.
It’s that little change in stitch height that gives the Brookside Hat its beautiful texture.

Getting the Right Slouchy Fit
When making a crochet hat, choosing the right size is just as important as choosing the right yarn.
The Brookside Slouchy Hat comes in seven sizes, including baby, child and adult sizes. This makes it a great pattern when you want to crochet matching hats for the whole family.
I always recommend checking the finished measurements rather than choosing a size by age alone.
Head circumference can vary quite a bit, particularly with babies and children, so taking a quick measurement is helpful if you’re making a hat for someone else.
Unlike a fitted beanie hat, a slouchy hat is designed with a little extra length at the crown. This creates the looser fit that allows the back of the hat to fall gently rather than sitting snugly against the head.

Tips for Making Your First Slouchy Crochet Hat
If this is your first slouchy hat or you’re still getting comfortable reading crochet patterns, there are a few things worth keeping in mind.
Keep an eye on your slip stitches.
Slip stitches are shorter than half double crochet stitches, so they can be a little harder to see when working into the next stitch. Try not to pull them too tightly, or you may have trouble inserting your hook on the following round.
Check your stitch count.
Once you’ve completed the first two rounds, the stitch count stays the same throughout the textured body and ribbed band. Checking occasionally can help you catch a missed stitch before you’ve worked several more rounds.
Use a stitch marker if needed.
A stitch marker can be helpful for identifying the first stitch of each round, particularly when you’re getting used to the textured pattern.
Measure the hat height as you work.
Because the body is worked to a measurement rather than a specific number of rounds, you can focus on reaching the correct length without counting every repeat.
Don’t forget the long yarn tail.
Leave a long tail when making your foundation chain. You’ll need it later to close the top of the hat.
These little details make the project much easier, especially for new crocheters trying a textured crochet beanie for the first time.

Purchase Ad Free Pattern – Instant Download!
Purchase the ad-free PDF for a smooth, distraction-free crocheting experience anytime, anywhere.
Already a subscriber? Check your latest email for your special discount code. Not subscribed yet? Sign up here to get yours!
Thanks so much for supporting my blog!
Free Brookside Slouchy Hat Crochet Pattern
Ready to make your own?
You’ll find the complete free slouchy hat crochet pattern below, with detailed written instructions for all seven sizes.
Skill Level
Easy
Abbreviations
- bpdc – back post double crochet
- ch – chain
- dc – double crochet
- fpdc – front post double crochet
- hdc – half double crochet
- rnd – round
- sc – single crochet
- sk – skip
- sp – space
- st – stitch
- sts – stitches
- sl st – slip stitch
- rpt – repeat
Gauge
4 stitches = 1.25″ (3.2 cm) using a 6.50 mm hook in the textured stitch pattern.
Special Stitch
Textured Stitch
Work *sl st in next hdc, hdc in next sl st; repeat from * across.
Materials Needed
Finished measurements include the ribbed band. Measurements given in the pattern instructions are taken before adding the ribbing.
Yarn used in pattern Lions Brand – Heartland Yarn (see sizing chart for exact amount required):
Yarn Gauge:
Gauge must be matched for the correct fit of this hat, matching the recommended yarn gauge can assist in successful substitution and result in a more accurate finished product.
- K/6.50 mm hook
- Tapestry Needle
- Stitch Markers
Finished measurements include the ribbed band. Yarn amounts may vary depending on the yarn chosen, so it’s always a good idea to purchase a little extra.
Finished Measurements & Yarn Requirements
0 to 3 months
- Width: 13.75”
- Height: 7.75”
- Yarn: 50g, 78m, 1.76 oz, 85 yds
3 to 6 months
- Width: 15”
- Height: 8”
- Yarn: 55g, 86m, 1.94 oz, 94 yds
6 to 12 months
- Width: 16.25”
- Height: 8.5”
- Yarn: 60g, 94m, 2.12 oz, 102 yds
12 months to 3 years
- Width: 17.5”
- Height: 9.25”
- Yarn: 80g, 125m, 2.82 oz, 137 yds
3 to 10 years
- Width: 18.75”
- Height: 10”
- Yarn: 90g, 140m, 3.17 oz, 154 yds
Adult
- Width: 20”
- Height: 10.75”
- Yarn: 100g, 156m, 3.53 oz, 171 yds
Adult XL
- Width: 21”
- Height: 11”
- Yarn: 115g, 179m, 4.06 oz, 196 yds

Notes
- Pattern is written in US terminology
- This hat is worked from the top down, beginning with a foundation chain that is joined to form a ring.
- Leave a long yarn tail at the beginning for closing the top of the hat once the crocheting is complete.
- The body of the hat is worked in turned rounds. Turn your work at the end of each round as instructed.
- The textured pattern is created by alternating slip stitches and half double crochet stitches.
- The ribbed band is worked in joined rounds without turning.
- Beginning chains and joining slip stitches do not count as stitches.
- Stitch counts are shown in parentheses at the end of each round.
- The hat is designed to have a relaxed, slouchy fit.

0 – 3 Months
Hat is made working top down. Leave long tail at beginning chain for sewing top of hat closed.
Ch 22, Join with slip stitch, ch 1.
Rnd 1: Sc in 1st ch and each chain around. Join with slip stitch, ch 1 turn. (22)
Rnd 2: 2 sc in 1st and each st around. Join with slip stitch, ch 1 turn. (44)
Rnd 3: Slst in 1st st, hdc in next st, *sl st in next st, hdc in next st* rpt from *to* until end of round. Join with slip stitch, ch 1 turn. (44)
Rnd 4: Slst in 1st hdc, hdc in 1st sl st, *sl st in next hdc, hdc in next sl st* rpt from *to* until end of round. Join with slip stitch, ch 1 turn. (44)
Repeat rounds 3 and 4 until hat measures 7.25” from crown to bottom of hat.
Ribbed Band
Rnd 1: Dc in 1st and each st around. Join with sl st to 1st dc. Ch 2, do not turn. (44)
Rnd 2: Fpdc in 1st st, bpdc in next. *fpdc in next st, bpdc in next* rpt from *to* until end of rnd. Join with sl st to 1st fpdc, fasten off and weave in ends. (44)
Finishing the Crown
- Thread the long yarn tail left at the beginning of the foundation chain onto a tapestry needle.
- Weave the needle in and out of the stitches around the opening at the top of the hat.
- Gently pull the yarn tail to gather the stitches and close the opening. If a small hole remains, sew a few stitches across the opening to close it completely.
- Secure the yarn on the inside of the hat and weave in the remaining ends.
3 – 6 Months
Hat is made working top down. Leave long tail at beginning chain for sewing top of hat closed.
Ch 24, Join with slip stitch, ch 1.
Rnd 1: Sc in 1st ch and each chain around. Join with slip stitch, ch 1 turn. (24)
Rnd 2: 2 sc in 1st and each st around. Join with slip stitch, ch 1 turn. (48)
Rnd 3: Slst in 1st st, hdc in next st, *sl st in next st, hdc in next st* rpt from *to* until end of round. Join with slip stitch, ch 1 turn. (48)
Rnd 4: Slst in 1st hdc, hdc in 1st sl st, *sl st in next hdc, hdc in next sl st* rpt from *to* until end of round. Join with slip stitch, ch 1 turn. (48)
Repeat rounds 3 and 4 until hat measures 7.75” from crown to bottom of hat.
Ribbed Band
Rnd 1: Dc in 1st and each st around. Join with sl st to 1st dc. Ch 2, do not turn. (48)
Rnd 2: Fpdc in 1st st, bpdc in next. *fpdc in next st, bpdc in next* rpt from *to* until end of rnd. Join with sl st to 1st fpdc, fasten off and weave in ends. (48)
Finishing the Crown
- Thread the long yarn tail left at the beginning of the foundation chain onto a tapestry needle.
- Weave the needle in and out of the stitches around the opening at the top of the hat.
- Gently pull the yarn tail to gather the stitches and close the opening. If a small hole remains, sew a few stitches across the opening to close it completely.
- Secure the yarn on the inside of the hat and weave in the remaining ends.
6 – 12 Months
Hat is made working top down. Leave long tail at beginning chain for sewing top of hat closed.
Ch 26, Join with slip stitch, ch 1.
Rnd 1: Sc in 1st ch and each chain around. Join with slip stitch, ch 1 turn. (26)
Rnd 2: 2 sc in 1st and each st around. Join with slip stitch, ch 1 turn. (52)
Rnd 3: Slst in 1st st, hdc in next st, *sl st in next st, hdc in next st* rpt from *to* until end of round. Join with slip stitch, ch 1 turn. (52)
Rnd 4: Slst in 1st hdc, hdc in 1st sl st, *sl st in next hdc, hdc in next sl st* rpt from *to* until end of round. Join with slip stitch, ch 1 turn. (52)
Repeat rounds 3 and 4 until hat measures 8” from crown to bottom of hat.
Ribbed Band
Rnd 1: Dc in 1st and each st around. Join with sl st to 1st dc. Ch 2, do not turn. (52)
Rnd 2: Fpdc in 1st st, bpdc in next. *fpdc in next st, bpdc in next* rpt from *to* until end of rnd. Join with sl st to 1st fpdc, fasten off and weave in ends. (52)
Finishing the Crown
- Thread the long yarn tail left at the beginning of the foundation chain onto a tapestry needle.
- Weave the needle in and out of the stitches around the opening at the top of the hat.
- Gently pull the yarn tail to gather the stitches and close the opening. If a small hole remains, sew a few stitches across the opening to close it completely.
- Secure the yarn on the inside of the hat and weave in the remaining ends.
1 – 3 Years
Hat is made working top down. Leave long tail at beginning chain for sewing top of hat closed.
Ch 28, Join with slip stitch, ch 1.
Rnd 1: Sc in 1st ch and each chain around. Join with slip stitch, ch 1 turn. (28)
Rnd 2: 2 sc in 1st and each st around. Join with slip stitch, ch 1 turn. (56)
Rnd 3: Slst in 1st st, hdc in next st, *sl st in next st, hdc in next st* rpt from *to* until end of round. Join with slip stitch, ch 1 turn. (56)
Rnd 4: Slst in 1st hdc, hdc in 1st sl st, *sl st in next hdc, hdc in next sl st* rpt from *to* until end of round. Join with slip stitch, ch 1 turn. (56)
Repeat rounds 3 and 4 until hat measures 8.5” from crown to bottom of hat.
Ribbed Band
Rnd 1: Dc in 1st and each st around. Join with sl st to 1st dc. Ch 2, do not turn. (56)
Rnd 2-3: Fpdc in 1st st, bpdc in next. *fpdc in next st, bpdc in next* rpt from *to* until end of rnd. Join with sl st to 1st fpdc. Ch 2, do not turn. (56). Note: Do not ch 2 after the final round. Fasten off and weave in ends.
Finishing the Crown
- Thread the long yarn tail left at the beginning of the foundation chain onto a tapestry needle.
- Weave the needle in and out of the stitches around the opening at the top of the hat.
- Gently pull the yarn tail to gather the stitches and close the opening. If a small hole remains, sew a few stitches across the opening to close it completely.
- Secure the yarn on the inside of the hat and weave in the remaining ends.
3 – 10 Years
Hat is made working top down. Leave long tail at beginning chain for sewing top of hat closed.
Ch 30, Join with slip stitch, ch 1.
Rnd 1: Sc in 1st ch and each chain around. Join with slip stitch, ch 1 turn. (30)
Rnd 2: 2 sc in 1st and each st around. Join with slip stitch, ch 1 turn. (60)
Rnd 3: Slst in 1st st, hdc in next st, *sl st in next st, hdc in next st* rpt from *to* until end of round. Join with slip stitch, ch 1 turn. (60)
Rnd 4: Slst in 1st hdc, hdc in 1st sl st, *sl st in next hdc, hdc in next sl st* rpt from *to* until end of round. Join with slip stitch, ch 1 turn. (60)
Repeat rounds 3 and 4 until hat measures 9” from crown to bottom of hat.
Ribbed Band
Rnd 1: Dc in 1st and each st around. Join with sl st to 1st dc. Ch 2, do not turn. (60)
Rnd 2-4: Fpdc in 1st st, bpdc in next. *fpdc in next st, bpdc in next* rpt from *to* until end of rnd. Join with sl st to 1st fpdc. Ch 2, do not turn. (60) Note: Do not ch 2 after the final round. Fasten off and weave in ends.
Finishing the Crown
- Thread the long yarn tail left at the beginning of the foundation chain onto a tapestry needle.
- Weave the needle in and out of the stitches around the opening at the top of the hat.
- Gently pull the yarn tail to gather the stitches and close the opening. If a small hole remains, sew a few stitches across the opening to close it completely.
- Secure the yarn on the inside of the hat and weave in the remaining ends.
Teen/Adult
Hat is made working top down. Leave long tail at beginning chain for sewing top of hat closed.
Ch 32, Join with slip stitch, ch 1.
Rnd 1: Sc in 1st ch and each chain around. Join with slip stitch, ch 1 turn. (32)
Rnd 2: 2 sc in 1st and each st around. Join with slip stitch, ch 1 turn. (64)
Rnd 3: Slst in 1st st, hdc in next st, *sl st in next st, hdc in next st* rpt from *to* until end of round. Join with slip stitch, ch 1 turn. (64)
Rnd 4: Slst in 1st hdc, hdc in 1st sl st, *sl st in next hdc, hdc in next sl st* rpt from *to* until end of round. Join with slip stitch, ch 1 turn. (64)
Repeat rounds 3 and 4 until hat measures 9.5” from crown to bottom of hat.
Ribbed Band
Rnd 1: Dc in 1st and each st around. Join with sl st to 1st dc. Ch 2, do not turn. (64)
Rnd 2-5: Fpdc in 1st st, bpdc in next. *fpdc in next st, bpdc in next* rpt from *to* until end of rnd. Join with sl st to 1st fpdc. Ch 2, do not turn. (64) Note: Do not ch 2 after the final round. Fasten off and weave in ends.
Finishing the Crown
- Thread the long yarn tail left at the beginning of the foundation chain onto a tapestry needle.
- Weave the needle in and out of the stitches around the opening at the top of the hat.
- Gently pull the yarn tail to gather the stitches and close the opening. If a small hole remains, sew a few stitches across the opening to close it completely.
- Secure the yarn on the inside of the hat and weave in the remaining ends.
Adult XL
Hat is made working top down. Leave long tail at beginning chain for sewing top of hat closed.
Ch 34, Join with slip stitch, ch 1.
Rnd 1: Sc in 1st ch and each chain around. Join with slip stitch, ch 1 turn. (34)
Rnd 2: 2 sc in 1st and each st around. Join with slip stitch, ch 1 turn. (68)
Rnd 3: Slst in 1st st, hdc in next st, *sl st in next st, hdc in next st* rpt from *to* until end of round. Join with slip stitch, ch 1 turn. (68)
Rnd 4: Slst in 1st hdc, hdc in 1st sl st, *sl st in next hdc, hdc in next sl st* rpt from *to* until end of round. Join with slip stitch, ch 1 turn. (68)
Repeat rounds 3 and 4 until hat measures 10” from crown to bottom of hat.
Ribbed Band
Rnd 1: Dc in 1st and each st around. Join with sl st to 1st dc. Ch 2, do not turn.(68)
Rnd 2-5: Fpdc in 1st st, bpdc in next. *fpdc in next st, bpdc in next* rpt from *to* until end of rnd. Join with sl st to 1st fpdc. Ch 2, do not turn. (68) Note: Do not ch 2 after the final round. Fasten off and weave in ends.
Finishing the Crown
- Thread the long yarn tail left at the beginning of the foundation chain onto a tapestry needle.
- Weave the needle in and out of the stitches around the opening at the top of the hat.
- Gently pull the yarn tail to gather the stitches and close the opening. If a small hole remains, sew a few stitches across the opening to close it completely.
- Secure the yarn on the inside of the hat and weave in the remaining ends.
How to Style Your Brookside Slouchy Hat
One of my favourite things about a slouchy crochet hat is how easily it works with just about anything. Whether you’re heading out for a winter walk or running errands, it’s the kind of hat you can throw on without giving it much thought.
Wear it slightly back on your head.
For that classic slouchy beanie look, position the ribbed band just above your eyebrows and gently pull the extra fabric toward the back of your head. This lets the textured stitches show while giving the hat its relaxed shape.
Try a more fitted look.
If you prefer something a little less slouchy, you can tuck some of the extra fabric toward the back rather than letting it hang loosely. The ribbed band helps keep everything in place.
Pair it with your favourite winter accessories.
I think these textured crochet hats look especially nice with a chunky scarf, a simple cowl or a pair of fingerless gloves. You could even make matching accessories in the same worsted weight yarn for a coordinated winter set.
Have fun with colours and pompoms.
The Brookside Hat looks beautiful left just as it is, but you could also add a faux fur pom pom to the top for a little extra personality. A neutral colour gives it a classic look, while a brighter shade makes it a fun addition to a winter coat.
And don’t forget about the little ones! The baby and children’s sizes are just as cute with a tiny pompom or in colours that match their favourite winter jackets.
Frequently Asked Questions
Is this crochet slouch hat pattern beginner-friendly?
Yes! The Brookside Slouchy Hat is rated easy and uses basic crochet stitches, including single crochet, slip stitch and half double crochet.
The textured stitch pattern is simple once you get used to alternating stitches. You’ll also work front post and back post double crochet stitches for the ribbed band, so it’s a nice project for beginners who are ready to learn a couple of new techniques.
Do I need to know how to make a magic circle?
No! Unlike many top-down crochet beanie patterns, Brookside doesn’t begin with a magic circle or magic loop.
You’ll start with a foundation chain joined into a ring, then work the body of the hat before gathering the top closed with a yarn needle and the long tail left at the beginning.
Can I make this slouchy crochet hat less slouchy?
Yes! If you prefer a more fitted beanie hat, you can shorten the textured body before adding the ribbed band.
Keep in mind that the finished measurements are designed for a relaxed, slouchy fit, so shortening the body will change the appearance of the hat.
Can I use a different yarn?
Absolutely. You can substitute another worsted weight yarn, but I recommend checking your gauge before starting.
Different yarns can vary in thickness and stretch, even within the same weight category. Matching the pattern gauge will help you get the correct finished circumference.
Why do I need to turn after every round?
Turning your work helps create the textured stitch pattern used throughout the body of the hat.
The slip stitches and half double crochet stitches are worked in alternating positions, giving the fabric its raised, woven appearance.
Once you reach the ribbed band, you’ll stop turning and continue working in joined rounds.
How do I know which size to make?
The pattern includes seven different sizes, from 0–3 months through Adult XL.
For the best fit, measure the person’s head circumference and compare it with the finished measurements in the sizing chart. Remember that the hat is designed to have a slightly looser, slouchy appearance.
Can I make this hat without a pompom?
Of course! The Brookside Slouchy Hat looks beautiful without any embellishments. The textured stitch pattern and ribbed band give it plenty of detail on their own.
If you want to add a pompom, you can attach one to the gathered crown after finishing the hat.