


Okay, let’s be honest. Who doesn’t giggle at the thought of baby (or a toddler) running around in a little crochet giraffe hat? It’s equal parts adorable and hilarious, which is exactly why I designed this The Gentle Giraffe free crochet giraffe hat pattern.
With Halloween creeping up, this is the perfect quick project if you want a handmade costume without going full Pinterest-overload. Pop this hat on your little one add some coordinating clothing and voila! Handmade costume done! Not only that but now you have a cute hat they can wear on repeat until they outgrow it!
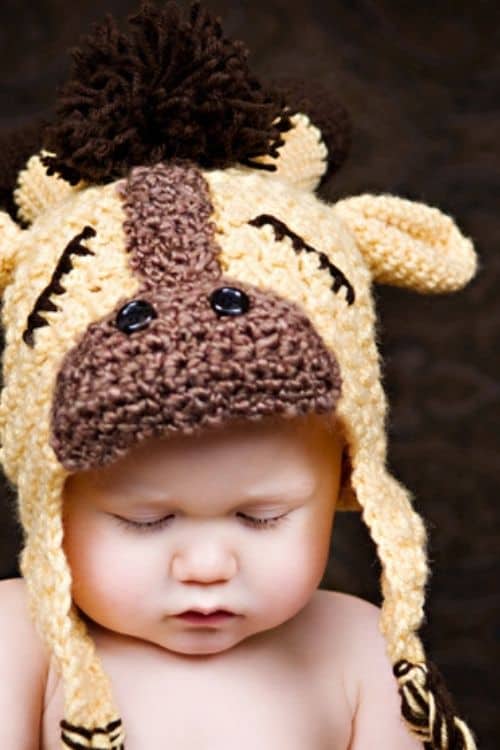
This free crochet giraffe hat pattern is quick, beginner-friendly, and perfect for Halloween. This adorable crochet animal hat pattern is written in sizes premie through child 10 years, so you can crochet a giraffe hat for babies, toddlers, and kids and have a whole herd if you like.
This pattern is beginner-friendly, so don’t worry if your crochet skills are still in the “I only know how to make rectangles” stage. If you can chain, single crochet, double crochet, and count (well… mostly count), you’re good to go.
Lately, I’ve been watching so many videos about how toxic and disposable cheap clothing and costumes have become. It really makes me want to step back toward slow fashion (is that an oxymoron?) choosing handmade pieces that last, feel special, and save money at the same time.
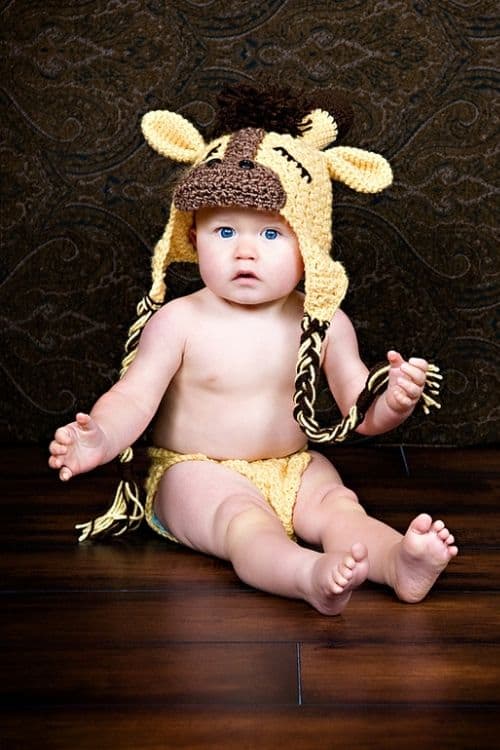
That’s exactly what this baby giraffe crochet hat is about. Instead of grabbing a one-night Halloween costume from the store, you can make something unique that your little one can wear again and again.
This hat is cozy, practical, and ridiculously cute, whether you make it with earflaps and ties for extra warmth or skip the extras and enjoy the fun textured look on its own. With just a bit of yarn, a hook, and some stuffing for the horns, you’ll have a handmade keepsake that beats fast fashion every single time.
What Makes This Crochet Giraffe Hat Special
- Unique texture: worked in a stitch combo that adds softness and depth (so it looks just as adorable even without the face).
- Details that pop: stuffed horns, little ears, and optional earflaps with braids for function + cuteness.
- Works both ways: keep it simple for an everyday textured hat, or add all the giraffe extras for a complete crochet giraffe costume.
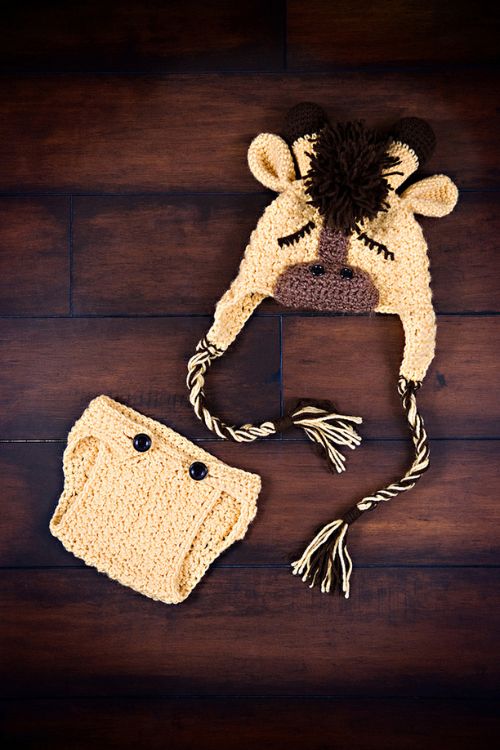
- Matching set: pair it with the crochet giraffe diaper cover (pattern here ➝ How to Easily Crochet a Baby Diaper Cover for Beginners) for the sweetest newborn photos or baby’s first Halloween crochet pattern.
Not a Giraffe fan? No problem I think you’ll love these patterns too!
- Free Crochet Baby Bear Hat Pattern & Video – 4 Sizes
- Free Crochet Elephant Hat Pattern with Matching Diaper Cover
- Free Crochet Cow Hat Pattern – The only hat your little one needs for fall!
- Free Dino Crochet Hooded Cowl Pattern
- Free and Easy Crochet Hooded Sock Monkey Cowl Pattern
How to Crochet a Giraffe Hat – Construction & Yarn Tips
This giraffe hat crochet pattern is worked from the crown down. You’ll increase evenly, work the main body, then add optional earflaps. The horns, ears and snout are made separately and stitched on at the end.
💡 Chunky yarn substitution – This pattern looks amazing in chunky yarn. It makes the horns sturdier, the texture stand out, and the earflaps extra cozy. Even if it turns out a little big, the earflaps and ties keep it snug and comfy.

Crochet Giraffe Costume Styling Ideas
Want to make this hat into a full crochet giraffe costume? Here are some easy, budget-friendly ways to style it:
- Everyday clothes with a twist: Pair the hat with yellow or brown pajamas/leggings and a matching top. Instant giraffe without sewing a costume.
- DIY giraffe tail: Crochet a simple chain with some fringe or pompom at the end, and pin it to pants. Done.
- Spotted leggings or tights: Add felt spots to plain yellow or brown leggings for an easy handmade costume add-on.
- Matching diaper cover: For babies, pair the hat with the matching diaper cover for the cutest newborn photo prop or baby giraffe crochet hat costume.
Sizing (Because Giraffes Come in All Heights)
This crochet animal hat pattern includes sizes:
- Preemie
- 0–6 months
- 6–12 months
- Toddler
- Child (up to age 10)
How to Assemble the Crochet Giraffe Hat
Materials Needed
- Finished crochet hat base (with or without earflaps)
- 2 horns (stuffed)
- 2 ears
- 1 snout muzzle piece (lightly stuffed or flat, depending on your preference)
- Yarn for eyelashes
- Yarn needle
- Matching yarn for sewing
- Scissors
- (Optional) Pins or stitch markers for positioning
Step 1: Prepare the Pieces
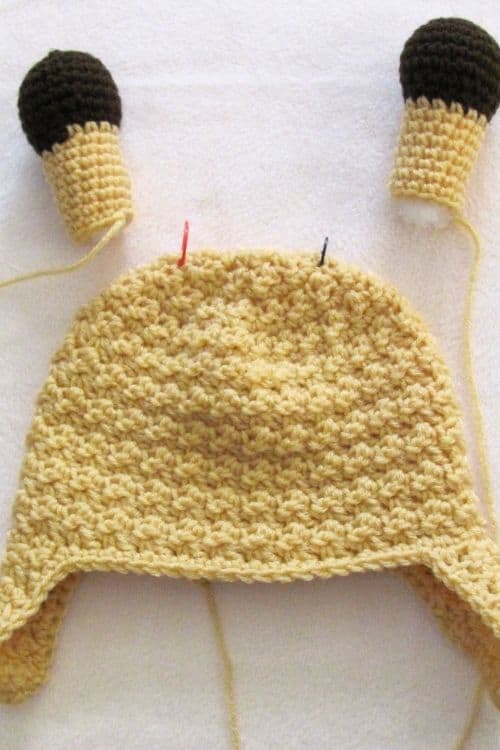
Lay out the hat base, horns, ears, and snout so you can see how they’ll fit together. Pin for balance before sewing.

Step 2: Attach the Horns
Sew the horns to the very top of the hat, spaced evenly apart. Stitch securely around the base so they stand up tall without wobbling.
Step 3: Sew on the Ears
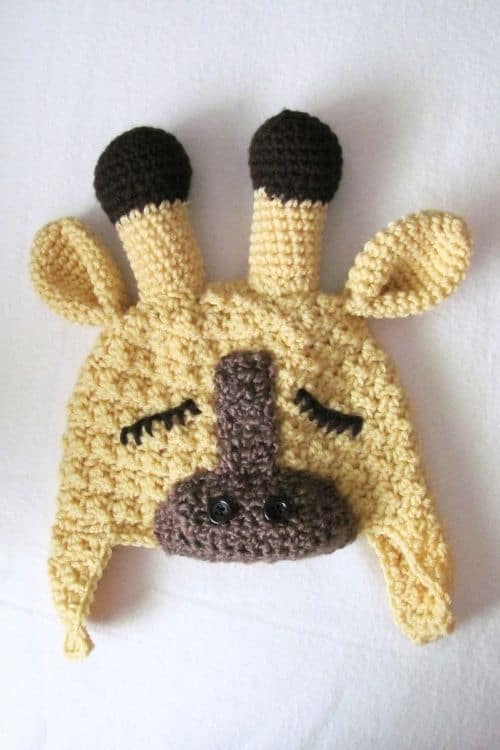
Position each ear slightly below and outside the horns. Angle them outward for a natural giraffe look, then stitch firmly into place.
Step 4: Attach the Snout
Center the snout on the front of the hat, a little above the brim line.
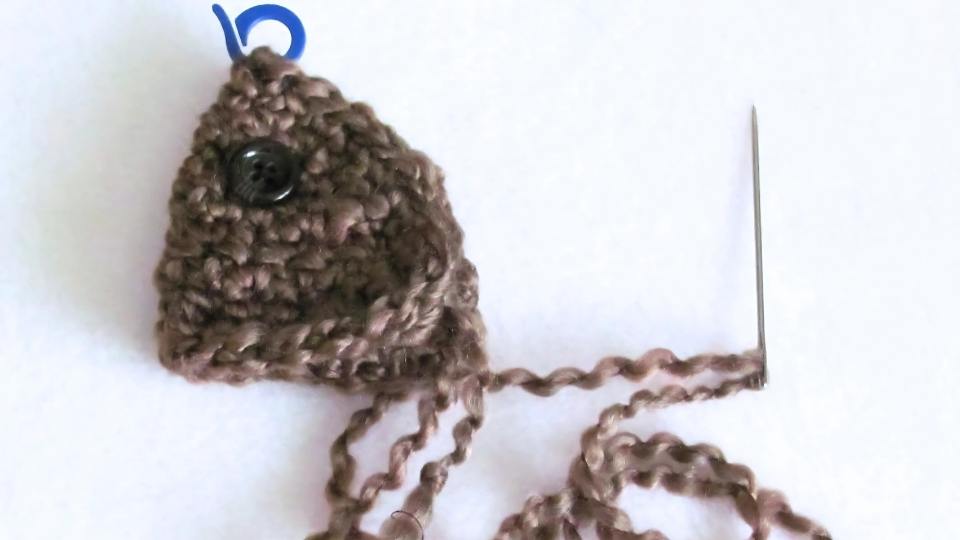
- Pin first to check symmetry.
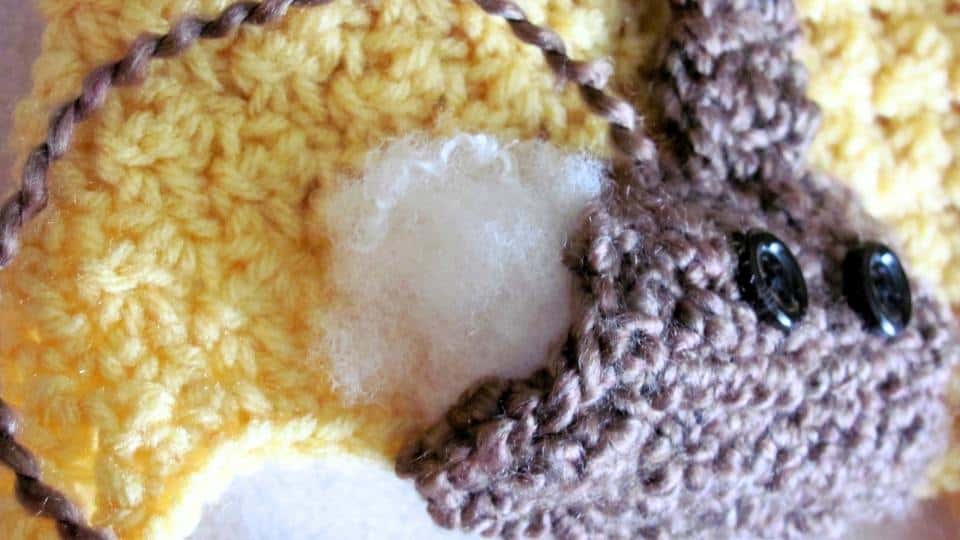
- Stitch around the edge; if the snout is 3D, add a touch of stuffing before closing.
- Sew buttons on for nostrils.

Step 5: Add the Eyelashes
Decide on sleeping lashes (curved line with small ticks) or open-eye lashes (short upward strokes at the outer corners).
- Lightly mark placement with pins.
- Use backstitch for the lash line and 2–4 short angled stitches for lashes.
- Mirror both sides for balance and secure yarn tails on the inside.

Step 6: Finish the Earflaps
If your hat includes earflaps, add braided ties to the ends. Knot tightly and trim neatly so they don’t unravel.
Step 7: Weave in Ends
Turn the hat inside out and weave in all yarn tails. Check that the outside looks neat and free of loose ends.
Step 8: Check the Fit
Pop the hat on your little giraffe! Make sure the horns stand tall, the ears are even, the snout is centered, and the eyelashes sit just right.
FAQs About the Free Crochet Giraffe Hat Pattern
If you’re thinking about making this crochet giraffe hat, you might be wondering about yarn, sizing, or how to style it as part of a Halloween costume. I’ve put together some quick answers to help you out.
Is this crochet giraffe hat pattern beginner-friendly?
Yes! This free crochet giraffe hat pattern is designed with beginners in mind. If you can chain, single crochet, and double crochet, you’re set.
How long does it take to make a giraffe hat?
Baby sizes can be finished in an evening. Toddler and child sizes are still weekend-friendly — perfect for a last-minute Halloween crochet pattern.
What yarn works best?
Worsted weight acrylic or cotton blends work great. Or substitute chunky yarn for an even cozier baby giraffe crochet hat.
Can I crochet this giraffe hat without earflaps?
Yes! The pattern includes both options. Without earflaps, it’s a fun textured beanie. With earflaps and braids, it makes a snug crochet giraffe costume hat.
Does the giraffe hat still look cute without the face?
Definitely! The unique textured stitches make it adorable even on its own.
What sizes are included?
Newborn, 3–6 months, 6–12 months, toddler, and child (up to 10 years).
Can I make an adult giraffe hat?
The pattern is written for babies and kids, but you can size up with a larger hook and thicker yarn if you’d like an adult-sized crochet animal hat.
How do I wash the finished hat?
Follow your yarn label. Most acrylic yarns are machine washable and dryer safe, perfect for kids.
How can I turn this into a full giraffe costume?
Pair with matching clothes, add a DIY crochet tail, or use the crochet giraffe diaper cover pattern. Together, they make an easy crochet giraffe costume.
If you’re looking for a Halloween crochet pattern that’s quick, affordable, and guaranteed to make people smile, this free crochet giraffe hat pattern is it. From newborn photos to toddler trick-or-treating, it’s one of those handmade pieces you’ll treasure long after Halloween.
Scroll down for the full instructions, grab your yarn, and let’s get that giraffe on the hook. 🧶🦒
Purchase Ad Free Pattern – Instant Download!
Purchase the ad-free PDF for a smooth, distraction-free crocheting experience anytime, anywhere.
Already a subscriber? Check your latest email for your special discount code. Not subscribed yet? Sign up here to get yours!
Thanks so much for supporting my blog!
Did you make any of these?
I would love to see what you have made be sure to mention @prettydarnadorable or tag me using #prettydarnadorable on Instagram so I can see your creations!
Free Crochet Giraffe Hat Pattern
Skill Level
Easy
Abbreviations
- ch – chain
- dec – decrease
- dc – double crochet
- hdc – half double crochet
- sc – single crochet
- sk – skip
- st – stitch
- sts – stitches
- sl st – slip stitch
- rsc – reverse single crochet
- rpt – repeat
- sc2tog – single crochet 2 together
Gauge
4” x 4” = 10 sc x 11 rows of single crochet
A gauge swatch is vital for a well-fitting crochet hat. It determines stitch tension and measures how many stitches and rows you get per inch. Comparing it to the pattern’s gauge ensures the final hat fits as desired. Adjust hook or tension if needed for a perfectly fitting hat.

Safety Note
If gifting to a baby or toddler, consider embroidering the nostrils instead of using buttons to avoid choking hazards.
Finished Measurements & Yarn Requirements
Premie
Width: 14”
Height: 4”
Yarn: 40 gm / 85 m / 1.41 oz / 93 yd
0 to 6 months
Width: 16”
Height: 5”
Yarn: 50 gm / 106 m / 1.76 oz / 116 yd
6 to 12 months
Width: 17”
Height: 6”
Yarn: 60 gm / 127 m / 2.12 oz / 139 yd
12 months to 3 years
Width: 18”
Height: 7”
Yarn: 70 gm / 148 m / 2.47 oz / 162 yd
3 to 10 years
Width: 20”
Height: 8”
Yarn: 85 gm / 180 m / 3.00 oz / 197 yd
Please note that the actual amount of yarn needed may change depending on the yarn chosen always purchase a little more than you think you may need..
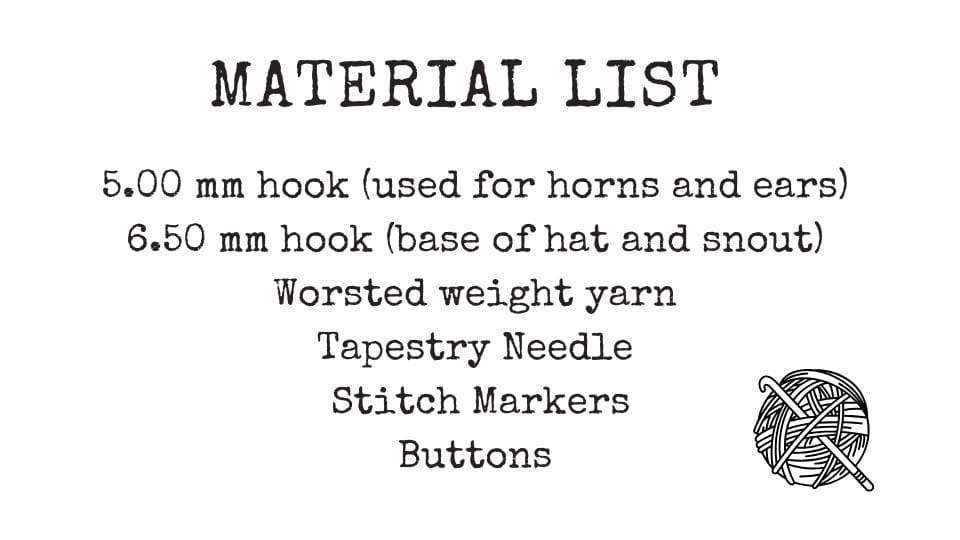
Materials Needed
- Worsted weight yarn (see sizing chart for exact amount)
- Main colour: Red Heart Super Saver in Cornmeal
- Horn tips: Loops & Threads Impeccable in Chocolate
- Small amount of bulky yarn for snout & hair (Lion Brand Homespun in Earth)
- 5.00 mm hook (horns & ears)
- 6.50 mm hook (hat base & snout)
- Tapestry needle
- Stitch markers
- Small buttons for nostrils (optional)
- Stuffing for horns
Notes
- (sc, dc) stitch: Sk next st, (sc, dc) in next st, repeat as instructed. This creates a textured pattern.
- Reverse Single Crochet (rsc): With right side facing, work from left to right. Insert hook into the stitch to the right, yo, pull through, yo, pull through both loops.
- sc2tog: Insert hook into first st, yo, pull through, insert hook into next st, yo, pull through, yo, pull through all 3 loops.
- If you want to make a hat with no ear flaps repeat last two rounds once and finish with single crochet or reverse single crochet.
Optional Ties
- Cut 6 (or 12 for larger sizes) strands of yarn, each 30″ long.
- Working in 3 stitches at the bottom of the earflap, fold 2 strands in half.
- With right side facing, insert hook into stitch from front to back, pull folded loop through, pull ends through loop, tighten.
- Repeat for the next two stitches.
- Braid and knot the ends.
- Repeat for the other earflap.
Horns, Ears & Snout – Preemie to 12 Months
Horns (make 2)
Work in continuous rounds
Start with dark brown or contrast colour
Using 5.00 mm hook
Ch 2
Rnd 1: Work 6 sc into 2nd ch from hook (6)
Rnd 2: 2 sc in 1st and each stitch around (12)
Rnd 3: Sc in 1st st, *2 sc in next, sc in next* rpt from *to* till end of rnd (18)
Rnds 4-6: Sc in 1st and each st around (18)
Rnd 7: Sc2tog over 1st 2 sts, *sc in next, sc2tog over next 2 sts* rpt from *to* till end of rnd (12)
Rnd 8: Sc2tog over 1st 2 sts, *sc in next 2, sc2tog over next 2 sts* rpt from *to* till end of rnd (9)
Change to contrast colour here
Rnds 9-13: Sc in 1st and each st around (9)
Fasten off leaving a long tail for attaching to hat.
Stuff quite firmly with batting.
Ears (make 2)
Work in continuous rounds
Using 5.00mm hook
Ch 2
Rnd 1: Work 4 sc into 2nd ch from hook (4)
Rnd 2: 2 sc in 1st and each st around (8)
Rnd 3: Sc in 1st st, *2 sc in next, sc in next* rpt from *to* till end of rnd (12)
Rnd 4: Sc 1st 2 sts, *2 sc in next, sc in next 2 sts* rpt from *to* till end of rnd (16)
Rnds 5-7: Sc in 1st and each st around (16)
Rnd 8: Sc 1st 3 sts, *sc2tog, sc next 3 sts* rpt from *to* 4 times (12)
Fold ear in half and stitch.
Snout
Use Homespun yarn here or your choice of bulky yarn
Using 6.50mm hook
Ch 11
Row 1: 2 sc in 1st 2 sts, sc across, 2 sc in last 2 sts (14)
Row 2: Skip 1st st, sc across, skip 2nd last st, sc in last (12)
Row 3: Skip 1st st, sc across, skip 2nd last st, sc in last (10)
Row 4: Skip 1st st, sc across, skip 2nd last st, sc in last (8)
Row 5: Skip 1st st, sc across, skip 2nd last st, sc in last (6)
Continuing, working sc around entire snout, join with sl st and leave long tail about 18” for sewing to hat.
Sew on small buttons for nostrils.
With right side of snout facing you, count from right to left and join yarn with slip stitch in 3rd stitch.
Row 1: Hdc in same stitch as slip stitch, hdc next st, ch 1 turn (2)
Rows 2-6: Hdc in 1st and each st across, ch 1 turn (2)
After row 6, leave long tail for attaching this part to hat.
Attach snout to hat using tapestry needle, when it is ¾ attached use small amount of batting to stuff. Continue sewing until completely attached, weave in ends.
Eyelashes
Using tapestry needle and yarn sew eyelashes, using photo as guide.
Hair
To speed things up I made pompoms☺. The number of pompoms you need is totally your choice depending on how much hair you want.
Use a 4” X 4” piece of cardboard and wind yarn around approximately 60 times. Slide off cardboard and tie yarn around middle as tight as possible. Leave ends long for attaching to hat.
Cut all loops. I like mine to look a little messy that way it looks more like hair and less like a pompom. Attach all the pompoms to the hat using photo as guide. Trim at this point as desired.
Preemie to 12 Months – Hat Base
Using 6.5 mm hook
Ch 2
Rnd 1: Work 8 hdc in 2nd st from hook (8)
Rnd 2: 2 sc in 1st and each st around. Join with sl st. Ch 1, turn. (16)
Rnd 3: Sk 1st st, (sc, dc) in next st *sk next st (sc, dc) in next st* rpt from *to* till end of rnd. Join with sl st. Ch 1, turn. (16)
Rnd 4: 2 sc in 1st st and each st around (32). Join with sl st. Ch 1, turn.
Rnd 5: Sk 1st st, (sc, dc) in next st *sk next st (sc, dc) in next st* rpt from *to* till end of rnd. Join with sl st. Ch 1, turn. (32)
From this point forward be sure to work (sc, dc) in dc
Rnds 6-10: (Sc, dc) in 1st dc *sk next st (sc, dc) in next dc* rpt from *to* till end of rnd. Join with sl st. Ch 1, turn. (32)
If you want to make a hat with no ear flaps repeat last two rounds once and finish with single crochet or reverse single crochet.
After last round, fasten off and weave in ends.
Earflaps Make 2
Ch 7
Row 1: Sc in 2nd ch from hook and each stitch across (6) Ch 1, turn.
Row 2: Sk 1st st (sc, dc) in next *sk next st, (sc, dc) in next* rpt from *to* till end of row. (6) Ch 1, turn.
Rows 3-8: Repeat row 2
Row 9: Sc2tog, 3 times (3) fasten off
Using tapestry needle and yarn stitch earflaps to the hat placing just slightly to the back of hat. Fasten off and weave in all ends.
Join yarn at fasten off point at back of hat. Working left to right rsc in each st around.
Fasten off and weave in all ends.
Newborn to 6 Months – Hat Base
Using 6.5 mm hook
Ch 2
Rnd 1: Work 8 hdc in 2nd st from hook (8)
Rnd 2: 2 sc in 1st and each st around. Join with sl st. Ch 1, turn. (16)
Rnd 3: Sk 1st st, (sc, dc) in next st *sk next st (sc, dc) in next st* rpt from *to* till end of rnd. Join with sl st. Ch 1, turn. (16)
Rnd 4: 2 sc in 1st st and each st around (32). Join with sl st. Ch 1, turn.
Rnd 5: Sk 1st st, (sc, dc) in next st *sk next st (sc, dc) in next st* rpt from *to* till end of rnd. Join with sl st. Ch 1, turn. (32)
Rnd 6: Sc in first 3 sts *2 sc in next st, sc in next 3 sts* rpt from *to* till end of rnd. (40) join with sl st, Ch 1, turn.
Rnds 7: Sk 1st st, (sc, dc) in next st *sk next st (sc, dc) in next st* rpt from *to* till end of rnd. Join with sl st. Ch 1, turn. (40)
From this point forward be sure to work (sc, dc) in dc
Rnds 8-14: (Sc, dc) in 1st dc *sk next st (sc, dc) in next dc* rpt from *to* till end of rnd. Join with sl st. Ch 1, turn. (40)
If you want to make a hat with no ear flaps repeat last two rounds once and finish with single crochet or reverse single crochet.
After last round, fasten off and weave in ends.
Earflaps (Make 2)
Ch 7
Row 1: Sc in 2nd ch from hook and each stitch across (6) Ch 1, turn.
Row 2: Sk 1st st (sc, dc) in next *sk next st, (sc, dc) in next* rpt from *to* till end of row. (6) Ch 1, turn.
Rows 3-8: Repeat row 2
Row 9: Sc2tog, 3 times (3) fasten off
Using tapestry needle and yarn stitch earflaps to the hat placing just slightly to the back of hat. Fasten off and weave in all ends.
Join yarn at fasten off point at back of hat. Working left to right rsc in each st around.
Fasten off and weave in all ends.
6 to 12 Months – Hat Base
Using 6.5 mm hook
Ch 2
Rnd 1: Work 8 hdc in 2nd st from hook (8)
Rnd 2: 2 sc in 1st and each st around. Join with sl st. Ch 1, turn. (16)
Rnd 3: Sk 1st st, (sc, dc) in next st *sk next st (sc, dc) in next st* rpt from *to* till end of rnd. Join with sl st. Ch 1, turn. (16)
Rnd 4: 2 sc in 1st st and each st around (32). Join with sl st. Ch 1, turn.
Rnd 5: Sk 1st st, (sc, dc) in next st *sk next st (sc, dc) in next st* rpt from *to* till end of rnd. Join with sl st. Ch 1, turn. (32)
Rnd 6: Sc in first 3 sts *2 sc in next st, sc in next 3 sts* rpt from *to* till end of rnd. (40) join with sl st, Ch 1, turn.
Rnd 7: Sk 1st st, (sc, dc) in next st *sk next st (sc, dc) in next st* rpt from *to* till end of rnd. Join with sl st. Ch 1, turn. (40)
Rnd 8: Sc in first 7 sts *2 sc in next st, sc in next 7 sts* rpt from *to* till end of rnd. (44) join with sl st, Ch 1, turn.
Rnds 9: Sk 1st st, (sc, dc) in next st *sk next st (sc, dc) in next st* rpt from *to* till end of rnd. Join with sl st. Ch 1, turn. (44)
From this point forward be sure to work (sc, dc) in dc
Rnds 10-16: (Sc, dc) in 1st dc *sk next st (sc, dc) in next dc* rpt from *to* till end of rnd. Join with sl st. Ch 1, turn. (44)
If you want to make a hat with no ear flaps repeat last two rounds once and finish with single crochet or reverse single crochet.
After last round, fasten off and weave in ends.
Earflaps (Make 2)
Ch 9
Row 1: Sc in 2nd ch from hook and each stitch across (8) Ch 1, turn.
Row 2: Sk 1st st (sc, dc) in next *sk next st, (sc, dc) in next* rpt from *to* to end of row. (8) Ch 1, turn.
Rows 3-8: Repeat row 2
Row 9: Sc2tog, sc, sc2tog, sc, sc2tog (5) Ch 1, turn.
Row 10: Sc2tog, sc, sc2tog (3) Ch 1, turn.
Using tapestry needle and yarn stitch earflaps to the hat placing just slightly to the back of hat. Fasten off and weave in all ends.
Join yarn at fasten off point at back of hat. Working left to right rsc in each st around.
Fasten off and weave in all ends.

Horns, Ears & Snout – 1 to 10 Years
Horns (make 2)
Work in continuous rounds
Start with dark brown or contrast colour
Using 5.00 mm hook
Ch 2
Rnd 1: Work 6 sc into 2nd ch from hook
Rnd 2: 2 sc in 1st and each stitch around (12)
Rnd 3: Sc in 1st st, *2 sc in next, sc in next* rpt from *to* till end rnd (18)
Rnd 4: Sc in 1st 2 sts, *2 sc in next, sc in next 2 sts* rpt from *to* till end rnd (24)
Rnds 5-7: Sc in 1st and each st around (24)
Rnd 8: Sc2tog over 1st 2 sts, *sc in next 2 sts, sc2tog over next 2 sts* rpt from *to* till end of rnd (18)
Rnd 9: Sc2tog over 1st 2 sts, *sc in next 2, sc2tog over next 2 sts* rpt from *to* till end of rnd (14)
Change to contrast colour here
Rnds 10-17: Sc in 1st and each st around (14)
Join with slip stitch leaving long tail for attaching to hat.
Ears (make 2)
Work in continuous rounds
Using 5.00mm hook
Ch 2
Rnd 1: Work 4 sc into 2nd ch from hook (4)
Rnd 2: 2 sc in 1st and each st around (8)
Rnd 3: Sc in 1st st, *2 sc in next, sc in next* rpt from *to* till end of rnd (12)
Rnd 4: Sc 1st 2 sts, *2 sc in next, sc in next 2 sts* rpt from *to* till end of rnd (16)
Rnd 5: Sc 1st 3 sts, *2 sc in next, sc in next 3 sts* rpt from *to* till end of rnd (20)
Rnds 6-11: Sc in 1st and each st around (20)
Rnd 12: Sc 1st 3 sts, *sc2tog, sc next 3 sts* rpt from *to* 4 times (16)
Rnd 13: Sc in 1st and each st around (16)
Snout
Use Homespun yarn here or your choice of bulky yarn
Using 6.50mm hook
Ch 14
Row 1: 2 sc in 1st 3 sts, sc across, 2 sc in last 3 sts (19)
Row 2: Skip 1st st, sc across, skip 2nd last st, sc in last (17)
Row 3: Skip 1st st, sc across, skip 2nd last st, sc in last (15)
Row 4: Skip 1st st, sc across, skip 2nd last st, sc in last (13)
Row 5: Skip 1st st, sc across, skip 2nd last st, sc in last (11)
Row 6: Skip 1st st, sc across, skip 2nd last st, sc in last (9)
Row 7: Skip 1st st, sc across, skip 2nd last st, sc in last (7)
Continuing, working sc around entire snout, join with sl st and leave long tail about 18” for sewing to hat.
Sew on small buttons for nostrils. (See safety note above)
With right side of snout facing you, count from right to left and join yarn with slip stitch in 3rd stitch.
Row 1: Hdc in same stitch as slip stitch, hdc next 2 sts, ch 1 turn (3)
Rows 2-9: Hdc in 1st and each st across, ch 1 turn (3)
After row 9, leave long tail for attaching this part to hat.
Attach snout to hat using tapestry needle, when it is ¾ attached use small amount of batting to stuff. Continue sewing until completely attached, weave in ends.
Eyelashes
Using tapestry needle and yarn sew eyelashes, using photo as guide.
Hair
To speed things up I made pompoms☺. The number of pompoms you need is totally your choice depending on how much hair you want.
Use a 4” X 4” piece of cardboard and wind yarn around approximately 60 times. Slide off cardboard and tie yarn around middle as tight as possible. Leave ends long for attaching to hat.
Cut all loops. I like mine to look a little messy that way it looks more like hair and less like a pompom. Attach all the pompoms to the hat using photo as guide. Trim at this point as desired.1 to 3 Years – Hat Base
Using 6.5 mm hook
Ch 2
Rnd 1: Work 8 hdc in 2nd st from hook (8)
Rnd 2: 2 sc in 1st and each st around. Join with sl st. Ch 1, turn. (16)
Rnd 3: Sk 1st st, (sc, dc) in next st *sk next st (sc, dc) in next st* rpt from *to* till end of rnd. Join with sl st. Ch 1, turn. (16)
Rnd 4: 2 sc in 1st st and each st around (32), join with sl st. (32) Ch 1, turn.
Rnd 5: Sk 1st st, (sc, dc) in next st *sk next st (sc, dc) in next st* rpt from *to* till end of rnd. Join with sl st. Ch 1, turn. (32)
Rnd 6: Sc in 1st st *2 sc in next st, sc in next st* rpt from *to* till end of rnd. (48) Join with sl st. Ch 1, turn.
Rnd 7: Sk 1st st, (sc, dc) in next st *sk next st (sc, dc) in next st* rpt from *to* till end of rnd. Join with sl st. Ch 1, turn. (48)
From this point forward be sure to work (sc, dc) in dc
Rnds 8-17: (Sc, dc) in 1st dc *sk next st (sc, dc) in next dc* rpt from *to* till end of rnd. Join with sl st. Ch 1, turn. (48)
If you want to make a hat with no ear flaps repeat last two rounds once and finish with single crochet or reverse single crochet.
After last round, fasten off and weave in ends.
Earflaps (Make 2)
Ch 9
Row 1: Sc in 2nd ch from hook and each stitch across (8) Ch 1, turn.
Row 2: Sk 1st st (sc, dc) in next *sk next st, (sc, dc) in next* rpt from *to* till end of row. (8) Ch 1, turn.
Rows 3-8: Repeat row 2
Row 9: Sc2tog, sc, sc2tog, sc, sc2tog (5) Ch 1, turn.
Row 10: Sc2tog, sc, sc2tog (3).
Using tapestry needle and yarn stitch earflaps to the hat placing just slightly to the back of hat. Fasten off and weave in all ends.
Join yarn at fasten off point at back of hat. Working left to right rsc in each st around.
Fasten off and weave in all ends.
3 to 10 Years – Hat Base
Using 6.5 mm hook
Ch 2
Rnd 1: Work 8 hdc in 2nd st from hook (8)
Rnd 2: 2 sc in 1st and each st around. Join with sl st. Ch 1, turn. (16)
Rnd 3: Sk 1st st, (sc, dc) in next st *sk next st (sc, dc) in next st* rpt from *to* till end of rnd. Join with sl st. Ch 1, turn. (16)
Rnd 4: 2 sc in 1st st and each st around (32), join with sl st , Ch 1, turn.
Rnd 5: Sk 1st st, (sc, dc) in next st *sk next st (sc, dc) in next st* rpt from *to* till end of rnd. Join with sl st. Ch 1, turn. (32)
Rnd 6: Sc in 1st st *2 sc in next st, sc in next st* rpt from *to* till end of rnd. Join with sl st. Ch 1, turn. (48)
Rnd 7: Sk 1st st, (sc, dc) in next st *sk next st (sc, dc) in next st* rpt from *to* till end of rnd. Join with sl st. Ch 1, turn. (48)
Rnd 8: 1 sc in 1st 7 sts *2 sc in next st, 1 sc in next 7 sts* rpt from *to* till end of rnd. (54)
Rnds 9: Sk 1st st, (sc, dc) in next st *sk next st (sc, dc) in next st* rpt from *to* till end of rnd. Join with sl st. Ch 1, turn. (54)
From this point forward be sure to work (sc, dc) in dc
Rnds 10-19: (Sc, dc) in 1st dc *sk next st (sc, dc) in next dc* rpt from *to* till end of rnd. Join with sl st. Ch 1, turn. (54)
If you want to make a hat with no ear flaps repeat last two rounds once and finish with single crochet or reverse single crochet.
After last round, fasten off and weave in ends.
Earflaps (Make 2)
Ch 11
Row 1: Sc in 2nd ch from hook and each stitch across (10) Ch 1, turn.
Row 2: Sk 1st st (sc, dc) in next *sk next st, (sc, dc) in next* rpt from *to* till end of row. (10) Ch 1, turn.
Rows 3-8: Repeat row 2
Row 9: Sc2tog, sc, sc2tog, sc next 2 sts, sc2tog, sc last st (7) Ch 1, turn.
Row 10: Sc2tog, sc next 2 sts, sc2tog, sc (5) Ch 1, turn.
Row 11: Sc2tog, sc, sc2tog (3) Fasten off and weave in ends
Using tapestry needle and yarn stitch earflaps to the hat placing just slightly to the back of hat. Fasten off and weave in all ends.
Join yarn at fasten off point at back of hat. Working left to right rsc in each st around.
Fasten off and weave in all ends.
Thank you for supporting my work!
Happy Crocheting,
Cyprianne