


The Logan Bucket Hat is a quick and easy crochet pattern that’s perfect for sunny days, weekend adventures, or just leveling up your handmade wardrobe. If you’re seeking a free crochet bucket hat pattern, this one offers a comfortable fit, modern shape, and just enough textured detail to keep things interesting. This crochet bucket hat pattern is one of those projects you’ll want to come back to again and again.
This pattern includes complete written instructions for all sizes—from 0–6 months to adult large—so you can crochet one for your baby niece, your teen, your partner… or keep them all for yourself. No judgement here.
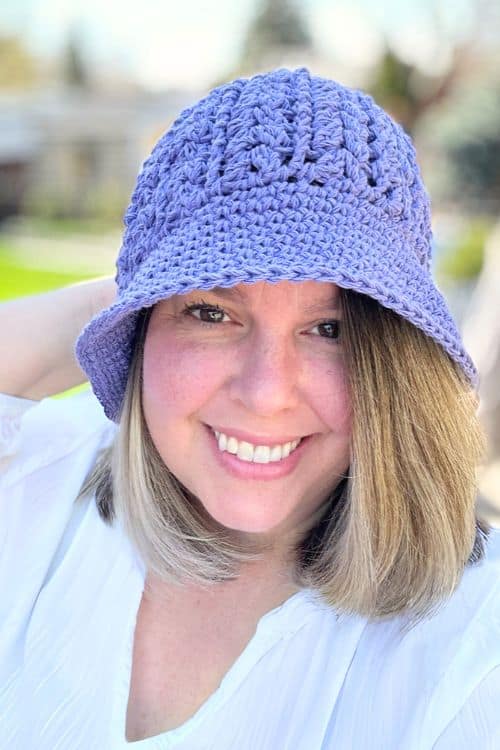
You’ll get everything you need to succeed:
- A step-by-step crochet video tutorial
- Gauge swatch instructions
- A full list of materials
- And detailed how-tos for the special stitches like the cluster stitch (CL) and front post double crochet (FPdc)
The brim is worked in continuous spiral rounds for a smooth, seamless finish—because nobody wants weird bumps on their bucket hat.
Most Popular
Crochet Patterns for Summer
Why You’ll Love the Logan Bucket Hat Pattern
Whether you’re crocheting for your market stall, making a handmade gift, or stitching one up because you need a hat in every colour, the Logan Bucket Hat is:
- A fun and fast crochet project
- Ideal for confident beginners
- Perfect for experienced crocheters looking for a finish-in-a-day win
You can easily customize your crochet bucket hat with colour changes, stripe patterns, or even different yarn fibres depending on the season.

Construction Details
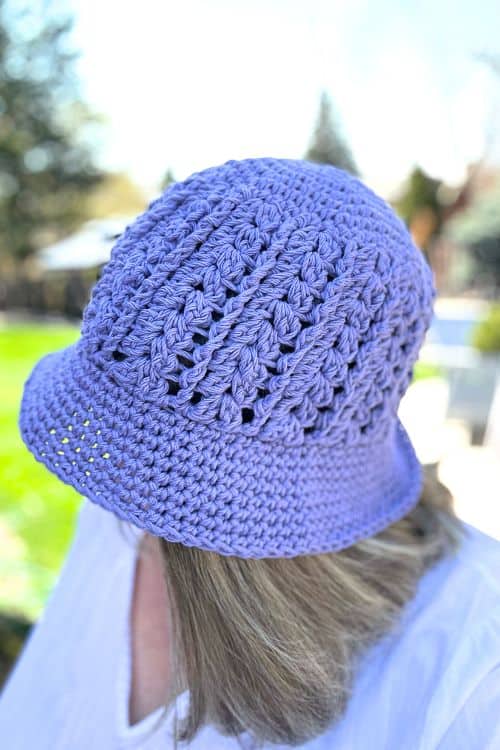
The construction of the Logan Bucket Hat is both straightforward and satisfying, making it a great pattern for crocheters of all skill levels.
- The crown is worked in the round, starting from the top down.
- The hat features single crochet (sc) and the textured cluster stitch (CL) for a sturdy yet flexible feel.
- The brim is created in continuous spiral rounds, so there are no visible seams—just a clean, smooth look all the way around.
Each round increases in a way that ensures proper fit for all sizes, from newborn to adult large, while keeping the shape consistent.
Skill Level: Easy / Beginner-Friendly
This is a beginner-friendly crochet pattern, even though it includes some stitches that might be new to you. Don’t worry—every technique is explained in detail, and the included video tutorial walks you through each step.
The cluster stitch (CL) might look fancy, but it’s surprisingly simple to learn. And once you’ve got the hang of it, you’ll be using it in all kinds of projects.
Understanding the Cluster Stitch (CL)
The cluster stitch is the star of the Logan Bucket Hat. It creates a beautiful, textured look that adds both style and structure to your finished hat.
In this pattern, the CL stitch helps the hat hold its shape while also giving it a modern, stylish edge. If you’ve never done it before, don’t stress—the video tutorial makes it easy to follow.

Yarn + Materials
For the best results, I recommend using 100% cotton yarn. It’s breathable, soft, and holds its shape well, making it a top choice for warm-weather accessories like this crochet bucket hat.
You’ll need:
- 50–100g of worsted weight cotton yarn
- 6.00 mm crochet hook
- Scissors, stitch markers, and a tapestry needle


Recommended Cotton Yarns
If you’re making this project and wondering what yarn to use, I’ve got you covered! I almost always reach for worsted weight 100% cotton yarns—they’re durable, absorbent, and hold up beautifully over time. Whether you’re making home decor, accessories, or baby items, these cottons are a great choice.
Bernat Handicrafter Cotton
The Bernat Handicrafter Cotton—thick, sturdy, and great for washcloths, coasters, and more. It has a matte texture and a dense feel, which gives your stitches really nice definition. If you’ve used it before, you know it’s a solid workhorse yarn.
Knit Picks Dishie
Dishie is probably the closest match to Handicrafter in terms of texture and weight. It’s a worsted weight 100% cotton that’s slightly smoother than Handicrafter, but still super durable. It also comes in a huge range of colours.
Lily Sugar’n Cream
Another long-time favourite, is Lily Sugar’n Cream in both weight and texture. It’s also 100% cotton and super sturdy, with a slightly more rustic feel. It works up nicely for everything from dishcloths to baskets and is widely available in stores.
You can’t go wrong with any of these! If you’re not sure what to choose, Knit Picks Dishie is a top pick when people want something super close to Bernat Handicrafter, especially for beginner-friendly projects.
🛒 Where to Buy Cotton Yarn Online
Common Questions About Crochet Bucket Hats. 💬
1. Can I crochet a bucket hat as a beginner?
Absolutely! The Logan Bucket Hat is a beginner-friendly crochet pattern with a step-by-step video tutorial to help you along the way.
2. What’s the best yarn for a crochet bucket hat?
I recommend cotton yarn, especially for spring and summer. It’s breathable, washable, and keeps its shape nicely.
3. How much yarn do I need?
That depends on the size you’re making. You’ll need about:
- 50g for baby sizes
- Up to 110g for adult large
4. How long does it take to crochet a bucket hat?
Most people finish theirs in 2–4 hours, depending on pace and experience. It’s a great weekend crochet project!
5. Can I sell what I make from this pattern?
Yes, absolutely. I love seeing what you make! You’re welcome to sell finished items from this pattern—of course I’d love you to credit me as the designer and tag me on Instagram so I can cheer you on.

Ready to Crochet the Logan Bucket Hat?
The Logan Bucket Hat is one of those crochet patterns that hits that sweet spot: stylish, quick, and satisfying to make. It’s easy enough for beginners to follow and still enjoyable for experienced crocheters who want something relaxing to work on.
Whether you’re making it for a baby shower, a summer festival, or just because you want to learn a new crochet stitch, this free bucket hat crochet pattern has you covered—literally.
So grab your yarn, queue up the video tutorial, and get ready to crochet your new favourite hat. I can’t wait to see your version!

Purchase Ad Free Pattern – Instant Download!
Purchase the ad-free PDF for a smooth, distraction-free crocheting experience anytime, anywhere.
Already a subscriber? Check your latest email for your special discount code. Not subscribed yet? Sign up here to get yours!
Thanks so much for supporting my blog!
Did you make any of these?
I would love to see what you have made be sure to mention @prettydarnadorable or tag me using #prettydarnadorable on Instagram so I can see your creations!
👉 Don’t forget to check out my Lacey Cotton Bucket Hat and The Crochet Granny Stitch Bucket Hat tutorials for more helpful projects and tips!
Skill Level
Easy
Abbreviations
- ch – chain
- CL – cluster
- dc – double crochet
- FPdc – Front Post Double Crochet
- sc – single crochet
- sk – skip
- st – stitch
- sts – stitches
- slst – slip stitch
- rpt – repeat
- YO – yarn over
Gauge
Approximately 11.5 single crochet stitches per 4 inches (10 cm) in rows using a 6 mm hook. This measurement is based on stitch width only and does not include row height, as the textured stitch pattern affects vertical measurements and makes it less reliable for standard gauge swatches. For best results, check your stitch count across the width of your swatch to ensure your sizing matches
A gauge swatch is vital for a well-fitting crochet hat. It determines stitch tension and measures the number of stitches and rows. Comparing it to the pattern’s gauge ensures the final hat fits as desired. Adjust hook or tension if needed for a perfectly fitting hat.
To do a crochet gauge swatch using a single crochet stitch, start by using the same type of yarn and crochet hook that you plan to use for your hat. Begin crocheting a square swatch using the single crochet stitch, making sure to maintain an even tension throughout. Once your swatch is complete, measure it using a ruler or measuring tape to determine the number of stitches and rows per inch.
Even though the hat is made using a different stitch, this gauge swatch will give you an idea of how your tension will affect the overall size of your finished product.
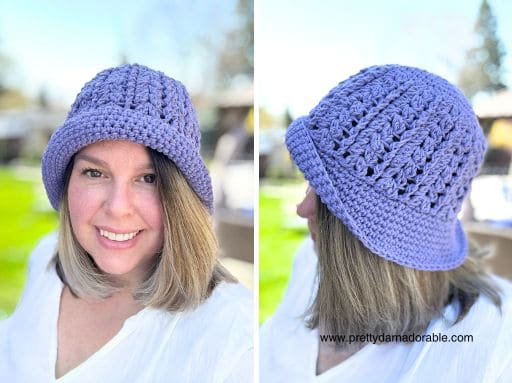
Finished Measurements & Yarn Requirements
0 to 6 months:
Width: 16”
Height: 6”
Yarn: 50g, 80m, 1.76 oz, 88 yds
6 to 12 months:
Width: 17”
Height: 6.5”
Yarn: 60g, 96m, 2.12 oz, 105 yds
12 months to 3 yrs:
Width: 18”
Height: 7.5”
Yarn: 80g, 128m, 2.82 oz, 140 yds
3 to 10 yrs:
Width: 19.5”
Height: 8.5”
Yarn: 95g, 152m, 3.35 oz, 166 yds
Adult:
Width: 21”
Height: 9.5”
Yarn: 110g, 176m, 3.88 oz, 193 yds
Please note that the actual amount of yarn needed may change depending on the yarn chosen always purchase a little more than you think you may need..
Materials Needed
Yarn used in pattern (see sizing chart above for exact amount required):
Yarn Gauge:
Gauge must be matched for the correct fit of this hat, matching the recommended yarn gauge can assist in successful substitution and result in a more accurate finished product.

Video Tutorial
Click below to Watch Video
Special Stitches
Note: This pattern uses the 2-double crochet cluster stitch (dc2-cl), which is made by working two double crochets in the same stitch and joining them at the top. To keep things simple, I’ll refer to them as “CL” throughout the pattern.
🧶 2-Double Crochet Cluster referred to as (CL) throughout this pattern
- Yarn over (YO), insert your hook into the stitch or space, YO and pull up a loop (3 loops on hook).
- YO, pull through 2 loops (2 loops on hook).
- YO, insert your hook into the same stitch, YO and pull up a loop (4 loops on hook).
- YO, pull through 2 loops (3 loops on hook).
- YO, pull through all 3 loops on the hook to close the cluster.
🧶 Front Post Double Crochet (FPDC)
- Yarn over (YO) as you would for a regular double crochet.
- Insert your hook from front to back to front around the post of the stitch below (not into the top of the stitch, but around the vertical part of the stitch).
- YO and pull up a loop (you’ll have 3 loops on your hook).
- YO, pull through 2 loops (2 loops remain).
- YO, pull through the last 2 loops.

Notes:
- If the pattern repeat doesn’t reach the exact end of the round, simply work the sequence as far as it will go. You can stop when you run out of stitches.
- Use a stitch marker to mark the first stitch of each round. This makes it much easier to track your rounds—especially in continuous (spiral) rounds.
- After increase rounds, count your stitches to ensure accuracy. Stitch counts are listed at the end of each round in parentheses.
- Brims are worked in a continuous spiral. Do not join or turn at the end of each round. Use a stitch marker to track the first stitch, and move it up as you go to keep rounds even.
0 to 6 Months
Note: Entire hat is worked continuously. Join when indicated in pattern. Use a stitch marker to mark the first stitch of each round for easier counting.
Ch 2
Rnd 1: Work 8 sc in 2nd st from hook (8)
Rnd 2: 2 sc in 1st st and each st around (16)
Rnd 3: 1 sc in 1st st *2 sc in next st, 1 sc in next st* rpt from * to * till end of rnd (24)
Rnd 4: 1 sc in 1st 2 sts *2 sc in next st, 1 sc in next 2 sts* rpt from * to * till end of rnd (32)
Rnd 5: 1 sc in 1st 3 sts *2 sc in next st, 1 sc in next 3 sts* rpt from * to * till end of rnd (40)
Rnd 6: 1 sc in 1st 10 sts *2 sc in next st, 1 sc in next 10 sts* rpt from * to * till end of round. (44)
Texture starts here:
Rnd 7: Dc in 1st st, skip next *(CL, ch1, CL) in next, sk next sc, dc in next, sk next* rpt from * to * till end of rnd. Join with slst, ch 1. (44)
Rnds 8 – 10: FPdc in dc below (CL, ch 1, CL) in 1st ch 1 space, *FPdc around next dc, (CL, ch 1, CL) in next ch 1 space* rpt from *to* till end of round.. Join with slst, ch 1. (44)
Rnd 11: Sc in 1st and each st around (44)
Brim
Rnd 1: (Work in front loop only) Sc in 1st 2 sts, *2 sc in the next st, sc in the next stitch, 2 sc in the next st, sc in next 2 sts*. Repeat from * to * around. (61)
Note: If you have extra stitches at the end of the round, just continue the pattern sequence until you run out.
Rnds 2 – 4: Sc in 1st and each stitch around. (61)

6 to 12 Months
Note: Entire hat is worked continuously. Join when indicated in pattern. Use a stitch marker to mark the first stitch of each round for easier counting.
Ch 2
Rnd 1: Work 8 sc in 2nd st from hook (8)
Rnd 2: 2 sc in 1st st and each st around (16)
Rnd 3: 1 sc in 1st st *2 sc in next st, 1 sc in next st* rpt from * to * till end of rnd (24)
Rnd 4: 1 sc in 1st 2 sts *2 sc in next st, 1 sc in next 2 sts* rpt from * to * till end of rnd (32)
Rnd 5: 1 sc in 1st 3 sts *2 sc in next st, 1 sc in next 3 sts* rpt from * to * till end of rnd (40)
Rnd 6: 1 sc in 1st 4 sts *2 sc in next st, 1 sc in next 4 sts* rpt from * to * till end of rnd (48)
Texture starts here:
Rnd 7: Dc in 1st st, skip next *(CL, ch1, CL) in next, sk next sc, dc in next, sk next* rpt from * to * till end of rnd. Join with slst, ch 1. (48)
Rnds 8 – 11: FPdc in dc below (CL, ch 1, CL) in 1st ch 1 space, *FPdc around next dc, (CL, ch 1, CL) in next ch 1 space* rpt from *to* till end of round. Join with slst, ch 1. (48)
Rnd 12: Sc in 1st and each st around (48)
Brim
Rnd 1: (Work in front loop only) Sc in 1st 2 sts, *2 sc in the next st, sc in the next stitch, 2 sc in the next st, sc in next 2 sts*. Repeat from * to * around. (67)
Note: If you have extra stitches at the end of the round, just continue the pattern sequence until you run out.
Rnds 2 – 5: Sc in 1st and each stitch around. (67)
1 – 3 Years
Note: Entire hat is worked continuously. Join when indicated in pattern. Use a stitch marker to mark the first stitch of each round for easier counting.
Using 6.00 mm hook Ch 2
Rnd 1: Work 8 sc in 2nd st from hook (8)
Rnd 2: 2 sc in 1st st and each st around (16)
Rnd 3: 1 sc in 1st st *2 sc in next st, 1 sc in next st* rpt from * to * till end of rnd (24)
Rnd 4: 1 sc in 1st 2 sts *2 sc in next st, 1 sc in next 2 sts* rpt from * to * till end of rnd (32)
Rnd 5: 1 sc in 1st 3 sts *2 sc in next st, 1 sc in next 3 sts* rpt from * to * till end of rnd (40)
Rnd 6: 1 sc in 1st 4 sts *2 sc in next st, 1 sc in next 4 sts* rpt from * to * till end of rnd (48)
Rnd 7: 1 sc in 1st 11 sts *2 sc in next st, 1 sc in next 11 sts* rpt from * to * until end of round. (52)
Texture starts here:
Rnd 8: Dc in first sc, skip next *(CL, ch1, CL) in next, sk next sc, dc in next, sk next* rpt from * to * till end of rnd. Join with slst, ch 1. (52)
Rnds 9 – 13: FPdc in dc below (CL, ch 1, CL) in 1st ch 1 space, *FPdc around next dc, (CL, ch 1, CL) in next ch 1 space* rpt from *to* till end of round. Join with slst, ch 1. (52)
Rnd 14: Sc in 1st and each st around (52)
Brim
Rnd 1: (Work in front loop only) Sc in 1st 2 sts, *2 sc in the next st, sc in the next stitch, 2 sc in the next st, sc in next 2 sts*. Repeat from * to * around. (72)
Note: If you have extra stitches at the end of the round, just continue the pattern sequence until you run out.
Rnds 2 – 6: Sc in 1st and each stitch around. (72)

3 – 10 Years
Note: Entire hat is worked continuously. Join when indicated in pattern. Use a stitch marker to mark the first stitch of each round for easier counting.
Ch 2
Rnd 1: Work 8 sc in 2nd st from hook. (8)
Rnd 2: 2 sc in 1st st and each st around (16)
Rnd 3: 1 sc in 1st st *2 sc in next st, 1 sc in next st* rpt from * to * till end of rnd (24)
Rnd 4: 1 sc in 1st 2 sts *2 sc in next st, 1 sc in next 2 sts* rpt from * to * till end of rnd (32)
Rnd 5: 1 sc in 1st 3 sts *2 sc in next st, 1 sc in next 3 sts* rpt from * to * till end of rnd (40)
Rnd 6: 1 sc in 1st 4 sts *2 sc in next st, 1 sc in next 4 sts* rpt from * to * till end of rnd (48)
Rnd 7: 1 sc in 1st 5 sts *2 sc in next st, 1 sc in next 5 sts* rpt from * to * till end of rnd (56)
Texture starts here:
Rnd 8: Dc in first sc, skip next *(CL, ch1, CL) in next, sk next sc, dc in next, sk next* rpt from * to * till end of rnd. Join with slst, ch 1. (56)
Rnds 9 – 14: FPdc in dc below (CL, ch 1, CL) in 1st ch 1 space, *FPdc around next dc, (CL, ch 1, CL) in next ch 1 space* rpt from *to* till end of round. Join with slst, ch 1. (56)
Rnd 15: Sc in 1st and each st around (56)
Brim
Rnd 1: (Work in front loop only) Sc in 1st 2 sts, *2 sc in the next st, sc in the next stitch, 2 sc in the next st, sc in next 2 sts*. Repeat from * to * around. (78)
Note: If you have extra stitches at the end of the round, just continue the pattern sequence until you run out.
Rnds 2 – 7: Sc in 1st and each stitch around. (78)
Adult 21” x 10”
Note: Entire hat is worked continuously. Join when indicated in pattern. Use a stitch marker to mark the first stitch of each round for easier counting.
Ch 2
Rnd 1: Work 8 sc in 2nd st from hook. (8)
Rnd 2: 2 sc in 1st st and each st around (16)
Rnd 3: 1 sc in 1st st *2 sc in next st, 1 sc in next st* rpt from * to * till end of rnd (24)
Rnd 4: 1 sc in 1st 2 sts *2 sc in next st, 1 sc in next 2 sts* rpt from * to * till end of rnd (32)
Rnd 5: 1 sc in 1st 3 sts *2 sc in next st, 1 sc in next 3 sts* rpt from * to * till end of rnd (40)
Rnd 6: 1 sc in 1st 4 sts *2 sc in next st, 1 sc in next 4 sts* rpt from * to * till end of rnd (48)
Rnd 7: 1 sc in 1st 5 sts *2 sc in next st, 1 sc in next 5 sts* rpt from * to * till end of rnd (56)
Rnd 8: 1 sc in 1st 13 sts *2 sc in next st, 1 sc in next 13 sts* rpt from * to * till end of rnd. (60)
Texture starts here:
Rnd 9: Dc in first sc, skip next *(CL, ch1, CL) in next, sk next sc, dc in next, sk next* rpt from * to * till end of rnd. Join with slst, ch 1. (60)
Rnds 10 – 16: FPdc in dc below (CL, ch 1, CL) in 1st ch 1 space, *FPdc around next dc, (CL, ch 1, CL) in next ch 1 space* rpt from *to* till end of round. Join with slst, ch 1. (60)
Rnd 17: Sc in 1st and each st around (60)
Brim
Rnd 1: (Work in front loop only) Sc in 1st 2 sts, *2 sc in the next st, sc in the next stitch, 2 sc in the next st, sc in next 2 sts*. Repeat from * to * around. (84)
Note: If you have extra stitches at the end of the round, just continue the pattern sequence until you run out.
Rnds 2 – 8: Sc in 1st and each stitch around. (84)

📌 Pin this pattern or subscribe to my newsletter to get all the newest free crochet patterns straight to your inbox.