


Free Crochet Bucket Hat Pattern for the Whole Family
This year seems to be all about crochet bucket hats – I have been obsessed with them. I’m excited to add this free crochet bucket hat pattern for the Lacey Bucket Hat in this blog post.
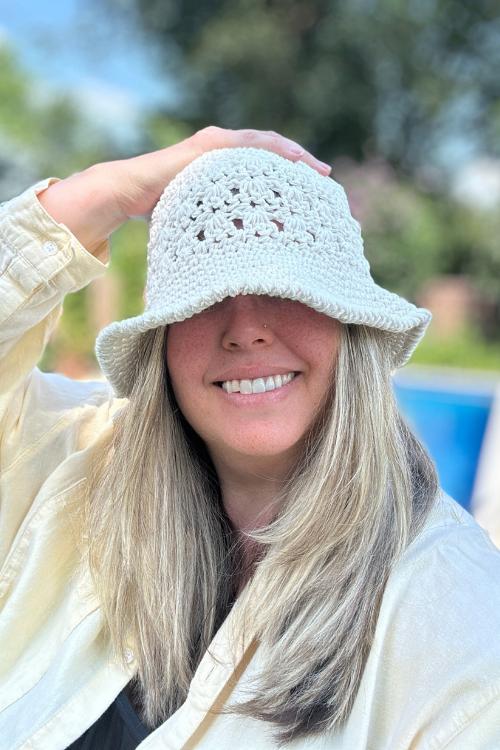
Made with the cotton yarn it is the perfect choice for warmer months and sunny days. The smaller brim makes it a stylish hat that seems to look perfect no matter where you are going. This fun and packable hat is perfect for the beach, the market, about town and of course for gardening.
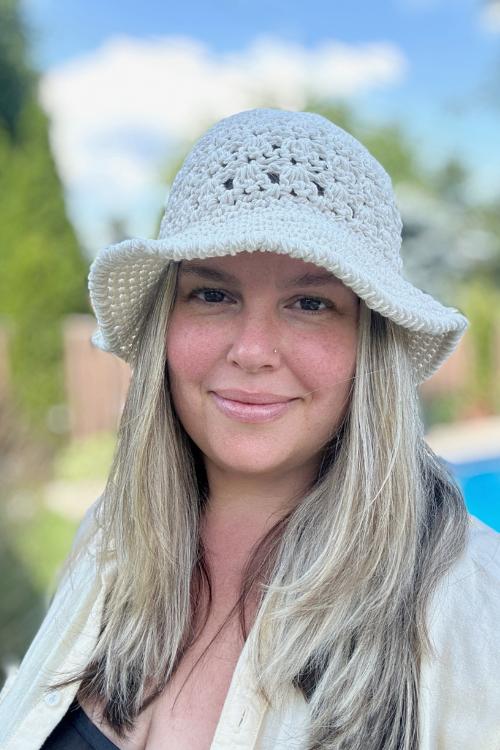
Scroll down for free crochet bucket hat pattern.
So that everyone can enjoy this free easy crochet bucket hat pattern I have included different sizes including newborn, toddler, child and adult so that you can find the right size for your head circumference. So no matter who you are crocheting for there is a size included. 🙂

I always recommend when possible to use a tape measure to measure the head of whom you are making it for. I also think for bucket hats a looser fitting hat makes for a more comfortable hat so you may want to keep that in mind when choosing the size you are going to make.
This easy bucket hat pattern is great for a beginner crocheter with the top of the hat (crown of the hat) is worked in increase rounds using single crochet stitches until you get to the body of the hat then the texture starts which is a simple combination of basic stitches – single crochet, chain stitch and double crochet stitches.
Purchase Ad Free Pattern – Instant Download!
Purchase the ad-free PDF for a smooth, distraction-free crocheting experience anytime, anywhere.
Already a subscriber? Check your latest email for your special discount code. Not subscribed yet? Sign up here to get yours!
Thanks so much for supporting my blog!

Love this texture – Make more like it


Best yarn for this pattern
I have only made this hat in cotton worsted weight yarn but I do think this simple bucket hat pattern would be really fun make for the cooler months as well. If you make it in the same weight acrylic yarn you could most likely make with no adjustments to the pattern if the yarn gauge is the same.
If you wanted to make in chunky yarn I think that would be easy to adjust. I would try going down a hook size which would create a tighter stitch and then should keep you around the same gauge as the pattern calls for.
Recommended Cotton Yarns
If you’re making this project and wondering what yarn to use, I’ve got you covered! I almost always reach for worsted weight 100% cotton yarns—they’re durable, absorbent, and hold up beautifully over time. Whether you’re making home decor, accessories, or baby items, these cottons are a great choice.
Bernat Handicrafter Cotton
The Bernat Handicrafter Cotton—thick, sturdy, and great for washcloths, coasters, and more. It has a matte texture and a dense feel, which gives your stitches really nice definition. If you’ve used it before, you know it’s a solid workhorse yarn.
Knit Picks Dishie
Dishie is probably the closest match to Handicrafter in terms of texture and weight. It’s a worsted weight 100% cotton that’s slightly smoother than Handicrafter, but still super durable. It also comes in a huge range of colours.
Lily Sugar’n Cream
Another long-time favourite, is Lily Sugar’n Cream in both weight and texture. It’s also 100% cotton and super sturdy, with a slightly more rustic feel. It works up nicely for everything from dishcloths to baskets and is widely available in stores.
You can’t go wrong with any of these! If you’re not sure what to choose, Knit Picks Dishie is a top pick when people want something super close to Bernat Handicrafter, especially for beginner-friendly projects.
🛒 Where to Buy Cotton Yarn Online

Free Crochet Lacey Bucket Hat Pattern
Skill Level
Easy
Abbreviations
- ch – chain
- dc – double crochet
- Lrsc – long reverse single crochet
- sc – single crochet
- st – stitch
- sts – stitches
- slst – slip stitch
- rpt – repeat
Gauge
A gauge swatch is vital for a well-fitting crochet hat. It determines stitch tension and measures the number of stitches and rows. Comparing it to the pattern’s gauge ensures the final hat fits as desired. Adjust hook or tension if needed for a perfectly fitting hat.
To do a crochet gauge swatch using a single crochet stitch, start by using the same type of yarn and crochet hook that you plan to use for your hat. Begin crocheting a square approximately 4” x 4” using the single crochet stitch, making sure to maintain an even tension throughout. Once your swatch is complete, measure it using a ruler or measuring tape to determine the number of stitches and rows per inch.
Even though the hat is made using a different stitch, this gauge swatch will give you an idea of how your tension will affect the overall size of your finished product.
Using 6.50 mm hook and #4 worsted weight yarn
12 rows + 12 sts across of sc = 4″ x 4″
You can do a quick gauge check using the photo on the next page. If you get the same measurement after round 7 your gauge is the same.
Crochet Bucket Hat Video Tutorial
Subscribe to my youtube channel
Finished Measurements & Yarn Requirements
0 to 6 months:
Width: 14”
Height: 5.5”
Yarn: 40g, 70m, 1.41 oz, 70 yds
6 to 12 months:
Width: 16”
Height: 6”
Yarn: 50g, 88m, 1.76 oz, 88 yds
12 months to 3 years:
Width: 18”
Height: 7”
Yarn: 65g, 114m, 2.29 oz, 114 yds
3 to 10 years:
Width: 20”
Height: 8.5”
Yarn: 85g, 149m, 3.00 oz, 149 yds
Adult:
Width: 22”
Height: 9.5”
Yarn: 105g, 184m, 3.70 oz, 184 yds
Please note that the actual amount of yarn needed may change depending on the yarn chosen always purchase a little more than you think you may need..
Materials Needed
- Cotton Worsted Weight Yarn – Exact requirements under chart above.
I made these hats in Bernat Handicrafter Cotton.
Please note that the actual amount of yarn needed may change depending on the yarn chosen always purchase a little more than you think you may need.
- Tapestry Needle
- Stitch Markers
- Scissors
- Measuring Tape
- 6.00 mm crochet hook used for brim of hat
- 6.50 mm crochet hook used for main part of hat
Yarn Gauge:
Gauge must be matched for the correct fit of this hat, matching the recommended yarn gauge can assist in successful substitution and result in a more accurate finished product.
Special Crochet Stitch Instructions
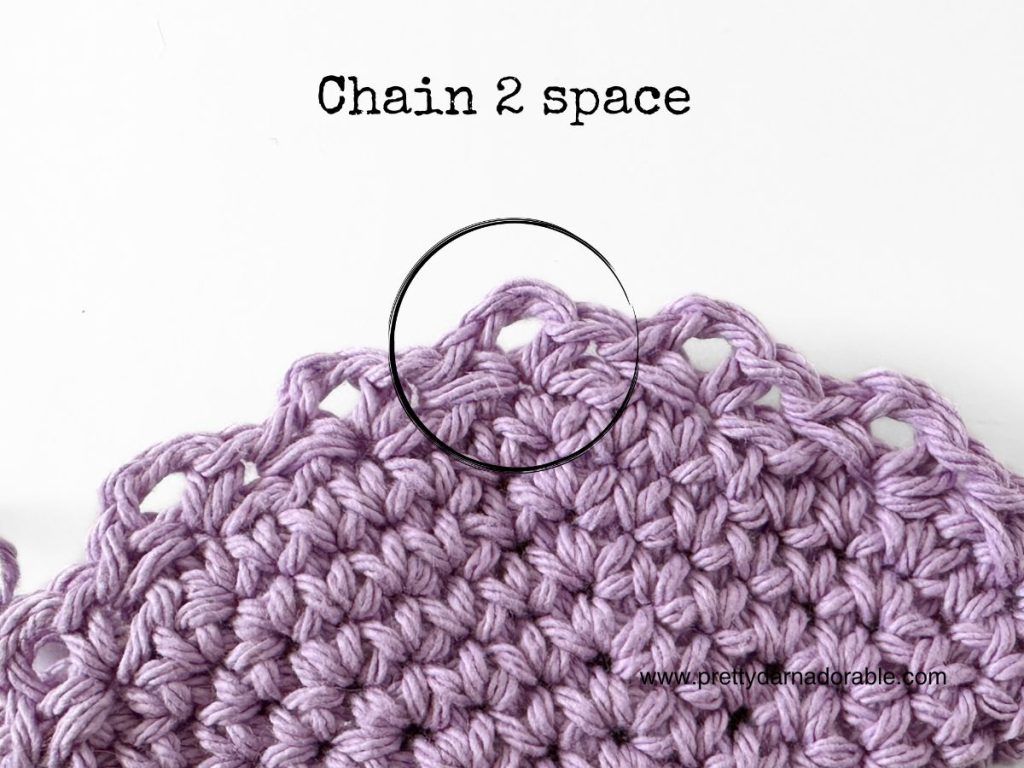
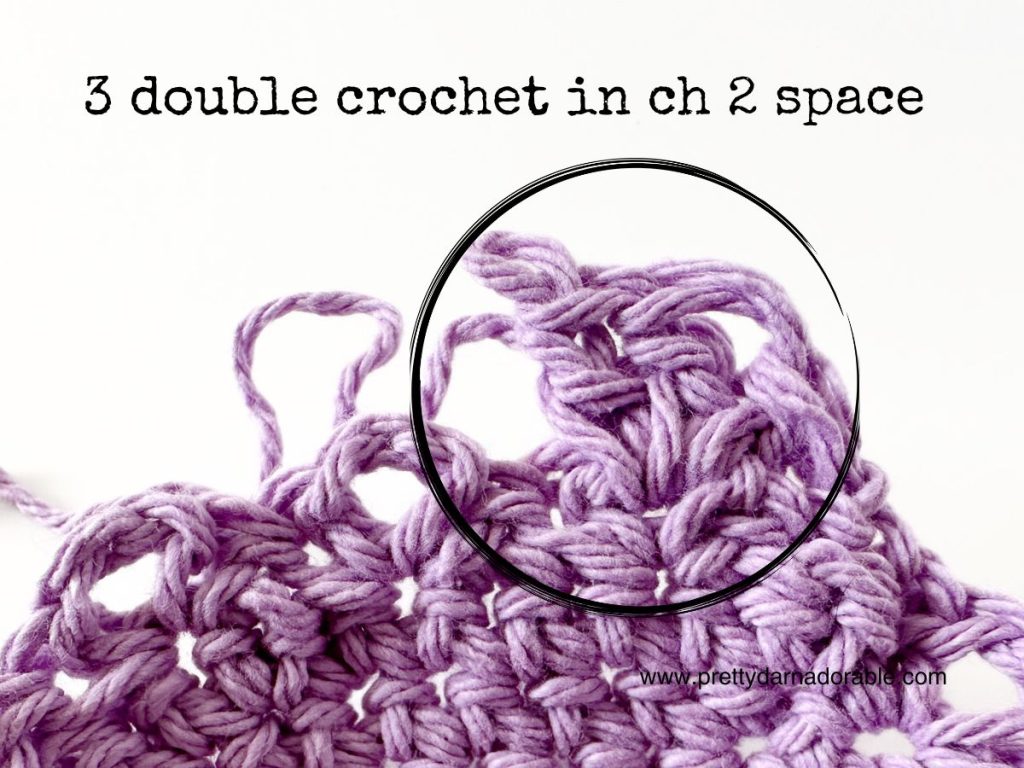
The Primrose Stitch: Provides the beautiful lacy texture of this hat. See portion of instructions on any size where it says “texture starts here” for complete instruction.
Below are a few reference photos so you know you are doing it correctly.
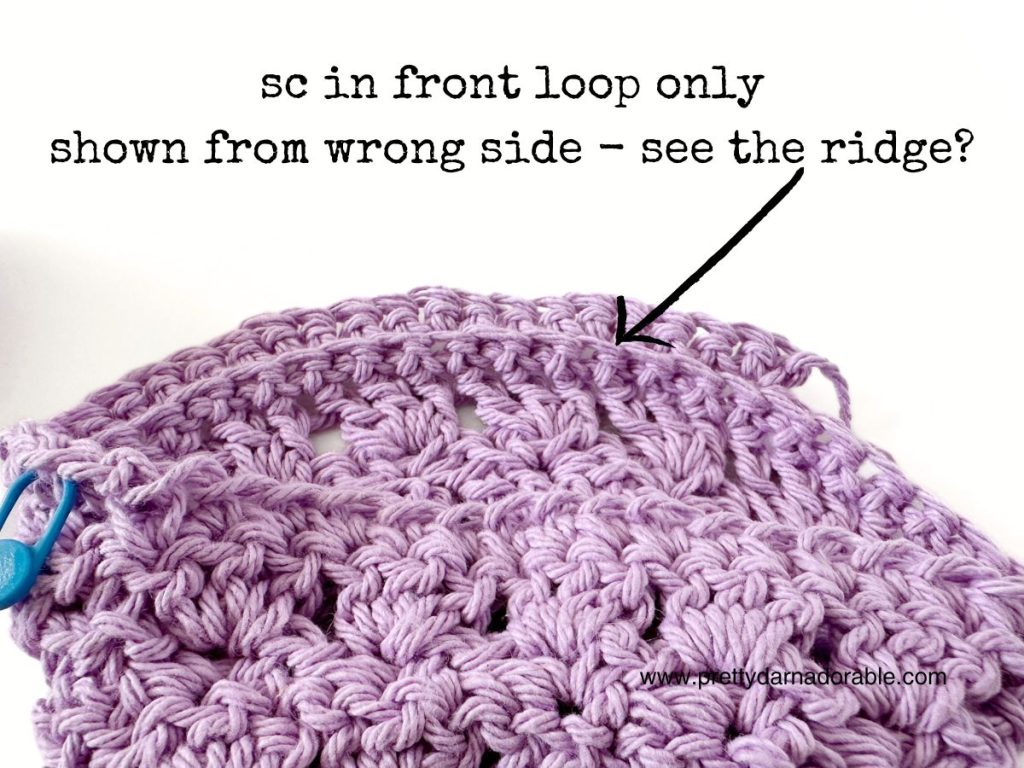
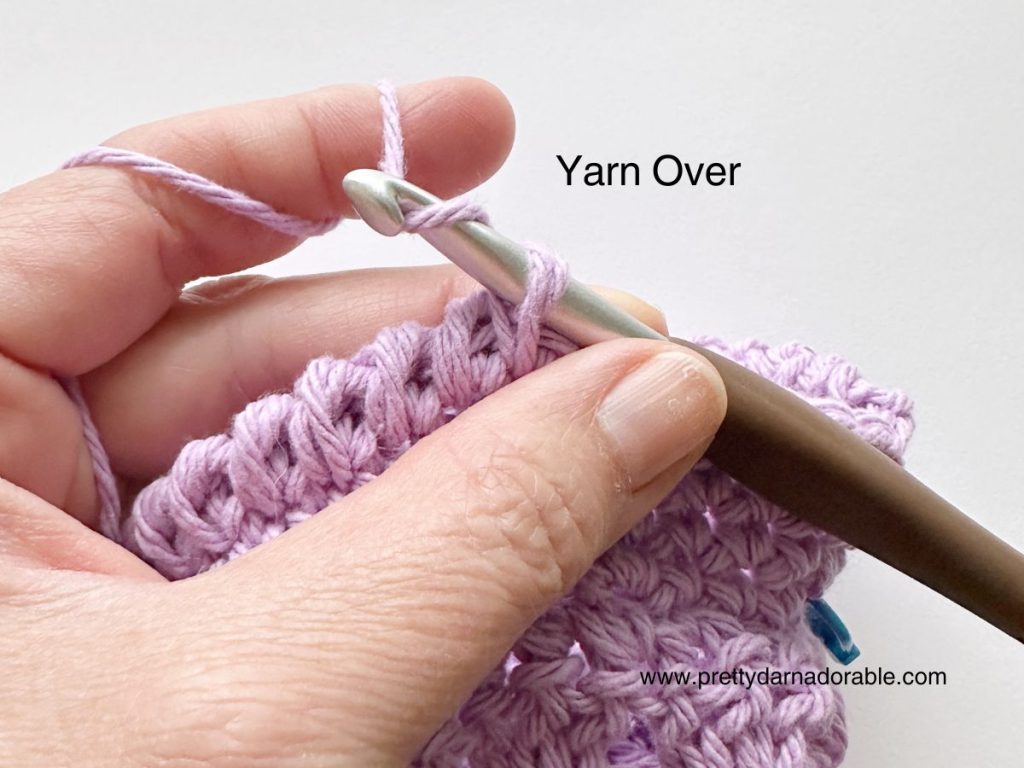
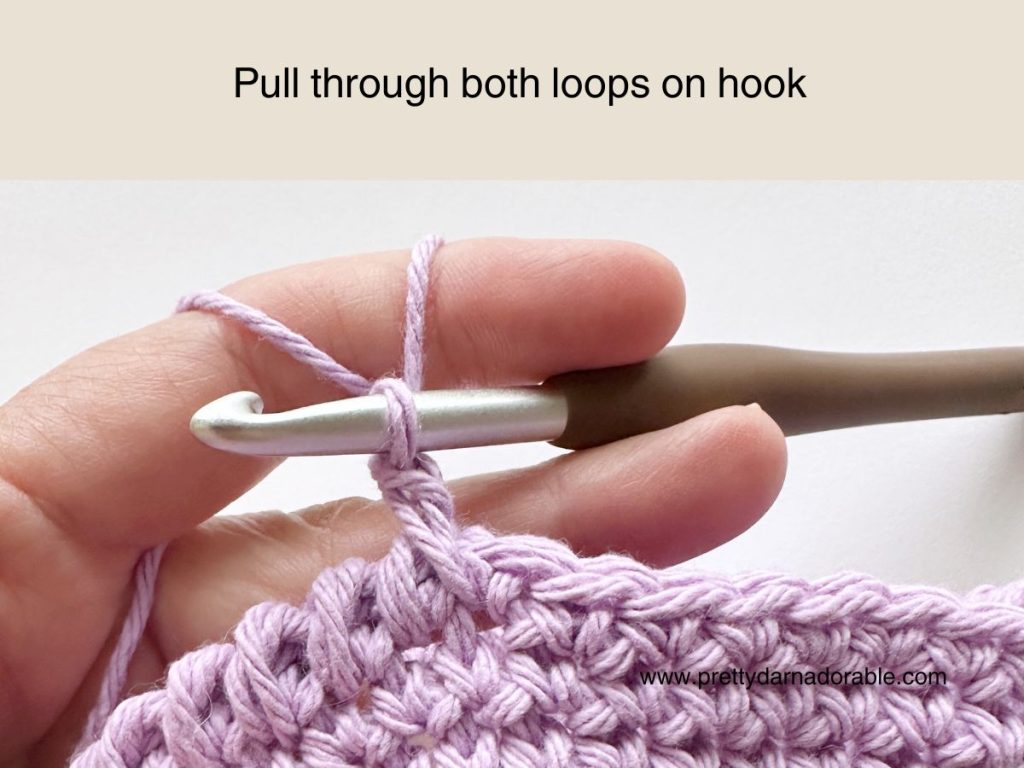
Front Loop Only: Insert your hook into the front loop only of the designated stitch (as opposed to both loops as usual). Yarn over and pull through both loops on hook.
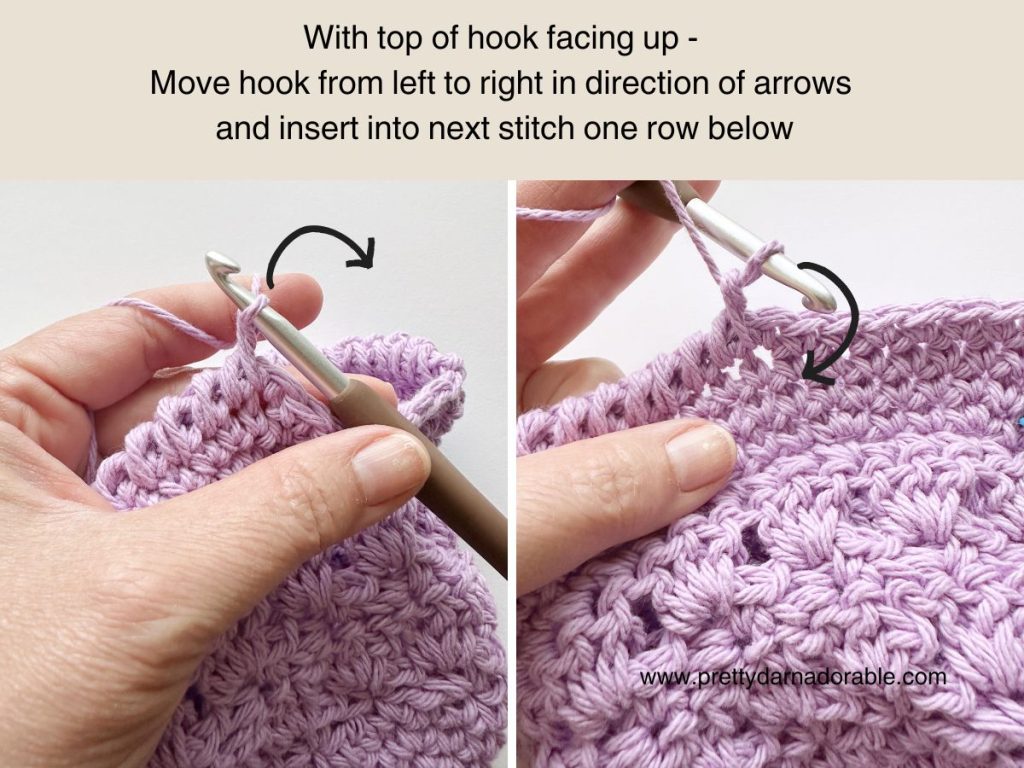
Long Reverse Single Crochet – Lrsc
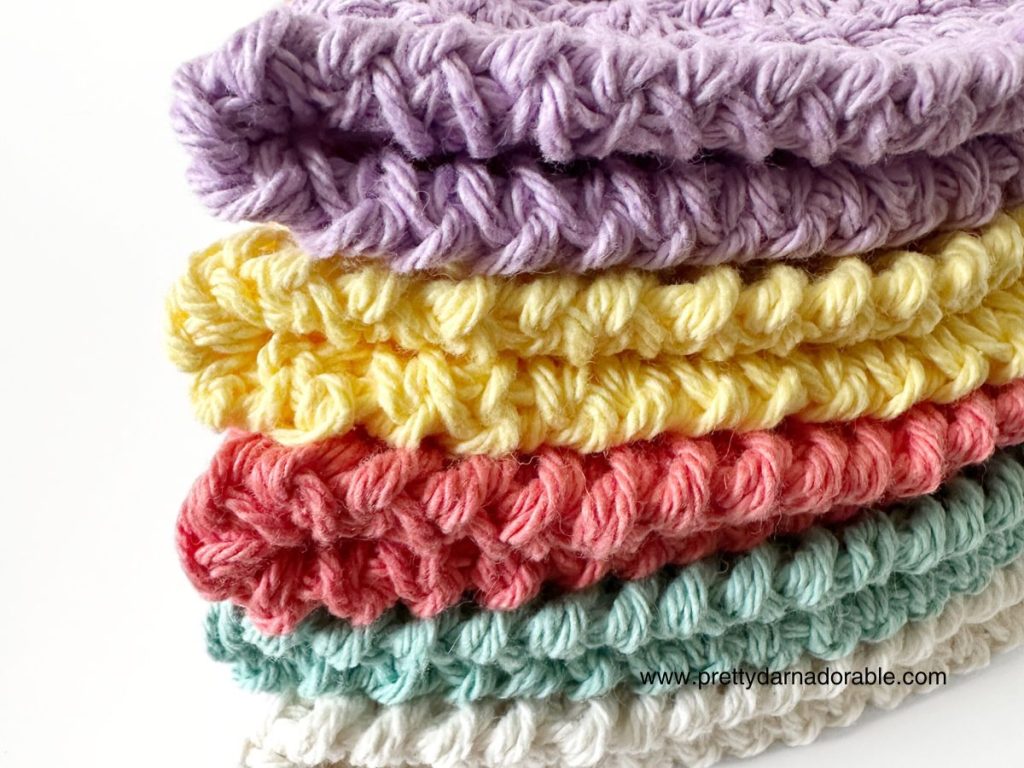
This technique results in a slightly twisted, rounded edge, making it ideal for creating a clean and straightforward finish for your projects.
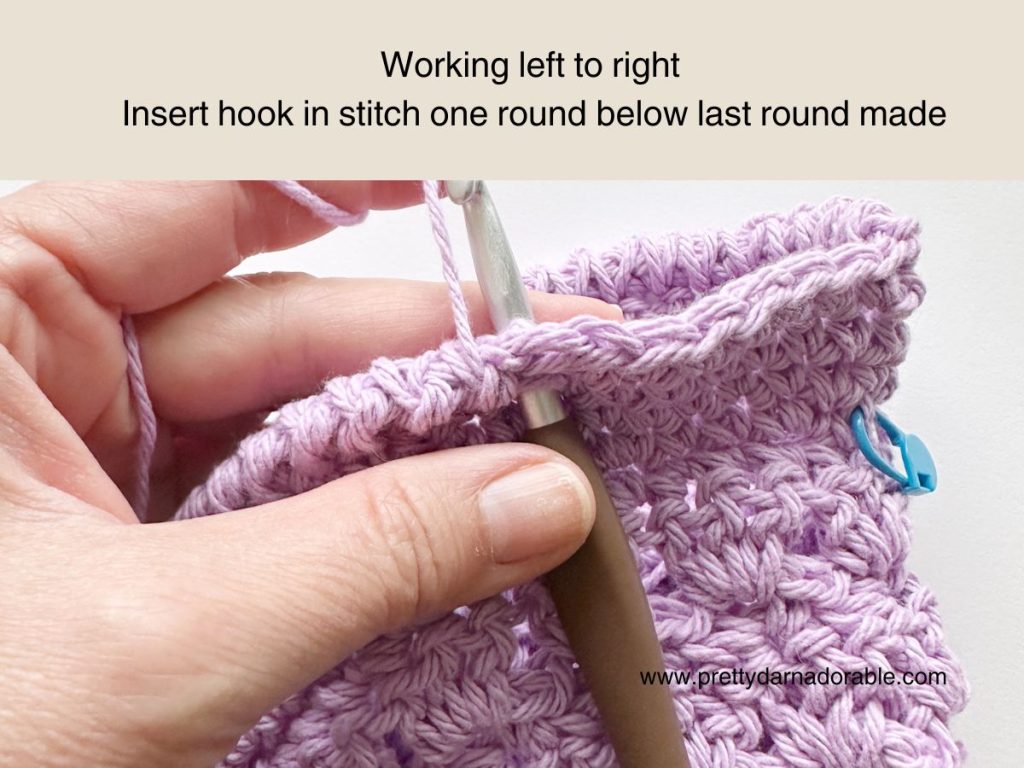
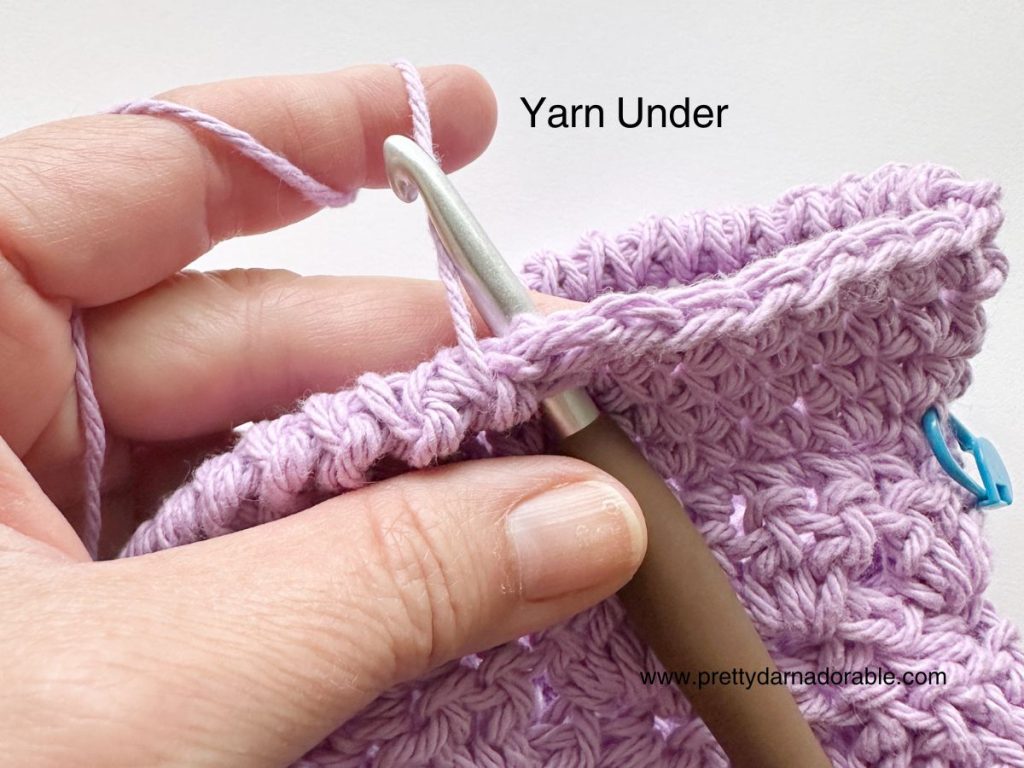
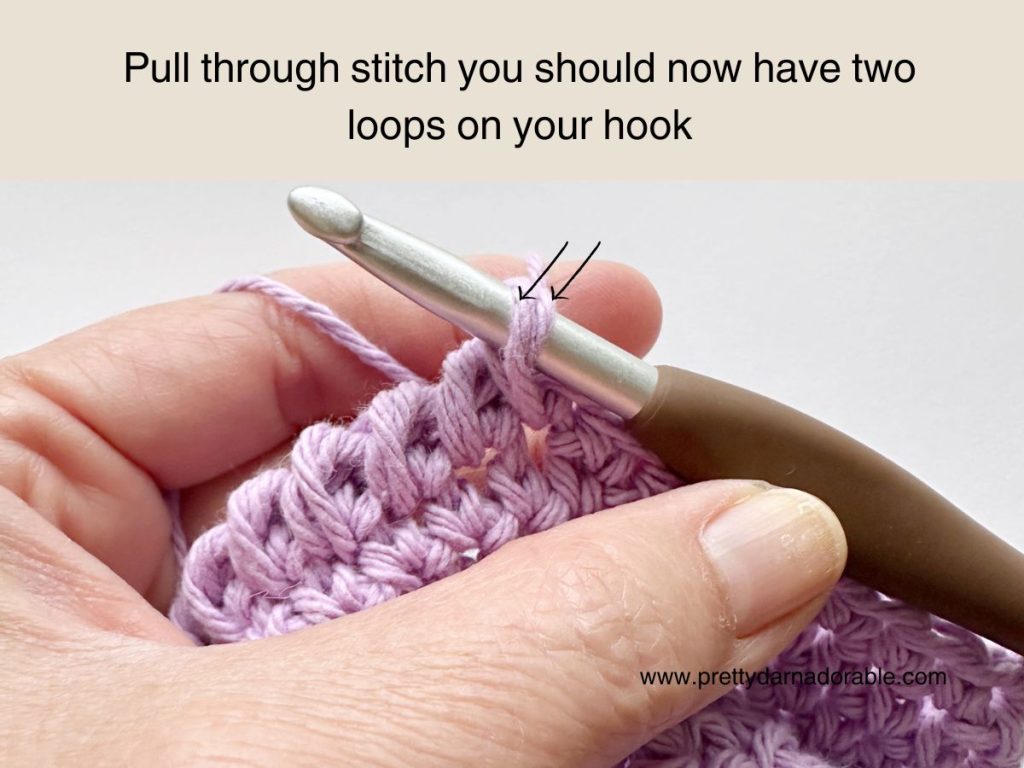
The reverse single crochet stitch, often referred to as the crab stitch, involves the same steps as a regular single crochet, but in the opposite direction. Typically abbreviated as rsc, this stitch is executed from left to right instead of the usual right to left.
The Long Reverse Single Crochet is worked in the exact same way but is worked into the ROUND BELOW. This gives the stitch a longer look – if you prefer the regular reverse single crochet that will absolutely work too!
See photos below for more help:
Crochet Rose & Leaf Instructions
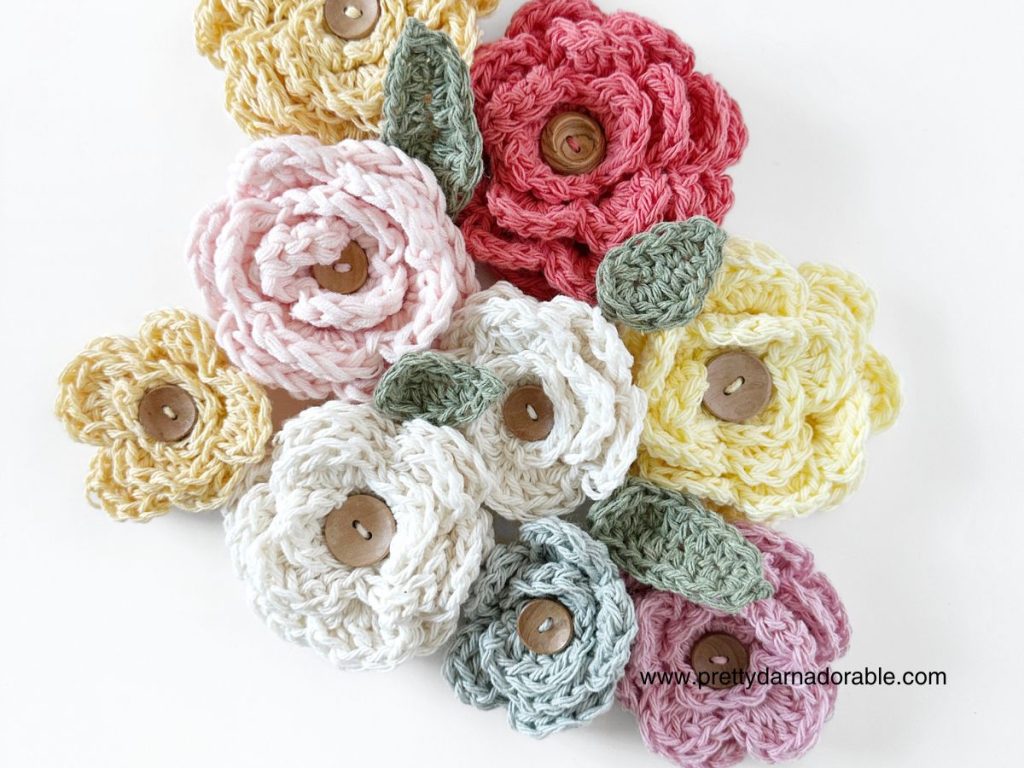
Use 6.50 mm hook,
Small Rose Ch 25
Medium Rose Ch 35 (click for video)
Large Rose Ch 55
Row 1: 1 dc in 5th chain from hook, *Ch 1, sk 1 ch, (dc, ch1, dc) in next st* rpt from *to* till end of row, ch 2 turn
Row 2: (Hdc, 4 dc, hdc) 1st ch1 sp, slst in next ch1 sp. *(Hdc, 4 dc, hdc) in next ch1 sp, slst in next ch1 sp.* Rpt from *to* till end of row. Leave long tail to secure rose into place and for attaching to hat.
Shaping the Rose (click to watch this part in video)
Roll rose into shape very loosely so that rose stays large and flat. Thread tapestry yarn with long tail of yarn.
Starting at the base (underside) of the rose, stitch through the layers of petals.
Use small, discreet stitches to anchor the petals in place. Continue stitching around the entire rose, adjusting the shape as needed.
Once satisfied with the shape, weave in the yarn ends to secure and trim any excess.
LEAF 6.5 mm hook Ch 9 (click to watch this part in video)
Row1: Sc 2nd ch from hook, hdc next 3, dc next 3, 3 hdc in last ch (this will bring to the bottom loops, which will be called row 2)
Row 2: Dc in next 3 sts, hdc next 3 sts, sc in last st and fasten off leaving long tail for attaching to hat.
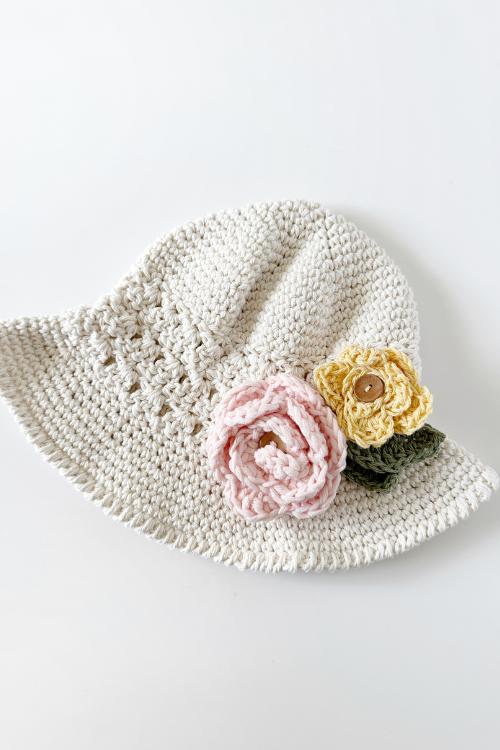
To attach a crochet rose and leaves to hat, thread a tapestry needle with yarn. Sew leaves to rose then position the rose on the hat and stitch it securely using small, discreet stitches around the base and through the petals. Weave in the yarn ends to secure, ensuring the rose is firmly attached.
Unlock Exclusive Content on Pretty Darn Adorable Crochet!
Quick heads-up before the sign-up form: some of my free crochet patterns and resources are now tucked behind a subscriber-only wall using a new feature called Grow’s Exclusive Content. This is to protect my content from being scraped by AI tools and popping up on random sites and being duplicated without permission. This new setup helps protect my work and keeps it available for actual crochet lovers like you.
If you’re already on my email list, you’re good, just sign in with a free Grow account when asked, and everything will unlock. And if you’re new, signing up gets you access to all the exclusive stuff (no unlocking things one by one). You can unsubscribe any time with one click right at the top of any email.
Thanks so much for all your support! 😊
Curious about all this AI business? I shared more about it in my post AI and the Crochet Community.
Free Crochet Bucket Hat Instructions
0 – 6 Months
Using 6.50 mm hook Ch 2
*Rounds 1 thru 7 are worked in continuous rounds. Do not join. Use a stitch marker at the beginning of round for easier counting.
Starting at the top of the hat
Rnd 1: Work 6 sc in 2nd st from hook. (6)
Rnd 2: 2 sc in 1st st and each st around. (12)
Rnd 3: 1 sc in 1st st *2 sc in next st, 1 sc in next st* rpt from * to * to 2nd last st, work 2 sc in last st. (18)
Rnd 4: 1 sc in 1st 2 sts *2 sc in next st, 1 sc in next 2 sts* rpt from * to * to 2nd last st, work 2 sc in last st. (24)
Rnd 5: 1 sc in 1st 3 sts *2 sc in next st, 1 sc in next 3 sts* rpt from * to * to 2nd last st, work 2 sc in last st. (30)
Rnd 6: 1 sc in 1st 4 sts *2 sc in next st, 1 sc in next 4 sts* rpt from * to * to 2nd last st, work 2 sc in last st. (36)
Rnd 7: 1 sc in 1st 5 sts *2 sc in next st, 1 sc in next 5 sts* rpt from * to * to 2nd last st, work 2 sc in last st. (42)
Texture Starts Here
Rnd 8: (Sc, ch 2, sc) in 1st sc, *sk next 2 sc, (sc, ch 2, sc) in next sc* rpt from * to * around (14 ch 2 spaces made). Skip the last two stitches then join with slst to 1st sc, ch 1 turn. (42)
Rnd 9: 3 dc in 1st ch 2 space and each ch 2 space around (42). Join with slst to 1st dc. Ch 1 turn. (42)
Rnd 10: Skip 1st st, (sc, ch 2, sc ) in 2nd dc, *sk next 2 dc, (sc, ch 2, sc) in next dc* rpt from * to * around (14 ch 2 spaces made). Skip the last two stitches then join with slst to 1st sc, ch 1 turn. (42)
Rnd 11: 3 dc in 1st ch 2 space and each ch2 space around (42). Join with slst to 1st dc. Ch 1 turn. (42)
Hat should be approximately 4.50” long at this point.
Change to 6.00 mm crochet hook
BRIM
Work brim in continuous rounds do not join or turn.
Rnd 12: Sc in 1st and each st around.
Rnd 13: Working in front loop only. Sc in 1st 2 sts, 2 sc in next. *sc in next 2 sts, 2 sc in next* Repeat from * to * to end of round. (56)
Rnds 14 – 16: Sc in 1st and each st around (56)
Rnd 17: Lrsc in 1st and each st around. (56)
Fasten off and weave in ends.
6–12 Months
Using 6.50 mm hook Ch 2
*Rounds 1 thru 9 are worked in continuous rounds. Do not join. Use a stitch marker at the beginning of round for easier counting.
Starting at the top of the hat
Rnd 1: Work 6 sc in 2nd st from hook. (6)
Rnd 2: 2 sc in 1st st and each st around. (12)
Rnd 3: 1 sc in 1st st *2 sc in next st, 1 sc in next st* rpt from * to * to 2nd last st, work 2 sc in last st. (18)
Rnd 4: 1 sc in 1st 2 sts *2 sc in next st, 1 sc in next 2 sts* rpt from * to * to 2nd last st, work 2 sc in last st. (24)
Rnd 5: 1 sc in 1st 3 sts *2 sc in next st, 1 sc in next 3 sts* rpt from * to * to 2nd last st, work 2 sc in last st. (30)
Rnd 6: 1 sc in 1st 4 sts *2 sc in next st, 1 sc in next 4 sts* rpt from * to * to 2nd last st, work 2 sc in last st. (36)
Rnd 7: 1 sc in 1st 5 sts *2 sc in next st, 1 sc in next 5 sts* rpt from * to * to 2nd last st, work 2 sc in last st. (42)
Rnd 8: 1 sc in 1st 6 sts *2 sc in next st, 1 sc in next 6 sts* rpt from * to * to 2nd last st, work 2 sc in last st. (48)
Rnd 9: Sc in 1st and each st around. (48)
Texture Starts Here
Rnd 10: (Sc, ch 2, sc) in 1st sc, *sk next 2 sc, (sc, ch 2, sc) in next sc* rpt from * to * around (16 ch 2 spaces made). Skip the last two stitches then join with slst to 1st sc, ch 1 turn.
Rnd 11: 3 dc in 1st ch 2 space and each ch 2 space around (48). Join with slst to 1st dc. Ch 1 turn.
Rnd 12: Skip 1st st, (sc, ch 2, sc ) in 2nd dc, *sk next 2 dc, (sc, ch 2, sc) in next dc* rpt from * to * around (16 ch 2 spaces made). Skip the last two stitches then join with slst to 1st sc, ch 1 turn.
Rnd 13: 3 dc in 1st ch 2 space and each ch2 space around (48). Join with slst to 1st dc. Ch 1 turn.
Rnd 14: Sc in 1st and each st around (48)
Hat should be approximately 4.75” long at this point.
The following rounds will be worked continuously without joining including the brim.
Change to 6.00 mm crochet hook
BRIM
Work brim in continuous rounds do not join or turn.
Rnd 15: Working in front loop only. Sc in 1st 2 sts, 2 sc in next. *sc in next 2 sts, 2 sc in next* Repeat from * to * to end of round. (64)
Rnds 16 – 18: Sc in 1st and each st around (64)
Rnd 19: Lrsc in 1st and each st around. (64)
Fasten off and weave in ends.

1 – 3 Years
Using 6.50 mm hook Ch 2
*Rounds 1 thru 11 are worked in continuous rounds. Do not join. Use a stitch marker at the beginning of round for easier counting.
Starting at the top of the hat
Rnd 1: Work 6 sc in 2nd st from hook. (6)
Rnd 2: 2 sc in 1st st and each st around. (12)
Rnd 3: 1 sc in 1st st *2 sc in next st, 1 sc in next st* rpt from * to * to 2nd last st, work 2 sc in last st. (18)
Rnd 4: 1 sc in 1st 2 sts *2 sc in next st, 1 sc in next 2 sts* rpt from * to * to 2nd last st, work 2 sc in last st. (24)
Rnd 5: 1 sc in 1st 3 sts *2 sc in next st, 1 sc in next 3 sts* rpt from * to * to 2nd last st, work 2 sc in last st. (30)
Rnd 6: 1 sc in 1st 4 sts *2 sc in next st, 1 sc in next 4 sts* rpt from * to * to 2nd last st, work 2 sc in last st. (36)
Rnd 7: 1 sc in 1st 5 sts *2 sc in next st, 1 sc in next 5 sts* rpt from * to * to 2nd last st, work 2 sc in last st. (42)
Rnd 8: 1 sc in 1st 6 sts *2 sc in next st, 1 sc in next 6 sts* rpt from * to * to 2nd last st, work 2 sc in last st. (48)
Rnd 9: 1 sc in 1st 7 sts *2 sc in next st, 1 sc in next 7 sts* rpt from * to * to 2nd last st, work 2 sc in last st. (54)
Rnds 10 & 11: Sc in 1st and each st around. (54)
Texture Starts Here
Rnd 12: (Sc, ch 2, sc) in 1st sc, *sk next 2 sc, (sc, ch 2, sc) in next sc* rpt from * to * around (18 ch 2 spaces made). Skip the last two stitches then join with slst to 1st sc, ch 1 turn.
Rnd 13: 3 dc in 1st ch 2 space and each ch 2 space around (54). Join with slst to 1st dc. Ch 1 turn.
Rnd 14: Skip 1st st, (sc, ch 2, sc ) in 2nd dc, *sk next 2 dc, (sc, ch 2, sc) in next dc* rpt from * to * around (18 ch 2 spaces made). Skip the last two stitches then join with slst to 1st sc, ch 1 turn.
Rnd 15: 3 dc in 1st ch 2 space and each ch2 space around (54). Join with slst to 1st dc. Ch 1 turn.
Rnd 16: Sc in 1st and each st around (54)
Hat should be approximately 5.5” long at this point.
The following rounds will be worked continuously without joining including the brim.
Change to 6.00 mm crochet hook
BRIM
Work brim in continuous rounds do not join or turn.
Rnd 17: Working in front loop only. Sc in 1st 2 sts, 2 sc in next. *sc in next 2 sts, 2 sc in next* Repeat from * to * to end of round. (72)
Rnd 18: Sc in 1st 8 sts, 2 sc in next. *sc in next 8 sts, 2 sc in next* Repeat from * to * to end of round. (80)
Rnds 19 – 21: Sc in 1st and each st around. (80)
Rnd 22: Lrsc in 1st and each st around. (80)
3 – 10 Years
Using 6.50 mm hook Ch 2
*Rounds 1 thru 12 are worked in continuous rounds. Do not join. Use a stitch marker at the beginning of round for easier counting.
Starting at the top of the hat
Rnd 1: Work 6 sc in 2nd st from hook. (6)
Rnd 2: 2 sc in 1st st and each st around. (12)
Rnd 3: 1 sc in 1st st *2 sc in next st, 1 sc in next st* rpt from * to * to 2nd last st, work 2 sc in last st. (18)
Rnd 4: 1 sc in 1st 2 sts *2 sc in next st, 1 sc in next 2 sts* rpt from * to * to 2nd last st, work 2 sc in last st. (24)
Rnd 5: 1 sc in 1st 3 sts *2 sc in next st, 1 sc in next 3 sts* rpt from * to * to 2nd last st, work 2 sc in last st. (30)
Rnd 6: 1 sc in 1st 4 sts *2 sc in next st, 1 sc in next 4 sts* rpt from * to * to 2nd last st, work 2 sc in last st. (36)
Rnd 7: 1 sc in 1st 5 sts *2 sc in next st, 1 sc in next 5 sts* rpt from * to * to 2nd last st, work 2 sc in last st. (42)
Rnd 8: 1 sc in 1st 6 sts *2 sc in next st, 1 sc in next 6 sts* rpt from * to * to 2nd last st, work 2 sc in last st. (48)
Rnd 9: 1 sc in 1st 7 sts *2 sc in next st, 1 sc in next 7 sts* rpt from * to * to 2nd last st, work 2 sc in last st. (54)
Rnd 10: 1 sc in 1st 8 sts *2 sc in next st, 1 sc in next 8 sts* rpt from * to * to 2nd last st, work 2 sc in last st. (60)
Rnds 11 – 13: Sc in 1st and each st around. (60)
Texture Starts Here
Rnd 14: (Sc, ch 2, sc) in 1st sc, *sk next 2 sc, (sc, ch 2, sc) in next sc* rpt from * to * around (20 ch 2 spaces made). Skip the last two stitches then join with slst to 1st sc, ch 1 turn.
Rnd 15: 3 dc in 1st ch 2 space and each ch 2 space around (60). Join with slst to 1st dc. Ch 1 turn.
Rnd 16: Skip 1st st, (sc, ch 2, sc ) in 2nd dc, *sk next 2 dc, (sc, ch 2, sc) in next dc* rpt from * to * around (20 ch 2 spaces made). Skip the last two stitches then join with slst to 1st sc, ch 1 turn.
Rnd 17: 3 dc in 1st ch 2 space and each ch2 space around (60). Join with slst to 1st dc. Ch 1 turn.
Rnd 18: Sc in 1st and each st around (60)
Hat should be approximately 6.5” long at this point.
Change to 6.00 mm crochet hook
BRIM
Work brim in continuous rounds do not join or turn.
Rnd 19: Working in front loop only. Sc in 1st 2 sts, 2 sc in next. *sc in next 2 sts, 2 sc in next* Repeat from * to * to end of round. (80)
Rnd 20: Sc in 1st 8 sts, 2 sc in next. *sc in next 8 sts, 2 sc in next* Repeat from * to * to last 8 sts. Sc in last 8 sts. (88)
Rnds 21 – 24: Sc in 1st and each st around (88)
Rnd 25: Lrsc in 1st and each st around. (88)
Adult
Using 6.50 mm hook Ch 2
*Rounds 1 thru 15 are worked in continuous rounds. Do not join. Use a stitch marker at the beginning of round for easier counting.
Starting at the top of the hat
Rnd 1: Work 6 sc in 2nd st from hook. (6)
Rnd 2: 2 sc in 1st st and each st around. (12)
Rnd 3: 1 sc in 1st st *2 sc in next st, 1 sc in next st* rpt from * to * till end of rnd. Place 2 sc in last st. (18)
Rnd 4: 1 sc in 1st 2 sts *2 sc in next st, 1 sc in next 2 sts* rpt from * to * till end of rnd. Place 2 sc in last st. (24)
Rnd 5: 1 sc in 1st 3 sts *2 sc in next st, 1 sc in next 3 sts* rpt from * to * till end of rnd. Place 2 sc in last st. (30)
Rnd 6: 1 sc in 1st 4 sts *2 sc in next st, 1 sc in next 4 sts* rpt from * to * till end of rnd. Place 2 sc in last st. (36)
Rnd 7: 1 sc in 1st 5 sts *2 sc in next st, 1 sc in next 5 sts* rpt from * to * till end of rnd. Place 2 sc in last st. (42)
Rnd 8: 1 sc in 1st 6 sts *2 sc in next st, 1 sc in next 6 sts* rpt from * to * till end of rnd. Place 2 sc in last st. (48)
Rnd 9: 1 sc in 1st 7 sts *2 sc in next st, 1 sc in next 7 sts* rpt from * to * till end of rnd. Place 2 sc in last st. (54)
Rnd 10: 1 sc in 1st 8 sts *2 sc in next st, 1 sc in next 8 sts* rpt from * to * till end of rnd. Place 2 sc in last st. (60)
Rnd 11: 1 sc in 1st 9 sts *2 sc in next st, 1 sc in next 9 sts* rpt from * to * till end of rnd. Place 2 sc in last st. (66)
Rnds 12 – 15: Sc in 1st st and each st around. (66)
Texture Starts Here
Rnd 16: (Sc, ch 2, sc) in 1st sc, *sk next 2 sc, (sc, ch 2, sc) in next sc* rpt from * to * around (22 ch 2 spaces made). Skip the last two stitches then join with slst to 1st sc, ch 1 turn.
Rnd 17: 3 dc in 1st ch 2 space and each ch 2 space around (66). Join with slst to 1st dc. Ch 1 turn.
Rnd 18: Skip 1st st, (sc, ch 2, sc ) in 2nd dc, *sk next 2 dc, (sc, ch 2, sc) in next dc* rpt from * to * around (22 ch 2 spaces made). Skip the last two stitches then join with slst to 1st sc, ch 1 turn.
Rnd 19: 3 dc in 1st ch 2 space and each ch2 space around (66). Join with slst to 1st dc. Ch 1 turn.
Rnd 20: Skip 1st st, (sc, ch 2, sc) in 2nd dc, *sk next 2 dc, (sc, ch 2, sc) in next dc* rpt from * to * around (22 ch 2 spaces made). Skip the last two stitches then do not turn. Continue with round 21 below.
Rnd 21: 3 dc in 1st ch 2 space and each ch2 space around (66). Join with slst to 1st dc. Ch 1 turn.
Hat should be approximately 7.5” long at this point.
Rnd 22: Sc in 1st and each st around (66)
The following rounds will be worked continuously without joining including the brim.
Change to 6.00 mm hook
BRIM
Work brim in continuous rounds do not join or turn.
Rnd 23: Working in front loop only. Sc in 1st 2 sts, 2 sc in next. *sc in next 2 sts, 2 sc in next* Repeat from * to * to end of round. (88)
Rnd 24: Sc in 1st and each st around (88)
Rnd 25: Sc in 1st 4 sts, 2 sc in next. *sc in next 4 sts, 2 sc in next* Repeat from * to * to last 3 sts. Sc last 3 sts. (105)
Rnds 26 – 29: Sc in 1st and each st around (105)
Rnd 30: Lrsc in 1st and each st around. (105)

Get Social with Me
Thank you for making me part of your day! If you enjoyed making it and want more crochet inspiration, be sure to follow me on social media and subscribe to my YouTube channel. I share all my latest patterns, tips, and tutorials there, and you don’t want to miss out!
Plus, if you make something using one of my patterns, I would absolutely love to see it – and I bet other crocheters would, too.
So, use the links below to connect with me on your favourite platforms, and let’s create something beautiful together. Thank you for your support, and happy hooking!

Free pattern, cotton yarn, slip stitch, affiliate links, stitch marker, magic ring, front loop, smaller hook, single crochet stitches, granny squares, slip stitch, Lion Brand, basic crochet stitches, free crochet pattern, magic circle, social media, larger hook, gauge swatch, best yarn, acrylic yarn, hook size, back loop, next stitch, basic stitches, first stitch, tape measure, different sizes, mm crochet hook, easy crochet bucket hat pattern, crown of the hat, ad-free PDFs, body of the hat, head circumference, free crochet bucket hat pattern, happy crocheting, step-by-step video tutorial, stylish hat, right size, bucket hat step, simple bucket hat pattern, skill level, blog post, raffia yarn, warmer months, great thing, first single crochet, strands of yarn, sunny days, different colors, easy bucket hat pattern, Facebook group, beginner crocheter, magic loop, free bucket hat pattern, different yarn weight, crochet skills, square bucket hat, packable hat, photo tutorials, insert hook, worsted weight yarn, US terms, free crochet hat patterns, wool blend, color changes, last stitch, head sizes, Dishie yarn, top of the hat, sun protection, Etsy shop, double crochet stitches, printable version, basic bucket hat, repeat rounds, free bucket hat crochet pattern, handmade hats, color change, different patterns, personal use, mm hook, hat game, increase rounds, perfect choice, color B, top of chain.