


Every year, I tell myself I don’t need to make any more Christmas decorations… and every year, I end up crocheting just one more. 😅
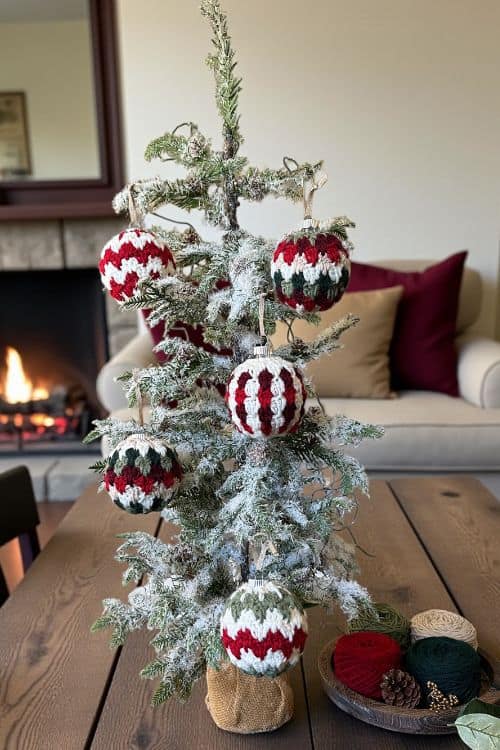
I love the idea of using these crochet bauble covers to repurpose old ornaments. A few of ours were scratched and chipped, so covering them in crochet was perfect! No landfill, no guilt. This easy crochet Christmas bauble cover pattern gives them a second life, wrapping each one in something soft, simple, and handmade.
This pattern fits both glass and plastic ornaments, works up quickly, and looks beautiful in every colour combination. Whether you’re adding to your own tree or gifting handmade crochet decorations, these baubles are the perfect touch of cozy.
What Makes This Easy Crochet Bauble Pattern So Great
This project is beginner-friendly, relaxing, and full of creative possibilities. Here’s why it’s sure to become a favourite:
- Beginner-friendly stitches – simple repeats of single crochet and double crochet
- Quick to make – each bauble takes about 30 minutes
- Customizable size – fits both plastic and glass ornaments
- Perfect stash-buster – only about 45 g of yarn needed
- Endless style options – change colours or add ribbons, twine, and tiny bells

Yarn Colour Ideas
You can make these baubles in endless colour combinations, from classic Christmas to modern minimal:
- Traditional: Cream base with red and green stripes
- Rustic farmhouse: Beige or taupe with white for a neutral look
- Scandi style: White and grey with a pop of red
- Modern metallic: Gold or silver with ivory yarn for sparkle

To create a coordinated look, choose a main colour palette and repeat it across your crochet Christmas ornaments. A set of three to five matching baubles makes a beautiful handmade gift, or bundle them in a clear box with ribbon for a personal touch.
Most Popular
Christmas Patterns
Tips for Beginners
- Don’t worry about perfect tension — the bauble cover stretches to fit snugly once it’s on the ornament.
- If you’re using multiple colours, change colours on the final slip stitch for a seamless look.
- Leave long tails when starting and finishing — these will close the top and bottom neatly.
- Use a yarn needle to weave the top closed once the bauble is inside.
- Acrylic yarn is easiest for beginners because it holds its shape well.

Finished Measurements & Yarn Requirements
The finished cover fits a 5″ bauble from centre top to bottom.
If using multiple colours, divide your total yarn amount by the number of shades you plan to use — for example, 45 g ÷ 3 colours = 15 g per colour.
Free Downloads
Gift Tags
Striping Notes
Each round is worked in a single colour. For clean colour transitions, finish the final slip stitch of the round with your new colour, then chain 1 and turn to continue.
If using three or more colours, carry your main shade and cut the contrast yarns each time for tidier results.

Frequently Asked Questions
Can beginners make this crochet bauble pattern?
Absolutely! If you can single crochet and double crochet, you can make this. It’s one of the easiest crochet Christmas ornament tutorials for beginners.
What yarn weight works best?
Use worsted weight yarn, it gives great texture and stretch, fitting snugly around both plastic and glass ornaments.
Can I use different sized baubles?
Yes! Just adjust your starting chain smaller ornaments need fewer stitches, and larger ones need more. Make sure it is a multiple of 6.
Can I sell finished baubles made from this pattern?
Yes, absolutely! You’re welcome to sell finished items made from this design — I just ask that you credit me, Pretty Darn Adorable, as the pattern designer whenever possible.
Purchase Ad Free Pattern – Instant Download!
Purchase the ad-free PDF for a smooth, distraction-free crocheting experience anytime, anywhere.
Already a subscriber? Check your latest email for your special discount code. Not subscribed yet? Sign up here to get yours!
Thanks so much for supporting my blog!
Free Crochet Country Charm Bauble Cover Pattern
Skill Level
Easy
Abbreviations (US Terms)
- ch – chain
- dc – double crochet
- ldc – long double crochet (see special stitches)
- sc – single crochet
- sk – skip
- sp – space
- st – stitch
- sts – stitches
- sl st – slip stitch
Gauge
No swatching required for this project.
Finished Measurements
This crochet bauble cover pattern is written for a bauble that measures 5” from centre top to centre bottom.
Finished dimensions and yarn requirements will change depending on the yarn and size of bauble used.

Materials Needed
- 45 grams (for solid colour) Worsted weight yarn – Lions Brand Pound of Love shown in photos
- Colours used: Olive, Winter Green, Cherry, Sugar Cookie, Antique White, Claret
- 5.50 mm Crochet hook
- Yarn needle
- Scissors
- Plastic Bauble
- Ribbon or premade bow
Please note that the actual amount of yarn needed may change depending on the yarn chosen always purchase a little more than you think you may need.
To adjust for multiple colours:
Take the total amount listed for the solid colour option and divide it by the number of colours you plan to use. This will give you the approximate amount of yarn needed for each colour.
Example:
If the solid colour option uses 45 g and you want to use 4 colours, divide 45 ÷ 3 = 15 g per colour.
Using Colours in Your Christmas Bauble
Follow the crochet bauble round instructions as written, and simply switch yarns according to the colour guide below.
Each round is worked completely in a single colour. At the end of the listed rounds, change colours as instructed.

How to change colours below.
Steps
- Work the round as written in the current colour.
- When you get to the very last slip stitch (sl st) of the round, stop before completing it.
- Drop the old colour and place the new colour on your hook.
- Pull the new colour through to finish the slip stitch – this completes the join for that round.
- Chain 1 and turn (as pattern instructs), now working the next round in the new colour.
- No need to weave in – simply tie a knot and tuck them to the inside of the bauble.
Note: Make sure all yarn tails from your colour changes are pulled to the same side of the bauble.
Round 1 is the outside of the bauble, so pull all tails to the inside. If you forget, no worries – just use your crochet hook to grab them through and pull them to the inside later.

Notes
- This bauble is worked in joined rounds, and you’ll turn at the end of each round to keep the texture even.
- Always leave a long tail at the beginning chain and at the end – these will be used to close the bauble later.
- Change colours on the final slip stitch of the round unless otherwise noted.
- Colour changes are done every round. (or as noted above)
- Stitch counts are included at the end of each round in ( ).
- Written in US crochet terms.
- Long double crochet (ldc) in Round 3 and beyond is worked into the sc of Round 1 (or into the middle st of the cluster below in later rounds).
- Always join with sl st unless otherwise noted.
- Turning chain does not count as a stitch.
- This crochet bauble cover can have many different looks just by adjusting colour changes.
Special Stitches
Long Double Crochet (ldc): Work double crochet around and in front of the previous Rnd and into the stitch indicated one Rnd below.
Cluster: In the space between groups of 3 dc, work (dc, ldc in middle st of cluster below, dc). When working ldc be sure to bring the height of the stitch up to match the height of the dc previously made in the space between the clusters.

Crochet Bauble Pattern
Leave a long tail at the beginning chain – this will be used later to close up your bauble.
Ch 27. Join with sl st to form a circle. Ch 1.
Rnd 1: Sc in 1st ch and each ch around. Join with sl st. Ch 1, turn. (27 sts)
Rnd 2: 3 dc in 1st sc, sk next 2 sts, *3 dc in next st, sk next 2 sts* repeat * to * around. Skip last 2 sts. Join with sl st, ch 1, turn. (27 sts)
Start colour changes here:
Rnd 3: In space before 1st cluster: (dc, ldc in sc below, dc). *Sk next cluster, in space before next cluster (dc, ldc in sc below, dc).* Repeat from * to * around. Skip last 2 sts. Join with sl st, ch 1, turn. (27 sts)
Rnd 4: Working in space before 1st cluster, (dc, ldc in middle st of cluster below, dc). *Sk next cluster, in space before next cluster (dc, ldc in 2nd st of cluster below, dc).* Repeat from * to *around. Skip last 2 sts. Join with sl st, ch 1, turn. (27 sts)
Rnds 5–10: Repeat Rnd 4. (27 sts each rnd)

Note for finishing round: You will no longer be working into the spaces. Work directly
into stitches as instructed below.
Finishing Round: Dc in middle st of cluster below, sk next st, sc in next 2 sts. *dc in middle
st of cluster below, sk next, sc in next 2 sts.* Repeat from *to* to last 3 sts. Skip next st,
sc in the last 2 sts. (27 sts). Fasten off, leaving a long tail for closing the bauble.
Note for finishing round: You will no longer be working into the spaces. Work directly
into stitches as instructed below.
Finishing Round: Dc in middle st of cluster below, sk next st, sc in next 2 sts. *dc in middle
st of cluster below, sk next, sc in next 2 sts.* Repeat from *to* to last 3 sts. Skip next st,
sc in the last 2 sts. (27 sts). Fasten off, leaving a long tail for closing the bauble.

Finishing Steps
Now that the main part of your crochet bauble pattern is complete, follow these steps to secure the cover:
- Using the yarn tail and a yarn needle, weave the needle in and out around the bottom edge of the bauble cover. Pull the yarn tight to close the bottom of the bauble, then weave in any remaining ends.
- Slide bauble into the ornament cover.
- Close the top – Using a yarn needle and yarn tail weave the needle back and forth between stitches. Pull the yarn until the top of bauble is closed. Weave in ends.
- Finishing touches: Weave in any remaining ends and add embellishments if you like.
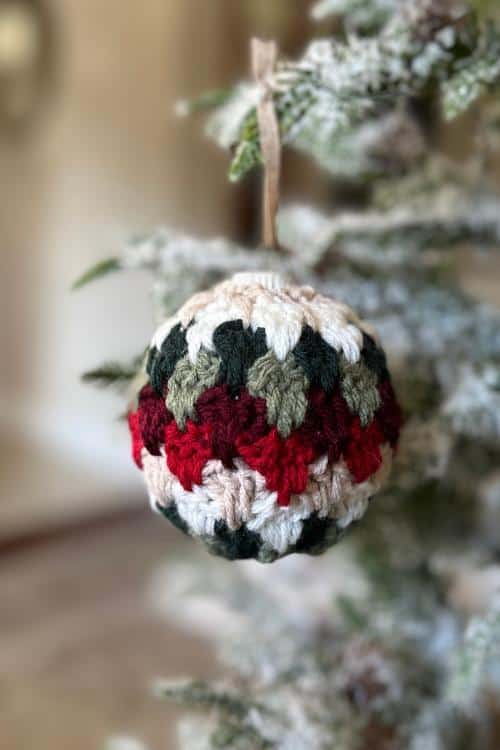
Top it off – Embellishment Ideas
Browsing thrift shops for vintage Christmas decorations is such a fun way to find unique pieces with tons of character. There’s something about discovering quirky old baubles, worn ribbons, or little bells that adds a cool, nostalgic vibe to your ornaments.
Adding these thrifted finds to your crochet baubles—like a ribbon from an old ornament or a tiny, weathered bell—gives each piece its own story. It’s a great way to make your holiday decorations feel even more personal and special.

Here are some more creative ideas for decorating the top of your crochet Christmas bauble:
Miniature Bow
Add a small satin or grosgrain ribbon bow at the top of the bauble. You can hot glue it in place or secure it with a stitch for a snug fit.
Rustic Twine Wrap
Wrap jute or natural twine around the top for a rustic touch. Tie it off in a small knot or bow to keep it secure.
Beaded Accent
Attach a few small beads or a charm on a thread, and tie it around the top. This adds a bit of sparkle and elegance, especially with metallic or crystal beads.
Mini Pinecone and Holly Cluster
Attach a tiny faux pinecone, a sprig of holly, or a few berry accents for a woodland feel. These can be hot glued or tied with a small piece of ribbon or twine.
Crochet Loop Hanger
Make a chain loop (about 15-20 chains, or to desired length), and attach it to the top as a built-in hanger. This gives a finished look and provides an easy way to hang your bauble on the tree.
Faux Snow
Add a touch of winter magic by brushing the top lightly with glue and sprinkling a bit of faux snow or iridescent glitter.
Tiny Bell
For a touch of sound and whimsy, attach a tiny bell with a small piece of yarn or ribbon. It adds an old-fashioned feel and gives the ornament a cheerful jingle.
Mini Crochet Holly Leaves
Crochet a few tiny holly leaves and berries, then sew or glue them around the top. It adds a handmade, festive detail to complete the look.
Any of these additions will make your bauble unique and charming!

This easy crochet Christmas bauble pattern adds a handmade touch to your tree while being simple enough for any crocheter to enjoy. Whether you go for classic red and green or soft neutral tones, each bauble tells its own story.
They also make wonderful handmade gifts — tie one onto a wrapped present, or create a full matching set for family and friends. Every stitch adds that extra bit of cozy, handmade magic that makes the holidays feel special.
If you make this project, I’d love to see your creations — tag me on Instagram @prettydarnadorable so I can share them!
Get the Pattern
🧶 Free version: Available right here on my blog — no sign-up needed.
📄 Printable PDF: Get the ad-free version with photo references on Etsy and Ravelry.
More Free Christmas Crochet Patterns You’ll Love
- Free Crochet Christmas Bauble Ornament Cover Pattern
- Christmas Stocking Ornament
- Crochet Granny Square Sweater Ornament Free Pattern
