


The hardest part about making these crochet towel holders was honestly cleaning my stove for the product photos.
Okay, that… and maybe crocheting around the wooden ring if you’re brand new to crochet but other than that, these might be some of the easiest little kitchen projects you’ll ever make.
This free crochet towel holder pattern is part of my Cedar Ridge collection and uses the same pretty texture created with simple stitches. The main body is worked with single crochet and chain stitches, which gives it that pretty raised lacey texture. So so easy!
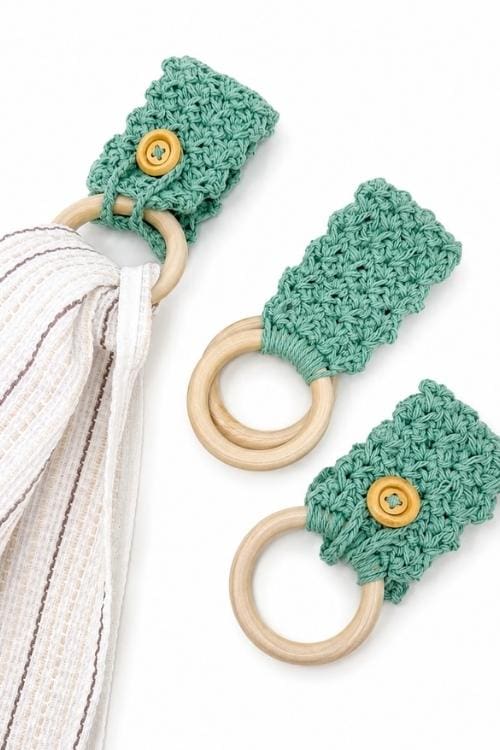
This pattern includes three different styles, so have a read and choose the one that works best for you. Especially if you are a beginner don’t be scared off by the wooden rings. I have an option that uses an easy work around so you don’t need to attach them.
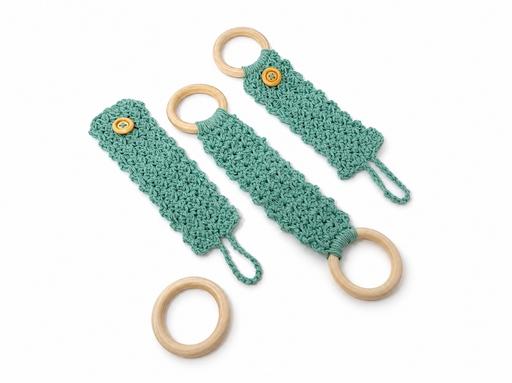
A Beginner Friendly Crochet Towel Holder
These crochet towel holders are made with simple stitches and a really easy repeat. The pattern uses single crochet and chain stitches, just like the Cedar Ridge mug cozy, where the texture looks more complicated than it really is.
The only part that may be a little tricky is working around the wooden ring. It’s not hard, but it does take a bit of patience because you’re holding the ring, the yarn, and the hook all at the same time.
So if you’re a confident beginner or beyond, I’d say go for it.
And if you’re not quite ready to crochet around a ring yet, I included a beginner version where you make a separate crochet piece and loop it through the wooden ring instead. No crocheting around the ring required.
Three Crochet Towel Holder Styles Included
This free crochet towel holder pattern includes three different versions:
1. Double Wooden Ring Towel Holder
This version is secured to two wooden craft rings, without the need for a button closure. This would be a good choice when gifting to someone who may have trouble with buttons or smaller closures.
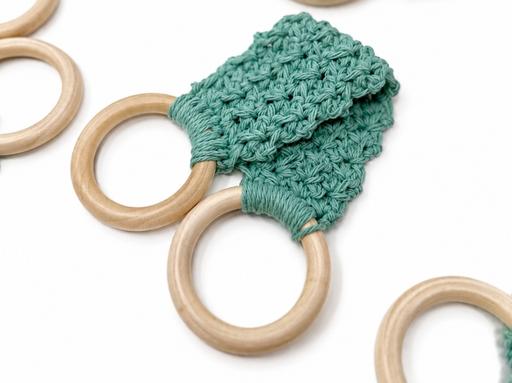
2. Wooden Ring and Button Closure Towel Holder
This version is crocheted around one wooden ring and then finished with a button closure. It’s a great option if you love the look of a classic hanging towel holder but don’t want to attach the crochet part permanently to a towel.
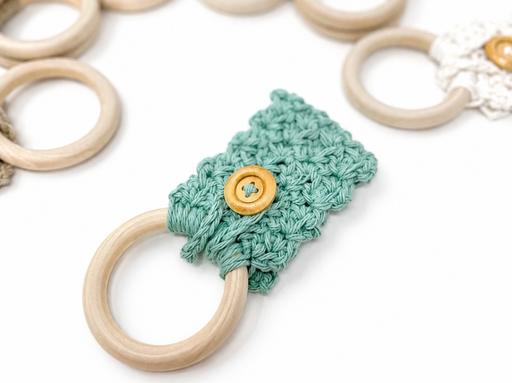
3. Beginner Friendly Loop Towel Holder – ATTENTION BEGINNERS!
This is the easiest version of the three. You crochet one separate piece, feed it through the wooden ring, and secure it with a button. It’s perfect if you don’t want to work stitches around the ring.
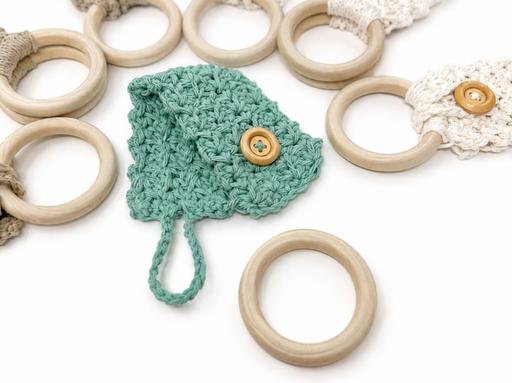
The completed pattern uses a 4.00 mm hook, worsted weight yarn, one 70 mm wooden craft ring, and a ¾” button, with the double ring version needing two wooden rings.
Why You Will Love This Crochet Towel Holder Pattern
These are different from the traditional crochet towel holders that are attached right to the towel.
Those are cute too, of course, but once the towel wears out, you lose the crochet piece along with it. With these, you can switch out the towel whenever you need to and keep using the holder.
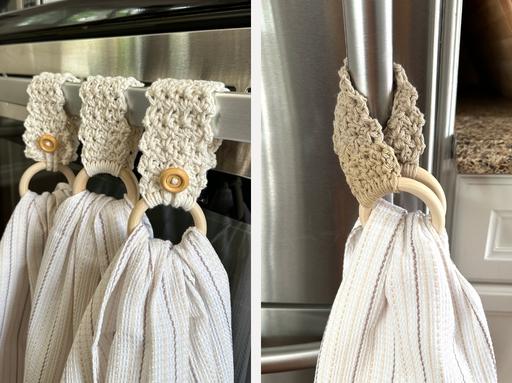
That also makes them really fun for seasonal decorating. You could make one in soft pastels for Easter, classic red and cream for Christmas, warm neutrals for fall, or bright colours for birthdays and hostess gifts.
You can also switch up the button. Little Christmas tree buttons, Easter egg buttons, hearts, flowers. I haven’t done this myself yet but think it would be super cute.
A Great Scrap Yarn Crochet Project
This is such a great project for using up small bits of yarn.
And since yarn seems to be worth a small fortune these days, which I was reminded of after wandering around Michaels for the first time in months 🙀 I am not throwing out any scraps!
These towel holders don’t use much yarn, so they’re perfect for those leftover bits and bobs that aren’t enough for a larger project.
The pattern calls for approximately 30 grams / 51 m / 55.8 yd of worsted weight yarn.
Choosing the Right Yarn
For this crochet towel holder pattern, I recommend worsted weight yarn.
Cotton is a great because it gives beautiful stitch definition and works well for kitchen items. Cotton blends would also work great.
You could use acrylic too, especially if you’re making these for craft fairs or gifts and want to use what you already have. Just keep in mind that different yarns may change the finished size slightly.
This pattern doesn’t require gauge, though tension may affect the finished measurements a little. The versions with wooden rings measure approximately 2” x 6.5”, and the version without wooden rings measures approximately 2” x 8”.
How to Crochet Around a Wooden Ring
This is the part that might feel new if you haven’t done it before.
You start with a slip knot on your hook and keep the working yarn over the wooden ring. Then you insert your hook under the ring, yarn over, pull up a loop, yarn over again, and pull through both loops on the hook.
That creates single crochet stitches directly around the wooden ring.
Once you get a few stitches on there, it starts to feel much easier. The pattern begins with 9 single crochet stitches worked evenly around the wooden ring for the ring versions.
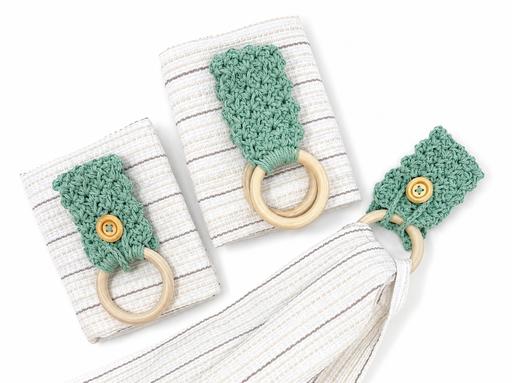
Perfect for Gifts and Craft Fairs
These crochet towel holders are such a nice little handmade gift.
Pair one with a pretty kitchen towel and you have an easy hostess gift, teacher gift, Mother’s Day gift, Christmas gift, or craft fair item.
They’re quick to make, don’t use a lot of yarn, and are practical enough that people will actually use them.
And for craft fairs, I think these are a good option because they are small, useful, and affordable. People may not always want to spend a lot these days, but a cute handmade kitchen item in that $5–$10 range feels like something they might happily grab.
Purchase Ad Free Pattern – Instant Download!
Purchase the ad-free PDF for a smooth, distraction-free crocheting experience anytime, anywhere.
Already a subscriber? Check your latest email for your special discount code. Not subscribed yet? Sign up here to get yours!
Thanks so much for supporting my blog!
Free Cedar Ridge Crochet Towel Holder Pattern
Skill Level
Easy
Abbreviations
ch – chain
sc – single crochet
sk – skip
sp – space
st – stitch
sts – stitches
sl st – slip stitch
rpt – repeat
yo – yarn over
Gauge
Gauge is not required for this design.
Tension may affect the finished size slightly.
Finished Measurements
Versions with wooden ring(s): approximately 2” x 6.5”
Version without wooden ring(s): approximately 2” x 8”
Materials Needed
4.00 mm hook
Tapestry needle
Needle that will fit through button holes
Stitch markers
1 button, approximately ¾”
70 mm wooden craft ring
Worsted weight yarn, approximately 30 grams / 51 m / 55.8 yd / 1.06 oz
Note: If you are making the double ring version, you will need two wooden craft rings.
Subscribe to my youtube channel
Video Tutorial
Prefer a visual walkthrough? Watch the full video tutorial below! If you want to skip ahead, speed up, or see a specific technique, check the timestamps in the YouTube video description.
Pattern Notes
- This pattern is written using standard US crochet terms.
- The ch 1 at the end of each row is a turning chain and does not count as a stitch.
- For the wooden ring versions, Row 1 is worked directly around the wooden craft ring.
- The main body uses a simple repeat of (sc, ch 2, sc) worked into the chain-2 spaces from the previous row.
Unlock Exclusive Content on Pretty Darn Adorable Crochet!
Quick heads-up before the sign-up form: some of my free crochet patterns and resources are now tucked behind a subscriber-only wall using a new feature called Grow’s Exclusive Content. This is to protect my content from being scraped by AI tools and popping up on random sites and being duplicated without permission. This new setup helps protect my work and keeps it available for actual crochet lovers like you.
If you’re already on my email list, you’re good, just sign in with a free Grow account when asked, and everything will unlock. And if you’re new, signing up gets you access to all the exclusive stuff (no unlocking things one by one). You can unsubscribe any time with one click right at the top of any email.
Thanks so much for all your support! 😊
Curious about all this AI business? I shared more about it in my post AI and the Crochet Community.
Towel Holder with Two Wooden Rings
Row 1: Work 9 sc evenly around the 1st wooden ring. To do this, start with a slip knot on the hook and working yarn over wooden ring. Insert hook under the ring, yo, pull up a loop, yo, pull through 2 loops on hook. Repeat until you have 9 sc around the ring. Ch 1, turn.
Row 2: (Sc, ch 2, sc) in 2nd st, skip next st. *(Sc, ch 2, sc) in next st, skip next st.* Repeat from * to * across. Ch 1, turn. (4 Ch 2 spaces).
Row 3: Repeat until piece measures 6 inches: (Sc, ch 2, sc) in 1st ch-2 sp. *(Sc, ch 2, sc) in next ch-2 sp.* Repeat from * to * across. Ch 1, turn. (4 Ch 2 spaces)
Final row: Work 1 sc in each sc across the final row. (8 sc). Ch 1, turn.
Attach second ring: Hold the second 70 mm wooden craft ring against the back of the last row. Work 1 sc in each stitch across, inserting your hook through the stitch and under the ring at the same time to attach the ring as you work. (8 sc)
Finishing: Fasten off and weave in all ends securely.
Towel Holder with Wooden Ring and Button Closure

Row 1: Work 9 sc evenly around wooden ring. To do this, start with a slip knot on the hook and working yarn over wooden ring. Insert hook under the ring, yo, pull up a loop, yo, pull through 2 loops on hook. Repeat until you have 9 sc around the ring. Ch 1, turn.
Row 2: (Sc, ch 2, sc) in 2nd st, skip next st. *(Sc, ch 2, sc) in next st, skip next st.* Repeat from * to * across. Ch 1, turn. (4 Ch 2 spaces).
Row 3: Repeat until piece measures 6 inches: (Sc, ch 2, sc) in 1st ch-2 sp. *(Sc, ch 2, sc) in next ch-2 sp.* Repeat from * to * across. Ch 1, turn. (4 Ch 2 spaces)
Creating the Button Loop:
- Work 1 sc into each of the first 4 sc.
- Chain 20 for the button loop.
- Work 1 sc into each of the last 4 sc.
Note: The ch-20 loop should reach comfortably around your chosen button. If your button is larger or smaller, adjust the chain count accordingly and test the fit before fastening off.
Attaching the Button:
- Fasten off and weave in your ends.
- Fold the towel holder in half lengthwise to find the vertical centre.
- Place the button on the centre front (use photo as a guide for height alignment), ensuring the ch-20 loop reaches it with a comfortable, secure fit.
- Using a tapestry needle and a length of yarn, sew the button securely.
- Fasten off and weave in any remaining ends.
Beginner Towel Holder Without Crocheting Around the Ring
This is the easiest version and the one I’d recommend if you are newer to crochet or just don’t feel like wrestling with a wooden ring.
You crochet the piece separately, feed it through the ring, and then button it closed.
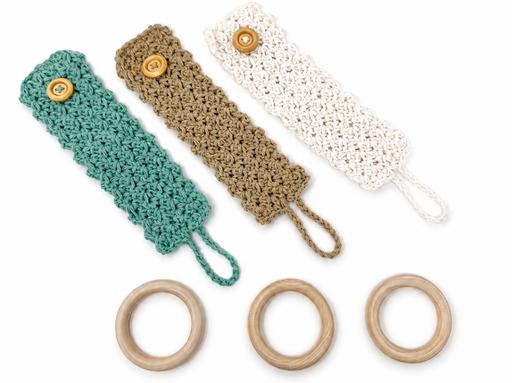
Ch 9
Row 1: Sc in 2nd ch from hook and each ch across. Ch 1, turn.
Row 2: (Sc, ch 2, sc) in 2nd st, skip next st. *(Sc, ch 2, sc) in next st, skip next st.* Repeat from * to * across. Ch 1, turn. (4 Ch 2 spaces)
Row 3: Repeat till piece measures 8 inches: (Sc, ch 2, sc) in 1st ch-2 sp. *(Sc, ch 2, sc) in next ch-2 sp.* Repeat from * to * across. Ch 1, turn. (4 Ch 2 spaces)
Creating the Button Loop:
- Work 1 sc into each of the first 4 sc.
- Chain 20 for the button loop.
- Work 1 sc into each of the last 4 sc.
Note: The ch-20 loop should reach comfortably around your chosen button. If your button is larger or smaller, adjust the chain count accordingly and test the fit before fastening off.
Attaching the Button:
- Fasten off and weave in your ends.
- Fold the towel holder in half lengthwise to find the vertical centre.
- Place the button on the centre front (use photo as a guide for height alignment), ensuring the ch-20 loop reaches it with a comfortable, secure fit.
- Using a tapestry needle and a length of yarn, sew the button securely.
- Fasten off and weave in any remaining ends.
Care Instructions
Hand wash in cool water with mild detergent and lay flat to dry.
Care may vary depending on the yarn you use, so always check the yarn label too.
And if you’ve washed wooden rings before and they held up beautifully, let us know in the comments because I know I’m not the only one wondering.
Frequently Asked Questions About Crochet Towel Holders
Can beginners make this crochet towel holder?
Yes. The beginner loop version is the easiest because you do not have to crochet around the wooden ring. The other two versions are still easy, but working around the ring may take a little practice.
What yarn is best for a crochet towel holder?
Worsted weight cotton yarn is a great choice because it gives nice stitch definition and works well for kitchen items. You can also try cotton blends or acrylic yarn if that’s what you have in your stash.
Do I have to crochet around the wooden ring?
No. The beginner version is made as a separate crochet piece and then looped through the wooden ring.
What size wooden ring do I need?
The pattern uses a 70 mm wooden craft ring.
Can I use scrap yarn?
Yes. This is a perfect scrap yarn crochet project because it only uses a small amount of worsted weight yarn.
Can I sell finished crochet towel holders made from this pattern?
Yes, you can sell finished towel holders made from this pattern. They would be great for craft fairs, markets, teacher gifts, hostess gifts, and holiday baskets.
Can I change the button?
Absolutely. Just make sure your button loop fits comfortably around the button. The pattern uses a chain-20 loop, but you can adjust it if your button is larger or smaller.
I hope you have fun making these free crochet towel holders.
They’re quick, useful, cute, and such a good way to use up those little bits of yarn we all swear we’re going to organize someday.
If you make one, I’d love to see it. Tag me on social media so I can see your finished Cedar Ridge crochet towel holder.
Hugs,
Cyp