


With Halloween coming up, I thought it was a good time to share this free crochet dinosaur hat pattern here on the blog. Made with worsted weight yarn and simple single crochet stitches, it comes in five sizes, including baby and child sizes along with an adult size for matching family hats.
My boys loved running around in these hats all winter when they were little. They chose their own colours, and I wish I had photos of those earlier versions because they were very colourful. Choosing every little detail was half the fun!
There’s plenty of room for that creativity with this dino hat. Picture soft blue yarn with sunny yellow dinosaur spikes, little polka dots made from variegated yarn, or fuzzy spots in a novelty yarn for extra texture.
You could use green yarn for a more traditional dinosaur or let your little dinosaur lover choose something completely unexpected. It’s a fun project for Halloween, with cosy earflaps to keep those dinosaur adventures going all winter.
Crochet Dinosaur Hat Pattern At a Glance
- Skill Level: Easy
- Yarn: Worsted weight yarn
- Crochet Hooks: 6.5 mm and 5.5 mm
- Construction: Worked from the top down, with dinosaur spikes sewn on afterwards
- Stitches: Chain, single crochet and slip stitch
- Great For: Dinosaur fans, Halloween outfits and everyday winter wear
An Easy Dino Hat Using Basic Crochet Stitches
Underneath all those spikes is a simple crochet earflap hat. You’ll begin at the crown of the hat, work the body in continuous rounds, then make the earflaps before adding the finishing details.
Most of this free crochet pattern uses single crochet. You don’t need double crochet or a complicated stitch combination to create the fabric. The shaping and sewn-on pieces make it a fun project for an advanced beginner who is ready to try something beyond a plain hat.

If this is your first time making animal hats, it helps to think of the project in separate pieces. Start with the base hat, then make the spikes and optional spots. You don’t have to tackle the entire hat in one sitting.
The detailed instructions are divided by size, so you can follow the section you need without jumping between several sets of stitch counts.
Let Them Choose Their Dinosaur Colours
One of the things I enjoyed about making these for my kids was seeing what they picked. When you hand over the colour choices, you don’t always end up with the hat you had pictured, but that’s part of the fun.
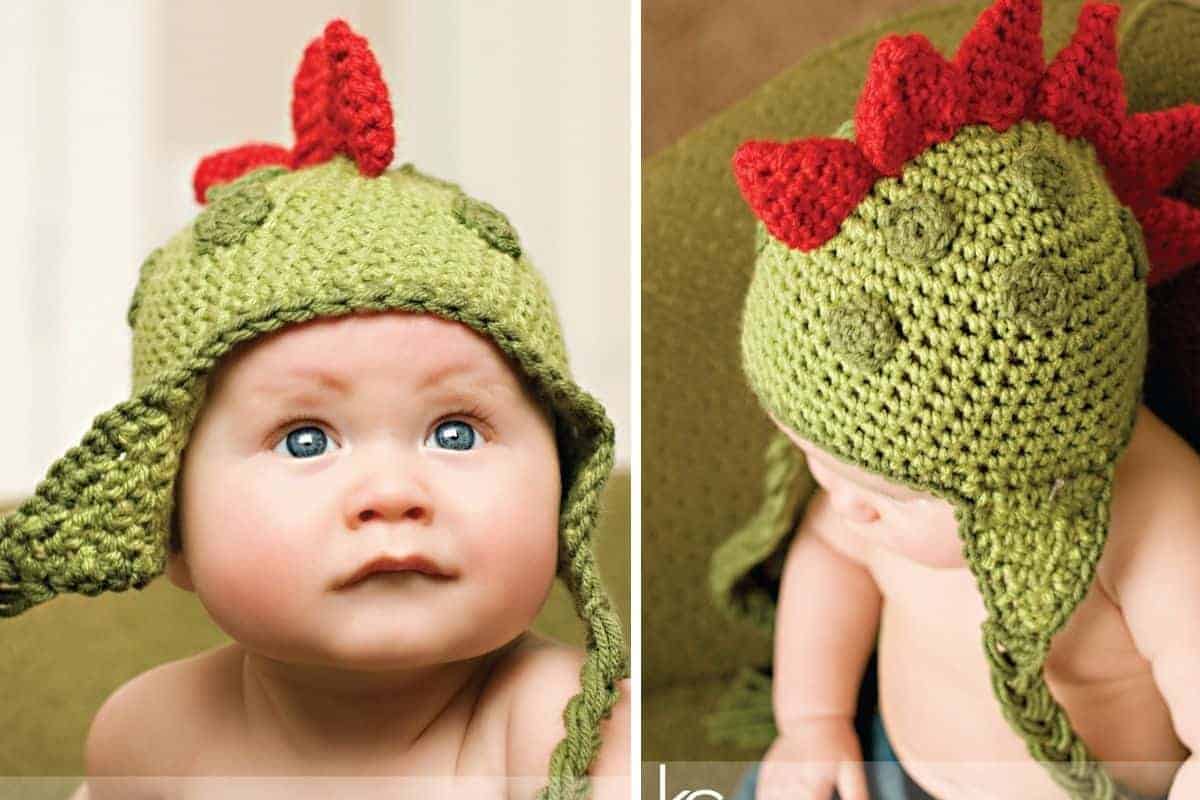
For the green hat shown here, I used green yarn for the body and spots, with red dinosaur spikes down the back. The blue version has orange and yellow spikes arranged in three rows. Just changing those details gives the finished hat a completely different personality.
You could spread out a few colours from your yarn stash and let your little dinosaur lover choose their favourites. Even choosing between two or three colours gives them a chance to be part of the project.
Perhaps they’re imagining a fierce tyrannosaurus rex, or perhaps their dinosaur is purple with pink spots and would rather eat cupcakes. This isn’t meant to be an exact model of a particular dinosaur, so there’s plenty of room for imagination.

Choosing Yarn for Your Crochet Dinosaur Hat
Use worsted weight yarn for the body of the hat, checking your crochet gauge before starting. Even yarns in the same weight category can vary in thickness, and a different yarn or hook size can change the fit.
For a hat that will be worn often, think about how the yarn feels against the forehead and around the ears. Check the care instructions too, especially when you’re giving it as a gift.
The contrasting details are a good place to use small amounts of leftover yarn. You might already have enough for the spikes and spots without buying a full ball of every colour.
Keep the main hat fabric fairly simple if you want those details to stand out. A solid background makes it easier to see the shape of the spikes and all the little colours in the polka dots.
Free Crochet Dinosaur Hat Pattern

Attaching the Dinosaur Spikes
Before sewing, arrange the spikes over the top of the hat and down the back. Have a look from both sides to check the spacing and decide where you want the first and last spike to sit.
Their triangle shape gives this dinosaur spike hat its character, so take a little time with the placement. You can use one row or follow the instructions for the three-row version shown in the photos.
If you’d like to sew with the yarn tail, leave a long tail when finishing each spike. Otherwise, thread a separate length of matching yarn onto your yarn needle.
Attach the bases securely to the stitches of the hat without pulling so tightly that the fabric bunches up. The hat body should still be able to stretch comfortably when worn.
I’d arrange the spots before sewing those on too. Moving a spot over a little is much easier before you’ve woven in all the ends!
Purchase Ad Free Pattern – Instant Download!
Purchase the ad-free PDF for a smooth, distraction-free crocheting experience anytime, anywhere.
Already a subscriber? Check your latest email for your special discount code. Not subscribed yet? Sign up here to get yours!
Thanks so much for supporting my blog!
Dinosaur Hat Crochet Instructions
Skill Level
Easy
Abbreviations
- ch – chain
- sc – single crochet
- sk – skip
- st – stitch
- sts – stitches
- sl st – slip stitch
- rpt – repeat
Gauge
Using 6.50 mm hook worsted weight yarn
12 sc and 13 rows – 4 inch square
A gauge swatch is vital for a well-fitting crochet hat. It determines stitch tension and measures the number of stitches and rows. Comparing it to the pattern’s gauge ensures the final hat fits as desired. Adjust hook or tension if needed for a perfectly fitting hat.
Make a single crochet gauge swatch larger than 4 inches square. Using a 6.5 mm hook, 12 sc and 13 rows should measure 4 inches. Measure across the centre of your swatch. If needed, adjust your hook size and check your gauge again before starting.
Materials Needed
Yarn used in pattern (see sizing chart for exact amount required):
Teal hat was made from Bernat Waverly and Green hat on baby was made from Bernat Super Saver
Please note that the actual amount of yarn needed may change depending on the yarn chosen always purchase a little more than you think you may need.
Finished Measurements & Yarn Requirements
0 to 6 months:
Width: 15”
Height: 6”
Yarn: 78g, 125m, 2.75 oz, 137 yds
6 to 12 months:
Width: 16.5”
Height: 7”
Yarn: 85g, 136m, 3 oz, 149 yds
12 months to 3 years:
Width: 18”
Height: 8”
Yarn: 93g, 149m, 3.29 oz, 163 yds
3 to 10 years:
Width: 19.5”
Height: 9”
Yarn: 138g, 221m, 4.87 oz, 241 yds
Adult:
Width: 21”
Height: 10”
Yarn: 164g, 262m, 5.78 oz, 287 yds
Additional Yarn for Spikes and Polka Dots
Allow the following amounts of worsted weight yarn in addition to the yarn needed for the hat:
- One row of spikes and 10 polka dots: approximately 20–40 g total.
- Three rows of spikes and 10 polka dots: approximately 40–60 g total.
These estimates are for all spike and polka dot colours combined, not per colour. The amount needed will vary depending on the size and number of spikes you make.
Notes
- This pattern uses US crochet terminology.
- The hat and spikes are worked in continuous rounds. Do not join or turn unless instructed.
- Place a stitch marker in the first stitch of each round and move it up as you work.
- Earflaps are worked back and forth in rows. The turning ch 1 does not count as a stitch.
- Work through both loops unless otherwise instructed.
- Numbers in brackets indicate the stitch count at the end of the row or round.
- Check your gauge before starting and choose your size using the finished measurements rather than age alone.
- Spikes and polka dots are made separately and sewn onto the finished hat. Leave a long yarn tail on each piece for attaching.
- Arrange the spikes and dots before sewing them in place. Keep your sewing stitches snug without pulling or puckering the hat.
Dinosaur Spikes
Small: Suggested for 0 – 12 months
Medium: Suggested for 12 months – 3 years
Large: Suggested for 3 years – Adult
Choose any combination of spike sizes and make as many as you like.
For the side rows of a three-row arrangement:
Do not work the 3 finishing rounds. Fasten off after the final increase round for your chosen size, leaving a long yarn tail for sewing the spike onto the hat.
Hook Size
For one row of spikes: Use a 5.5 mm hook.
For three rows of spikes:
- Middle row: Use a 6.5 mm hook and complete the instructions for your chosen spike size.
- Side rows: Use a 5.5 mm hook. Follow the increase rounds for your chosen spike size, but omit the three finishing rounds.
Small
Use for sizes 0-12 months
Ch 2
Rnd 1: Work 4 sc into 2nd ch from hook (4)
Rnd 2: Sc in 1st st,*2 sc in next, sc in next st* rpt from *to* till end of rnd (6)
Rnd 3: Sc in 1st 2 sts,*2 sc in next, sc in next 2 sts* rpt from *to* till end of rnd (8)
Rnd 4: Sc in 1st 3 sts,*2 sc in next, sc in next 3 sts* rpt from *to* till end of rnd (10)
Rnd 5: Sc in 1st 4 sts,*2 sc in next, sc in next 4 sts* rpt from *to* till end of rnd (12)
Rnds 6-8: Sc in 1st and each st around (12)
Fasten off, leaving a long yarn tail for sewing the spike onto the hat.
Medium
Use for sizes 12 Months – 3 Years
Ch 2
Rnd 1: Work 4 sc into 2nd ch from hook (4)
Rnd 2: Sc in 1st st,*2 sc in next, sc in next st* rpt from *to* till end of rnd (6)
Rnd 3: Sc in 1st 2 sts *2 sc in next, sc in next 2 sts* rpt from *to* till end of rnd (8)
Rnd 4: Sc in 1st 3 sts,*2 sc in next, sc in next 3 sts* rpt from *to* till end of rnd (10)
Rnd 5: Sc in 1st 4 sts,*2 sc in next, sc in next 4 sts* rpt from *to* till end of rnd (12)
Rnd 6: Sc in 1st 5 sts,*2 sc in next, sc in next 5 sts* rpt from *to* till end of rnd (14)
Rnd 7: Sc in 1st 6 sts,*2 sc in next, sc in next 6 sts* rpt from *to* till end of rnd (16)
Rnds 8-10: Sc in 1st and each st around (16)
Fasten off, leaving a long yarn tail for sewing the spike onto the hat.
Large
Use for sizes 3 Years to Adult
Ch 2
Rnd 1: Work 4 sc into 2nd ch from hook (4)
Rnd 2: Sc in 1st st,*2 sc in next, sc in next st* rpt from *to* till end of rnd (6)
Rnd 3: Sc in 1st 2 sts,*2 sc in next, sc in next 2 sts* rpt from *to* till end of rnd (8)
Rnd 4: Sc in 1st 3 sts,*2 sc in next, sc in next 3 sts* rpt from *to* till end of rnd (10)
Rnd 5: Sc in 1st 4 sts,*2 sc in next, sc in next 4 sts* rpt from *to* till end of rnd (12)
Rnd 6: Sc in 1st 5 sts,*2 sc in next, sc in next 5 sts* rpt from *to* till end of rnd (14)
Rnd 7: Sc in 1st 6 sts,*2 sc in next, sc in next 6 sts* rpt from *to* till end of rnd (16)
Rnd 8: Sc in 1st 7 sts,*2 sc in next, sc in next 7 sts* rpt from *to* till end of rnd (18)
Rnd 9: Sc in 1st 8 st,*2 sc in next, sc in next 8 sts* rpt from *to* till end of rnd (20)
Rnds 10-12: Sc in 1st and each st around (20)
Fasten off, leaving a long yarn tail for sewing the spike onto the hat.
Polka Dots
Make 10 – 5 each side
Using contrast colour and a 5.5 mm hook, ch 4. Join with a sl st in the first ch to form a ring.
Work 5 sc into the ring. Join with a sl st in the first sc. Fasten off, leaving a long yarn tail for attaching the polka dot.
Using the photo as a placement guide, thread the yarn tail onto a tapestry needle and sew around the edge of the dot to attach it securely to the hat. Weave in the remaining ends.
Helpful Hint: I love to use a little Liquid Stitch to hold the dots in place before sewing them on. That way they stay exactly where I want them! ☺
Braided Ties
Cut 18 strands of yarn, each 30 inches long or longer. Use 9 strands for each earflap. For thinner ties, cut 12 strands total and use 6 strands for each earflap.
- Hold the hat with the right side facing you. Locate the 3 sc at the bottom tip of one earflap.
- Hold 3 strands together and fold them in half. For thinner ties, use 2 strands.
- Insert your hook through the first of the 3 stitches, from the inside of the hat towards the outside. Catch the folded strands and pull the folded loop through to the inside.
- Pull all the loose ends through this loop and tighten gently to secure them to the earflap.
- Repeat in the remaining 2 stitches, using a new group of strands for each stitch.
- Divide the hanging yarn into 3 equal sections and braid until approximately 3 inches of loose yarn remain.
- Cut a separate piece of yarn approximately 12 inches long. Tie it firmly around the bottom of the braid, then wrap one end around the braid several times. Secure it with a tapestry needle by weaving it through the wrapped section. Trim the loose ends evenly.
Repeat for the second earflap.

0 to 6 Months
Baby Hat Safety Note: For safety, never leave a baby unattended while wearing this hat. Braided ties can pose a strangulation risk and should be omitted for babies and young children. Always remove the hat before naps or bedtime.
*Hat is worked in continuous rounds. Do not join. Use a stitch marker at the beginning of round for easier counting
Using 6.5 mm hook ch2
Rnd 1: Work 6 sc in 2nd ch from hook (6)
Rnd 2: 2 sc in 1st st and each st around (12)
Rnd 3: 1 sc in 1st st *2 sc in next st, 1 sc in next st* rpt from * to * till end of rnd (18)
Rnd 4: 1 sc in 1st 2 sts *2 sc in next st, 1 sc in next 2 sts* rpt from * to * till end of rnd (24)
Rnd 5: 1 sc in 1st 3 sts *2 sc in next st, 1 sc in next 3 sts* rpt from * to * till end of rnd (30)
Rnd 6: 1 sc in 1st 4 sts *2 sc in next st, 1 sc in next 4 sts* rpt from * to * till end of rnd (36)
Rnd 7: 1 sc in 1st 5 sts *2 sc in next st, 1 sc in next 5 sts* rpt from * to * till end of rnd (42)
Rnds 8-17: Sc in 1st st and each st around. (42)
Do not fasten off, continue with earflaps below.
Earflaps
Will be worked in rows
Row 1: Slst in next st, ch 1, sc in same space as slst (this counts as first sc), sc next 7 sts, ch 1 turn (8)
Row 2-3: Sc in 1st st and each st across, ch 1 turn (8)
Row 4: Sk 1st st, sc in each st across, ch 1 turn (7)
Row 5: Sk 1st st, sc in each st across, ch 1 turn (6)
Row 6: Sk 1st st, sc in each st across, ch 1 turn (5)
Row 7: Sk 1st st, sc in each st across, ch1 turn (4)
Row 8: Sk 1st st, sc in each st across, ch 1 turn (3)
Row 9: Sk 1st st, sc in each st across, ch1 turn (2)
Row 10: Sk 1st st, sc in each st across (1) Fasten off and weave in ends.
2nd Earflap
With the right side of the hat facing you, begin counting along the bottom edge of the hat from the side of the first earflap. Count 16 sts from right to left and join yarn with a sl st.
Repeat Rows 1–10 above to make the second earflap.
Change to contrast yarn here if desired. Join yarn with slst at back of hat. Work sc around entire hat including earflaps making sure to work 3 sc in the bottom of each earflap. Join with a sl st in the first sc. Fasten off and weave in ends.
Baby Hat Safety Note: For safety, never leave a baby unattended while wearing this hat. Braided ties can pose a strangulation risk and should be omitted for babies and young children. Always remove the hat before naps or bedtime.
6 to 12 Months
Baby Hat Safety Note: For safety, never leave a baby unattended while wearing this hat. Braided ties can pose a strangulation risk and should be omitted for babies and young children. Always remove the hat before naps or bedtime.
*Hat is worked in continuous rounds. Do not join. Use a stitch marker at the beginning of round for easier counting
Using 6.5 mm hook ch2
Rnd 1: Work 6 sc in 2nd ch from hook (6)
Rnd 2: 2 sc in 1st st and each st around (12)
Rnd 3: 1 sc in 1st st *2 sc in next st, 1 sc in next st* rpt from * to * till end of rnd (18)
Rnd 4: 1 sc in 1st 2 sts *2 sc in next st, 1 sc in next 2 sts* rpt from * to * till end of rnd (24)
Rnd 5: 1 sc in 1st 3 sts *2 sc in next st, 1 sc in next 3 sts* rpt from * to * till end of rnd (30)
Rnd 6: 1 sc in 1st 4 sts *2 sc in next st, 1 sc in next 4 sts* rpt from * to * till end of rnd (36)
Rnd 7: 1 sc in 1st 5 sts *2 sc in next st, 1 sc in next 5 sts* rpt from * to * till end of rnd (42)
Rnd 8: 1 sc in 1st 6 sts *2 sc in next st, 1 sc in next 6 sts* rpt from * to * till end of rnd (48)
Rnds 9 – 21: Sc in 1st st and each st around. (48)
Do not fasten off, continue with earflaps below.
Earflaps
Will be worked in rows
Row 1: Sl st in next st, ch 1, sc in same space as slst (this counts as first sc), sc next 9 sts, ch 1 turn (10)
Row 2 – 3: Sc in 1st st and each st across, ch 1 turn (10)
Row 4: Sk 1st st, sc in each st across, ch 1, turn. (9)
Row 5: Sk 1st st, sc in each st across, ch 1 turn (8)
Row 6: Sk 1st st, sc in each st across, ch 1 turn (7)
Row 7: Sk 1st st, sc in each st across, ch1 turn (6)
Row 8: Sk 1st st, sc in each st across, ch 1 turn (5)
Row 9: Sk 1st st, sc in each st across, ch 1 turn (4)
Row 10: Sk 1st st, sc in each st across, ch 1 turn (3)
Row 11: Sk 1st st, sc in each st across, ch1 turn (2)
Row 12: Sk 1st st, sc in each st across, ch 1 turn (1) Fasten off and weave in ends.
2nd Earflap
With the right side of the hat facing you, begin counting along the bottom edge of the hat from the side of the first earflap. Count 16 sts from right to left and join yarn with a sl st.
Repeat Rows 1-12 above to make the second earflap.
Change to contrast yarn here if desired. Join yarn with slst at back of hat. Work sc around entire hat including earflaps making sure to work 3 sc in the bottom of each earflap. Join with a sl st in the first sc. Fasten off and weave in ends.
Baby Hat Safety Note: For safety, never leave a baby unattended while wearing this hat. Braided ties can pose a strangulation risk and should be omitted for babies and young children. Always remove the hat before naps or bedtime.
Toddler 1– 3 Years
*Hat is worked in continuous rounds. Do not join. Use a stitch marker at the beginning of round for easier counting
Using 6.5 mm hook ch2
Rnd 1: Work 6 sc in 2nd ch from hook (6)
Rnd 2: 2 sc in 1st st and each st around (12)
Rnd 3: 1 sc in 1st st *2 sc in next st, 1 sc in next st* rpt from * to * till end of rnd (18)
Rnd 4: 1 sc in 1st 2 sts *2 sc in next st, 1 sc in next 2 sts* rpt from * to * till end of rnd (24)
Rnd 5: 1 sc in 1st 3 sts *2 sc in next st, 1 sc in next 3 sts* rpt from * to * till end of rnd (30)
Rnd 6: 1 sc in 1st 4 sts *2 sc in next st, 1 sc in next 4 sts* rpt from * to * till end of rnd (36)
Rnd 7: 1 sc in 1st 5 sts *2 sc in next st, 1 sc in next 5 sts* rpt from * to * till end of rnd (42)
Rnd 8: 1 sc in 1st 6 sts *2 sc in next st, 1 sc in next 6 sts* rpt from * to * till end of rnd (48)
Rnd 9: 1 sc in 1st 7 sts *2 sc in next st, 1 sc in next 7 sts* rpt from * to * till end of rnd (54)
Rnds 10-21: Sc in 1st and each st around (54)
Do not fasten off, continue with earflaps below.
Earflaps
Will be worked in rows
Row 1: Slst in next st, ch 1, sc in same space as slst (this counts as first sc), sc next 11 sts, ch 1 turn (12)
Row 2-3: Sc in 1st st and each st across, ch 1 turn (12)
Row 4: Sk 1st st, sc in each st across, ch 1 turn (11)
Row 5: Sk 1st st, sc in each st across, ch 1 turn (10)
Row 6: Sk 1st st, sc in each st across, ch 1 turn (9)
Row 7: Sk 1st st, sc in each st across, ch1 turn (8)
Row 8: Sk 1st st, sc in each st across, ch 1 turn (7)
Row 9: Sk 1st st, sc in each st across, ch 1 turn (6)
Row 10: Sk 1st st, sc in each st across, ch 1 turn (5)
Row 11: Sk 1st st, sc in each st across, ch1 turn (4)
Row 12: Sk 1st st, sc in each st across, ch 1 turn (3)
Row 13: Sk 1st st, sc in each st across, ch 1 turn (2)
Row 14: Sk 1st st, sc in each st across (1) Fasten off and weave in ends.
2nd Earflap
With the right side of the hat facing you, begin counting along the bottom edge of the hat from the side of the first earflap. Count 16 sts from right to left and join yarn with a sl st.
Repeat Rows 1-14 above to make the second earflap.
Change to contrast yarn here if desired Work sc around entire hat including earflaps. Be sure to work 3 sc in the bottom of each earflap. Join with a sl st in the first sc. Fasten off and weave in ends.
Ties
Cut 18 pieces yarn 30 inches or longer.
Working in the 3 sc stitches at bottom of earflap, hold three strands of yarn and fold in half, (use only two for smaller sizes, if desired). Hold hat with right side facing you. Using hook, draw the folded ends through the stitch from right to wrong side. Pull the loose ends through the folded section and draw the knot up firmly. Repeat for next two stitches.
Braid to last 3 inches. Using a piece of string, about 12 inches long, tie and knot leaving one long end to wrap around braid. Wrap yarn around braid several times and then use tapestry needle to weave end through.
Repeat for other earflap.
Child 3 – 10 Years
*Hat is worked in continuous rounds. Do not join. Use a stitch marker at the beginning of round for easier counting
Using 6.5 mm hook ch2
Rnd 1: Work 6 sc in 2nd ch from hook (6)
Rnd 2: 2 sc in 1st st and each st around (12)
Rnd 3: 1 sc in 1st st *2 sc in next st, 1 sc in next st* rpt from * to * till end of rnd (18)
Rnd 4: 1 sc in 1st 2 sts *2 sc in next st, 1 sc in next 2 sts* rpt from * to * till end of rnd (24)
Rnd 5: 1 sc in 1st 3 sts *2 sc in next st, 1 sc in next 3 sts* rpt from * to * till end of rnd (30)
Rnd 6: 1 sc in 1st 4 sts *2 sc in next st, 1 sc in next 4 sts* rpt from * to * till end of rnd (36)
Rnd 7: 1 sc in 1st 5 sts *2 sc in next st, 1 sc in next 5 sts* rpt from * to * till end of rnd (42)
Rnd 8: 1 sc in 1st 6 sts *2 sc in next st, 1 sc in next 6 sts* rpt from * to * till end of rnd (48)
Rnd 9: 1 sc in 1st 7 sts *2 sc in next st, 1 sc in next 7 sts* rpt from * to * till end of rnd (54)
Rnd 10: 1 sc in 1st 8 sts *2 sc in next st, 1 sc in next 8 sts* rpt from * to * till end of rnd (60)
Rnds 11-26: Sc in 1st st and each st around. (60)
Do not fasten off, continue with earflaps below.
Earflaps
Will be worked in rows
Row 1: Slst in next st, ch 1, sc in same space as slst (this counts as first sc), sc next 13 sts, ch 1 turn (14)
Row 2-3: Sc in 1st st and each st across, ch 1 turn (14)
Row 4: Sk 1st st, sc in each st across, ch 1 turn (13)
Row 5: Sk 1st st, sc in each st across, ch 1 turn (12)
Row 6: Sk 1st st, sc in each st across, ch 1 turn (11)
Row 7: Sk 1st st, sc in each st across, ch1 turn (10)
Row 8: Sk 1st st, sc in each st across, ch 1 turn (9)
Row 9: Sk 1st st, sc in each st across, ch 1 turn (8)
Row 10: Sk 1st st, sc in each st across, ch 1 turn (7)
Row 11: Sk 1st st, sc in each st across, ch1 turn (6)
Row 12: Sk 1st st, sc in each st across, ch 1 turn (5)
Row 13: Sk 1st st, sc in each st across, ch 1 turn (4)
Row 14: Sk 1st st, sc in each st across, ch 1 turn (3)
Row 15: Sk 1st st, sc in each st across, ch 1 turn (2)
Row 16: Sk 1st st, sc in each st across (1)
Fasten off and weave in ends.
2nd Earflap
With the right side of the hat facing you, begin counting along the bottom edge of the hat from the side of the first earflap. Count 18 sts from right to left and join yarn with a sl st.
Repeat Rows 1-16 above to make the second earflap.
Change to contrast yarn here if desired. Join yarn with slst at back of hat. Work sc around entire hat including earflaps making sure to work 3 sc in the bottom of each earflap. Join with a sl st in the first sc. Fasten off and weave in ends.
Ties
Cut 18 pieces yarn 30 inches or longer.
Working in the 3 sc stitches at bottom of earflap, hold three strands of yarn and fold in half, (use only two for smaller sizes, if desired). Hold hat with right side facing you. Using hook, draw the folded ends through the stitch from right to wrong side. Pull the loose ends through the folded section and draw the knot up firmly. Repeat for next two stitches.
Braid to last 3 inches. Using a piece of string, about 12 inches long, tie and knot leaving one long end to wrap around braid. Wrap yarn around braid several times and then use tapestry needle to weave end through.
Repeat for other earflap.
Adult
*Hat is worked in continuous rounds. Do not join. Use a stitch marker at the beginning of round for easier counting
Using 6.5 mm hook ch2
Rnd 1: Work 6 sc in 2nd ch from hook (6)
Rnd 2: 2 sc in 1st st and each st around (12)
Rnd 3: 1 sc in 1st st *2 sc in next st, 1 sc in next st* rpt from * to * till end of rnd (18)
Rnd 4: 1 sc in 1st 2 sts *2 sc in next st, 1 sc in next 2 sts* rpt from * to * till end of rnd (24)
Rnd 5: 1 sc in 1st 3 sts *2 sc in next st, 1 sc in next 3 sts* rpt from * to * till end of rnd (30)
Rnd 6: 1 sc in 1st 4 sts *2 sc in next st, 1 sc in next 4 sts* rpt from * to * till end of rnd (36)
Rnd 7: 1 sc in 1st 5 sts *2 sc in next st, 1 sc in next 5 sts* rpt from * to * till end of rnd (42)
Rnd 8: 1 sc in 1st 6 sts *2 sc in next st, 1 sc in next 6 sts* rpt from * to * till end of rnd (48)
Rnd 9: 1 sc in 1st 7 sts *2 sc in next st, 1 sc in next 7 sts* rpt from * to * till end of rnd (54)
Rnd 10: 1 sc in 1st 8 sts *2 sc in next st, 1 sc in next 8 sts* rpt from * to * till end of rnd (60)
Rnd 11: 1 sc in 1st 9 sts *2 sc in next st, 1 sc in next 9 sts* rpt from * to * till end of rnd (66)
Rnds 12-29: Sc in 1st st and each st around. (66)
Do not fasten off, continue with earflaps below.
Earflaps
Will be worked in rows
Row 1: Slst in next st, ch 1, sc in same space as slst (this counts as first sc), sc next 15 sts, ch 1 turn (16)
Row 2-3: Sc in 1st st and each st across, ch 1 turn (16)
Row 4: Sk 1st st, sc in each st across, ch 1 turn (15)
Row 5: Sk 1st st, sc in each st across, ch 1 turn (14)
Row 6: Sk 1st st, sc in each st across, ch 1 turn (13)
Row 7: Sk 1st st, sc in each st across, ch1 turn (12)
Row 8: Sk 1st st, sc in each st across, ch 1 turn (11)
Row 9: Sk 1st st, sc in each st across, ch 1 turn (10)
Row 10: Sk 1st st, sc in each st across, ch 1 turn (9)
Row 11: Sk 1st st, sc in each st across, ch1 turn (8)
Row 12: Sk 1st st, sc in each st across, ch 1 turn (7)
Row 13: Sk 1st st, sc in each st across, ch 1 turn (6)
Row 14: Sk 1st st, sc in each st across, ch 1 turn (5)
Row 15: Sk 1st st, sc in each st across, ch 1 turn (4)
Row 16: Sk 1st st, sc in each st across, ch 1 turn (3)
Row 17: Sk 1st st, sc in each st across, ch 1 turn (2)
Row 18: Sk 1st st, sc in last st. (1) Fasten off and weave in ends.
2nd Earflap
With the right side of the hat facing you, begin counting along the bottom edge of the hat from the side of the first earflap. Count 20 sts from right to left and join yarn with a sl st.
Repeat Rows 1-18 above to make the second earflap.
Change to contrast yarn here if desired. Join yarn with slst at back of hat. Work sc around entire hat including earflaps making sure to work 3 sc in the bottom of each earflap. Join with a sl st in the first sc. Fasten off and weave in ends.
Ties
Cut 18 pieces yarn 30 inches or longer.
Working in the 3 sc stitches at bottom of earflap, hold three strands of yarn and fold in half, (use only two for smaller sizes, if desired). Hold hat with right side facing you. Using hook, draw the folded ends through the stitch from right to wrong side. Pull the loose ends through the folded section and draw the knot up firmly. Repeat for next two stitches.
Braid to last 3 inches. Using a piece of string, about 12 inches long, tie and knot leaving one long end to wrap around braid. Wrap yarn around braid several times and then use tapestry needle to weave end through.
Repeat for other earflap.
Dinosaur Hats for Halloween and Winter
A dinosaur hat and a coordinating sweatshirt can be the start of a simple Halloween outfit. With baby and child sizes as well as an adult size, you can make a whole family of dinosaurs ready to head out together.
They don’t all have to match. Each person could choose their own colours, or you could use the same colours in different combinations so the hats look like they belong together.
What I like is that this fun accessory doesn’t have to be packed away once Halloween is over. My kids wore theirs through the winter, with all those colourful spikes following them around as they played.
It’s still a practical hat underneath the dinosaur details. The earflaps add coverage on chilly days, and a favourite colour combination can make getting bundled up a little more appealing.
More Ways to Customize Your Dinosaur Hat
The polka dots are a good place to try something different without committing to a whole hat in an unusual yarn.
Variegated yarn could give you little multicoloured spots scattered across a solid background. Depending on where the colour changes fall, each spot might come out differently. Imagine little flecks of turquoise, yellow and green against a deep blue hat.
A small amount of fuzzy novelty yarn could add soft, tufty patches that stand out against the smooth single crochet fabric. Keep any special yarns close to the thickness used in the pattern, and check how the finished spots sit before attaching them.
For a quieter look, try cream spots on an oatmeal hat or several shades of green with just one contrasting colour for the spikes.
You can also leave the spots off and let the spikes do all the talking. There’s no need to add every detail if you prefer a simpler finish.
A Handmade Gift for Dinosaur Fans
This would make a fun birthday gift for a child who loves dinosaurs, especially in colours they’ve chosen themselves. Tuck it into a gift bag with a dinosaur book or a little toy for something they can enjoy straight away.
If you also crochet dinosaurs, pairing a hat with a small handmade toy would make a thoughtful set. You could use matching colours so their dinosaur has something in common with the hat they’re wearing.
Matching sibling hats would be cute too, without needing to be identical. Give each child their own combination of spots and spikes.
And don’t forget the grown-ups. A dinosaur hat would be a fun gift for someone who is always willing to join in with the kids.
Frequently Asked Questions
Is this pattern suitable for a beginner?
The pattern is rated easy. You’ll need to be comfortable with basic crochet stitches, counting rounds, increasing and following the earflap shaping. There’s also some sewing to attach the details.
If you’ve made a simple hat before, this is a way to try a few extra steps without learning a complicated stitch pattern.
How do I choose the right hat size?
Measure the wearer’s head circumference and compare it with the finished measurements in the pattern. Age labels are a guide, so check the measurements even when choosing a toddler size or making a hat for an older child.
Matching the pattern gauge matters too. A crochet hat sizing guide can help with general measuring, but use this pattern’s measurements and gauge when choosing your size.
Do I need to use a magic circle?
No. The written pattern begins with chain 2, with the first stitches worked into the 2nd ch from the hook. You can follow that start without needing to learn a magic circle.
How do I keep track of continuous rounds?
Place a stitch marker in the first stitch and move it up each time you begin a new round. This makes it easier to recognise the end of the round and count your stitches before continuing.
Is the hat worked in the back loop?
No back loop technique is called for. Work through both loops unless a specific instruction tells you otherwise.
Do I need to stuff the spikes?
No stuffing is called for in this pattern. Make the spikes as written and sew them onto the finished hat.
Can I leave off the braided ties?
Yes. The ties are added separately, so you can leave them off without changing the earflap instructions.
I’d Love to See Your Dinosaur Hat
I wish I had more photos of the colourful versions my boys wore when they were small, but I’d love to see what you come up with now.
If you make this free crochet dinosaur hat pattern, tag me on social media @prettydarnadorable so I can see your finished hat and the colours you chose.
Happy crocheting!